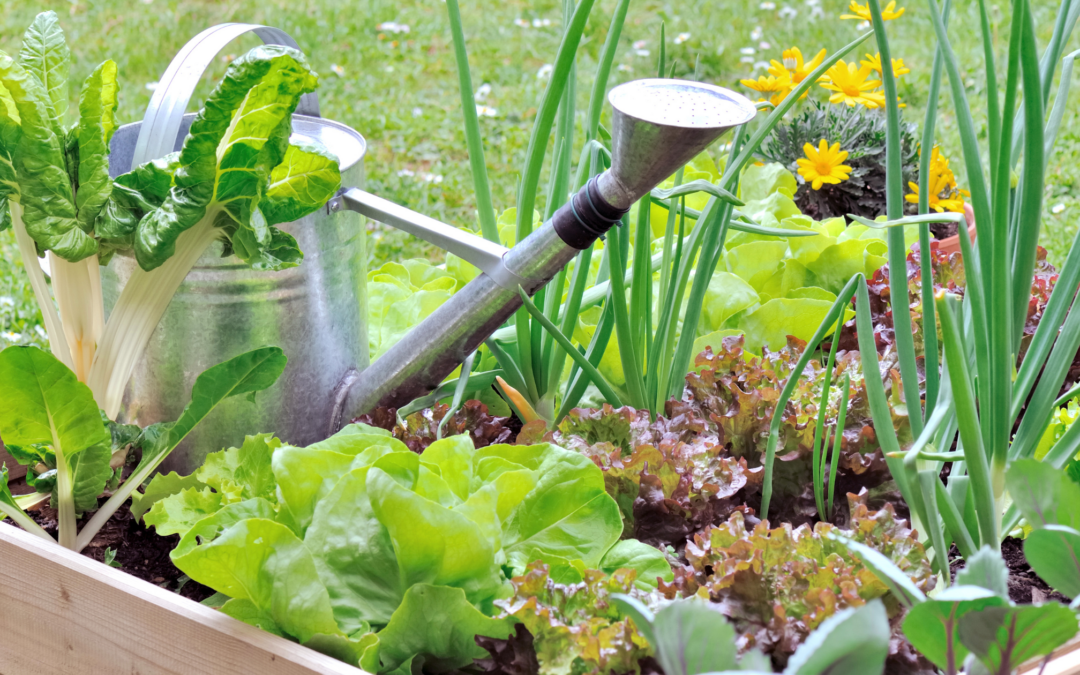
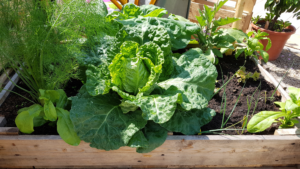
When I was a child, we had a vegetable garden of about 40 square meters. Seeing that we were six people and Granny also had a patch for her and Gramps, it was a relatively small garden. Yet, it produced most of our vegetables, and we rarely had to buy any from the supermarket. Today, my mom is still an avid gardener, but she cultivates only two raised beds for her and my dad, which is plenty of work for an octogenarian. Surprisingly enough, like before, those beds (and a few pots) provide them with most of their veggies throughout the growing season. That shows that a small space is no excuse for not starting a vegetable garden! Let me show you how you can also have a huge harvest in your small space vegetable garden.
Small vegetable gardens: Choose your site
If you have already established patches or raised beds to grow vegetables, that’s fine. But if you’re just starting, there are a few things to observe when you plan your garden.
Location
Vegetables need light to grow. It doesn’t matter if you have a small garden with a tiny bed or just some pots on a patio, as long as your veggies get enough sunshine, they’ll be fine.
Inventory
Take inventory of what plants already grow in your garden and use the different growing heights to your advantage. If you have some shrubs and bushes, for example, you could plant herbs which grow smaller, on the south of them and proceed with vegetables. That way, you can cultivate fruits, herbs and vegetables in a comparatively small space.
Patches and Co.
If you have the opportunity, you can create some garden patcheswith this easy method (no need to dig, I promise!). But even if a coherent gardening space isn’t possible, maybe you can create “pockets” within your garden, which means single patches scattered throughout your soon-to-be small vegetable garden.
Raised beds may be a good idea, no matter if you have a garden, patio or just a balcony.
Last but not least, pots and containers fit on the tiniest balcony. You’ll be surprised to see what you can grow in pots!
Dreaming of your small vegetable garden
Every garden, even a small one, needs a plan! I know it can be tedious to create one, but I promise you it’s worth it.
Choosing vegetables
To make a plan, however, you must decide first what vegetables you want to grow. Make a list with all the veggies you like AND which don’t require too much space.
Good, and beginner-friendly, examples are Swiss chard, Chinese cabbage, peas, beans, leeks, carrots, garlic, onions, kohlrabi, radishes, turnips, beetroot, stalk celery, lettuce and lamb’s lettuce.
For a small vegetable garden, it’s also clever to choose vegetables that grow vertically rather than horizontally. Runner beans, for example, that grow upwards on trellises, may be a better option than bush beans, which require much more space.
If you have one or two vegetables that you absolutely want to have, although they normally need too much space, include them in your plan. Growing our own food should be fun, and not a way to limit ourselves. Growing them in pots is usually a great option.
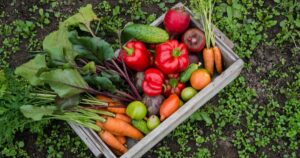
Look for high-yielding vegetables that produce a huge harvest. Good examples are zucchini, carrots, onions and tomatoes.
Make sure you cultivate varieties that are robust and well-adapted to your climate and hardiness zone, and prefer heirloom and resistant varieties.
Choose vegetables that are easy to cultivate, like lettuce, Swiss chard, garlic and beets.
It’s also good to have vegetables that grow fast, like radishes, beets, Swiss chard and spinach and veggies you can harvest for a long time, like lettuce, runner beans, leek, stalk celery and kale.
Small vegetable garden: Make a cultivation plan
Now that you have your list of vegetables, it’s time to make a plan. If you have patches or raised beds, draw them on paper and outline which plants you want to grow where. To make the best of your space, combine high and low-growing plants.
The right combinations
Randomly mixing vegetables can work, but usually, it won’t. It’s good, therefore, to know which plants to grow together and how to combine different veggies.
Now that we have a plan, we prepare our patches. No matter the kind of patches or pots we have to grow our vegetables in, soil preparation is essential for a good harvest. And what would be better than
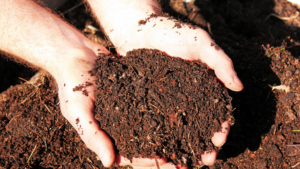
Compost
Compost is a universal remedy. It improves the soil structure, stores water, provides nourishment for the soil organisms and nutrients for the plants.
A generous layer of compost on the soil is a great method to ensure a huge harvest.
“Homemade” compost is certainly best, but if you don’t have enough “homemade” compost, I recommend buying some from a composting plant. It’s usually of better quality than the stuff in plastic bags you can buy in the supermarket, and it’s cheaper.
Manure
If you have livestock and use their manure for the garden, the soil will become increasingly fertile with time. Chicken manure, for example, is a marvellous fertiliser.
Horse manure has fewer nutrients than other manure, but the nutrient content is very balanced. Yet, no matter what animals you have: your garden will profit from their manure in any case.
Even if you don’t have any livestock, you can ask on farms, horse stables, or other animal owners if you can have some manure for your garden.
The only thing you have to keep in mind is that fresh manure is usually too „hot“ for most plants, and they would burn. For that reason, you must compost it before you can use it in your garden.
Cultivating your small vegetable garden
Made a plan: check
Prepared the soil: check
Now we can plant!
Intensive cultivation
When you use compost to enhance your soil’s fertility, you can plant your vegetables more closely than indicated on the seed packages. Especially leafy vegetables can be planted closer together, and a smaller planting distance means a higher yield.
Another example is head cabbage, which needs a lot of space as it grows relatively expansively, and we should plant it with the right spacing.
Normally.
We can intensify the space yield, however, when we plant leeks between the cabbage rows. The cabbage grows on the ground and leeks on the “first floor” without them getting in each other’s way.
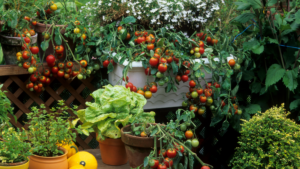
Pots and containers
For most gardeners, tomatoes and cucumbers are a must-have. Unfortunately, they require a comparatively large space to grow healthily and bring a good harvest. Instead of growing them in our patches or raised beds, therefore, we plant them in pots and containers. Just make sure that the pots are large enough and that you put them in a protected, sunny spot.
Attract pollinators in small vegetable gardens.
Fruiting vegetables like tomatoes and cucumbers, but peas and beans, as well, need insects to pollinate them. To attract these pollinators, it’s a good idea to plant blooming herbs or (edible) flowers like calendula or nasturtium between our veggies or around the patches. Bees and other pollinating insects will love them, and as a thank you, pollinate your veggies.
Harvest
Many gardeners hesitate when it comes to harvesting, but harvesting is our goal, isn’t it?!
When you cultivate vegetables that can be harvested for a long time, like lettuce, runner beans, leek, stalk celery and kale, make sure to harvest them continually throughout the season. That way, you drive them to grow more leaves or fruits.
As soon as you have harvested any veggies completely, sow or plant immediately afterwards so that the next batch of veggies is on its way.
Having fewer vegetables makes us want to use more parts of them. Did you know, for example, that you can mix the leaves of beetroots, carrots and Florence fennel with your lettuce? Or that the leaves of radishes make a wonderful pesto? You can also cut off garlic greens and put them in your salad or cook with them. They have a mild garlic taste and improve every dish.
Lastly, why not harvest edible wild plants that grow in your garden? One of the most dreaded weeds, goutweed, for example, can be perfectly baked into pancakes or used up for a wild herb pesto.
The leaves of stinging nettle can be mixed with spinach or cooked into a soup.
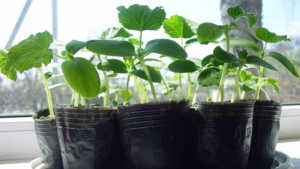
Vegetable garden, greenhouse, balcony, or patio: Cucumbers thrive in many environments and brighten your summer with crisp, fresh fruit. And they are a vegetable that can be easily seed-started indoors. Let’s have a look at how it works.
Cucumber varieties
Depending on where they grow, there are different varieties of cucumbers. Snack and pickling cucumbers grow well outdoors and even in pots, while snake cucumbers prefer to be cultivated in a greenhouse.
Seed-starting cucumbers for greenhouse cultivation
Many cucumbers for the greenhouse produce only female flowers, which makes them more productive.
Cucumber varieties with only female flowers are called “parthenocarpous”. That means that they don’t need male pollen for fertilisation and don’t produce seeds.
If you choose a parthenocarpous cucumber variety, make sure that you don’t plant other varieties with male flowers in the vicinity. Otherwise, bees could bring in male pollen – and you‘ll get a smaller harvest.
Seed-starting cucumbers for outdoor cultivation
Outdoor cucumber varieties are often smaller and have less smooth skin, but they often taste more aromatic and stay fresher and crispier.
If you want to cultivate your cucumbers in an unprotected place, I recommend the robust outdoor varieties. They are not as prone to mildew as the more sensitive greenhouse cucumbers.
But cucumbers are not only for fresh consumption. There are several varieties, especially for preserving. My favourite variety for pickles and ferments is „Boston Pickling“. Its fruits stay smaller, and they grow well outdoors.
The right time
At the beginning of April, you can seed-start cucumbers indoors. I also recommend sowing cucumbers in several batches between April and mid-June. This succession planting will make sure that you can harvest cucumbers throughout the whole season.
Seeing that sometimes older plants get infected with (real or false) mildew, a further batch provides you with fresh fruits.
Seed-starting Cucumbers: 8 Steps for Healthy Seedlings
. To make sure seed-starting will be a success, let’s go from sowing to transplanting step by step!
#1 How many cucumber plants do I need?
If you want to be self-sufficient with cucumbers, I recommend cultivating one to two plants per household member. For pickling and fermenting, you can even calculate some more. That way, you can preserve cucumbers for the winter months.
#2 Equipment
Fortunately, there’s not much equipment you’ll need:
Wondering if you could really sow in compost? Yep, that’s possible, BUT only in mature compost. If it looks dark and smells like a forest, it’s ready for seed-starting.
#3 How to sow cucumbers
Take your pots, fill them with mature compost or cultivation soil and make a hole of about 2 cm in it. There, you put in two seeds. Unfortunately, there’s always the risk that some seeds won’t germinate. By putting two seeds into the pots, we minimise that risk. If both germinate, rip out the weaker plant (even if it’s hard for you).
Now cover the seeds with soil, press it slightly and water the pots with the watering can or ball shower.
#4 Do NOT thin out cucumbers
Cucumbers don’t like it when their roots get messed with. For that reason, we seed-start them in pots that are large enough for them to grow until they’re transplanted outdoors or into the greenhouse without being uprooted.
#5 Temperature and light
Cucumbers like it hot, about 25 °C (77 °F), for germination. I usually place the pots above the radiator, or I use a heating mat to create a cosily warm atmosphere for my cucumber babies.
When they have germinated and peek out of the soil, they need less temperature but more light. At that stage, I move them to the guest toilet, where it’s a few degrees colder (18 – 20 °C / 64 – 68 °F). Now they need more light to grow, about 12 – 16 hours per day and at best special wavelengths.
It’s difficult to get that amount of light at the beginning of April, which is why I have several plant lamps installed. The right light is essential for sturdy growth. If there’s too little, the plants will get leggy and weak.
When your cucumbers are 2 – 3 weeks old, they need their first dose of fertiliser. It’s best to use a liquid fertiliser that you dilute with water (I usually use half the amount indicated on the package) and water your plants with it.
At that stage, cucumbers need a small dose of nitrogen to get them going and induce healthy growth.
#7 Watering
You shouldn‘t water any seedlings from above but rather into the saucer or holder. That way, the water can be absorbed up into the pot and the seedlings can take what they need. It’s the simplest and best way to water seedlings, and you can even fertilise them that way.
But be careful: don’t over-water your seedlings! A short period with a slightly drier soil helps them to develop strong roots.
#8 Hardening off
Before planting your cucumbers outdoors (here, that’s around the middle of May), you must harden them off to get them used to the harsher conditions. About a week before the „great day“, start putting them outside in a protected, shady place for 2 – 3 hours. Prolong that time over the next few days, and also put them into the sun. After about 7 days, they are hardened off enough to get transplanted outdoors.
Now you can also sow cucumbers directly into the patch.
Have fun seed-starting your cucumbers! If you want to read on, here are some articles you may also like:
If you have ever been to Southern Germany, I hope you have tried our Spätzle! If you have, I just know that you loved them. If not, let me explain what we’re talking about here: Spaetzle are a kind of pasta where the raw dough is pressed into boiling water. You can either eat them as a side dish to beef or veggies with sauce or as a main dish, for example, with cheese (“Kässpätzle”), homemade sauerkraut (“Krautspätzle) or herbs.
Here in Southern Germany, spaetzle (which translates as “little sparrows”) is a common traditional dish. Although there are ready-made spaetzle available in the supermarkets here, it’s so easy and way yummier to make them yourself. With this traditional spaetzle recipe, I’ll show you how you can make these yummy egg noodles at home and add a new dish to your collection of recipes.
Pro tips for great Spaetzle
Before we start, I’m going to share some pro tips that will help you create great Spaetzle! After all, when you go to all the length to try a new recipe, you want it to be a success!
Spaetzle recipe: Dough
The recipe for Spaetzle dough is quite simple, actually, as it only consists of flour, eggs, a pinch of salt and water or milk. Use all-purpose wheat flour or spelt flour. You can even take wholemeal wheat or spelt flour, but it requires more liquid.
The basic spaetzle recipe per person is
100 g flour
1 egg
1 pinch of salt
50 ml milk or water
That’s it. Easy, right? You’ll probably have all the ingredients at home already.
Many recipes use water for the dough, but in my opinion, spaetzle taste a lot better when made with milk. This spaetzle recipe, therefore, uses milk. If you don’t want to or can’t consume milk, feel free to substitute it with water.
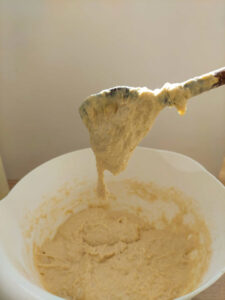
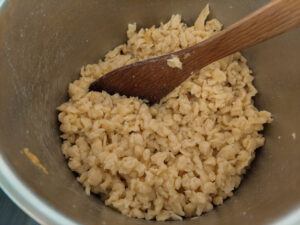
Spaetzle dough is best made by hand in a large bowl with a wooden spoon. That way, you can feel how thick the dough is and add some liquid to make it thinner or flour to thicken it. You can, of course, also mix the dough with a hand mixer.
You can tell that the dough is ready when it is thick and falls slowly from the spoon. Now let it rest for about 15 minutes.
Further down in the recipe, you’ll find a detailed description of how to make Spaetzle.
Equipment
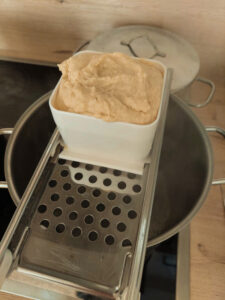
It’s easy to mix the Spaetzle dough, but to press it into the water, you have to use either a “Spaetzlehobel” or a kind of ricer with larger holes. If you have neither and just want to try out the recipe, take a sieve with large holes and scrape the dough through with a wooden spoon or a dough scraper. For completeness, let me tell you that you could also flatly spread the dough onto a cutting board and scrape it into the boiling water with the back of a knife. This method, however, requires experience and takes longer. But don’t let me keep you from trying it!
Spaetzle that are pressed through a ricer are long and thin, whereas Spaetzle formed with a “Spaetzlehobel” are short and round (sometimes, those are called “Knoepfle”, which means “buttons”).
I prefer making our Spaetzle with a Spaetzlehobel. Put the device safely onto the pot, fill in a portion of the dough and move the sledge forward and backwards so that the dough will be scraped through the holes into the water.
How to make Spaetzle
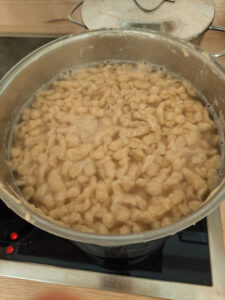
Make sure the water is boiling before you press the dough in portions into it, the Spaetzle won’t be cooked through and become a slimy mass.
When the Spaetzle are ready, they’ll swim on the surface. It’s okay to make all the Spätzle before straining. The first batch can stand that.
When all the dough is used up and all the Spaetzle are ready take them off with a skimmer or strain them through a colander and shortly rinse with hot or cold water.
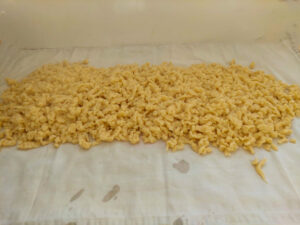
Drying
Although Spaetzle are usually used immediately, you can also prepare them several hours up to one day in advance. Either way, it is necessary to dry off excess water or the Spätzle will become doughy and stick together.
To dry the Spaetzle, put them onto a kitchen towel after straining them and distribute them evenly.
Let them dry for at least 5 minutes.
If you use them later, scrape them off the towel once they’re cool and dry and put them into a plastic container.
How long does raw Spaetzle dough last?
You can, of course, prepare Spaetzle dough and keep it in the fridge for several hours before using it. As it contains raw eggs, however, the raw dough shouldn’t be kept any longer.
It’s better to store the cooked Spaetzle. Dry and cool them as described above, and put them into plastic containers where they will last 2 – 3 days in the fridge.
Angela Braun
Spaetzle - A Traditional Recipe from Southern Germany
Making traditional Spaetzle, a traditional dish from Southern Germany, is easier than you might think and once you've tasted them you'll want to make them time and time again!
Put the flour, eggs and salt into a bowl. Slowly add the water and mix the ingredients with a wooden spoon or a hand mixer. The dough should be thick and fall slowly from the spoon. You may even observe small bubbles under the surface.
Once the dough is ready, let it rest for about 15 minutes. This time is necessary for the dough to hold together and become more stable.
Heat water in a pot. When it comes to a boil either press the Spaetzle in portions through a Spaetzle ricer or a Spätzlehobel. Make sure that the device is about 2 – 3 cm (1 inch) above the water surface which should only be simmering now. Make all the Spätzle until you’ve used up the whole dough.
Cook the Spaetzle in the open pot until they well up several times and swim on the surface. Depending on the size and amount of Spaetzle this takes 2 – 3 minutes.
When the Spaetzle are cooked, take them out of the pot with a skimmer or strain them through a colander and shortly rinse with hot or cold water.
Place a kitchen towel on your kitchen surface and dump the Spaetzle on it. Distribute them evenly on the towel to let them dry and cool off.
Melt butter in a large pot until it sizzles and brown the Spaetzle gently in the hot butter. Serve immediately.
Spaetzle dough variations
Once you’ve developed your taste for Spaetzle (that is: after the first bite 😉), you can try many different variations of the dough.
Mix finely ground hard cheese, like parmesan, for example or season the dough with spices like paprika or chilli powder. You can also add finely chopped herbs like bear’s garlic or parsley to alter the taste. Or take a mix of curd or sour cream and milk to serve as liquid for the dough.
There are almost no limits to the variations a Spaetzle dough provides.
Left-over Spaetzle
What to do with leftover Spaetzle? As you know, you can keep them in the fridge for a few days, and then you can re-heat them in a pan with hot butter and season with salt, pepper and nutmeg.
Basically, Spaetzle can be treated like pasta or rice as a side dish to beef dishes with sauce, like these beef rolls.
Or you layer them with cheese into a pan, fill in some milk and bake it in the oven for 25 – 30 minutes, which makes for a yummy main dish, called “Kässpätzle” (cheese Spaetzle). Served with fried onions and a salad, that’s a wonderful meal.
Spaetzle wrap-up
Congratulations! You’ve just mastered one of Southern Germany’s most beloved dishes. Now comes the fun part: experimenting with variations. Will you try the cheese version (Käsespätzle) first, or add herbs to the dough? Let me know how your first batch turns out—I remember mine being slightly wonky, but absolutely delicious!
In an ideal world, we would just take the time once to make a planting plan for our vegetable garden and then stick to it for all the years to come. That would be so convenient, wouldn’t it? Alas, it doesn’t work that way. Cultivating the same plants in the same place again and again would leach out the soil over the years and bring little to no harvest. The solution to this problem is to implement a rotational system where crops are planted on a different field every year until they reach that first field again. This concept is what we know as crop rotation.
But crop rotation isn’t just an old farming technique: In a vegetable garden where we intensively cultivate a small(ish) amount of soil for maximum harvest, we also use crop rotation to keep the soil fertile and our plants healthy. In this post, I’ll show you what crop rotation is, how it will help you to get healthier plants, fewer pests and more abundant harvests and how you can integrate it into your garden plan. Let’s dive into everything you need to know about this game-changing practice!
What is crop rotation, and what are its benefits?
Crop rotation is the concept of NOT cultivating the same plants in the same place year after year. That way, we avoid pests and diseases from getting the upper hand. Many pests and diseases specialise in one plant or plant family (see below). By rotating our crops, we keep them at bay and diminish the risk of them getting ground and permanently invading our garden.
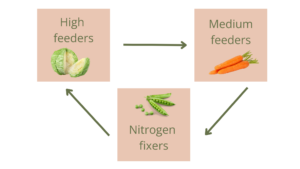
Another benefit of crop rotation is the soil’s nutrient content and thus its fertility. As you know, we can categorise vegetables as heavy, medium and light feeders, that is, plants with high, medium or low nutrient demands. Cultivating cabbage, for example, which is a heavy feeder, for years in a row would leach out the soil fast of the many nutrients cabbage needs to grow healthily.
However, nutrient supply by crop rotation is not as important for vegetable gardening as the disruption of pest and disease cycles. After all, we do add compost and fertilisers to supply nutrients. For the same reason, a fallow where we grow nothing but a cover crop on a bed will not be necessary in vegetable gardening.
Together with companion planting (mixed culture), the use of eco-friendly fertilisers and plant protection, crop rotation is an important pillar for the long-term sustainability of our gardens.
How to use crop rotation in your vegetable garden
First of all, we need to understand the different groups of vegetables. The best way to do so is to either categorise our vegetables by the “family” they belong to or by what we want to harvest from them.
Understanding Plant Families
Plants, like humans, belong to different families. It’s important to know which plants are members of the same family, as they usually show not only similar nutrient needs but also attract the same pests and diseases.
Here’s a short overview of the most common plant families and their requirements:
Family: Poaceae (sweet grass) Vegetables: Corn Nutrient uptake: medium
Understanding plant categories
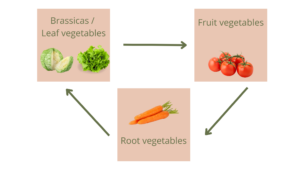
Apart from plant families, we can also sort our vegetables depending on what we want to harvest from them.
There are five categories:
Category: Leafy vegetables Vegetables: Lettuce, spinach and Swiss chard Nutrient uptake: medium to high
Category: Brassicas Vegetables: Cabbage, Brussels sprouts, kale, broccoli, cauliflower, Savoy cabbage and kohlrabi. Nutrient uptake: high
Category: Fruiting vegetables Vegetables: Tomatoes, zucchini, pumpkins, peppers, eggplants, cucumbers, melons and potatoes Nutrient uptake: high (especially potassium and phosphorus)
Category: Root vegetables Vegetables: Carrots, turnips, parsnips, beetroots, radishes, parsley, onions and garlic Nutrient uptake: medium
Category: Legumes Vegetables: Beans, peas, lentils, chick peas, soy beans and peanuts Nutrient uptake: low; fixes nitrogen into the soil
Crop rotation in practice
With two possibilities of dividing vegetables into groups, we also have two options for planning our crop rotation. But first of all, we need to
Make a garden plan
Before the planting comes a plan. Make a list of all the vegetables you like and want to cultivate. If you’re a fledgling in vegetable gardening, start small and only take a few crops. Then, draw a map of your garden beds, raised beds or containers and divide them into sections for each crop group.
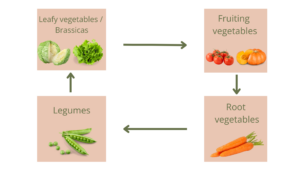
At the beginning of your garden journey, I’d recommend sorting the vegetables by category (leafy veggies + brassicas, fruit bearers, root vegetables and legumes). Divide your vegetable garden into quarters and cultivate one category per quarter.
If you choose to group your vegetables by family, think about how many plants per variety you’ll need and plan the size of the zones accordingly.
Crop Rotation by Category
Legumes have the extraordinary ability to gather nitrogen from the air and fix it in their roots. For that reason, we only cut legumes after harvesting and leave their roots in the soil to enrich it with nitrogen.
Plant leafy vegetables and brassicas after legumes, as they need the nitrogen the legumes have fixed.
Fruiting vegetables follow leafy veggies and brassicas. Fruiting vegetables don’t need as much nitrogen as leafy veggies and brassicas, but rather potassium and phosphorus. Too much nitrogen can even prevent them from producing many fruits. The leafies and brassicas will have consumed enough nitrogen in the season before, so there’ll be no problem on that front.
Plant root vegetables after fruiting vegetables. Root vegetables need even less nitrogen than fruiters. At the same time, they’ll break up the soil which legumes, that you should plant afterwards, love.
Rotating by plant category can be easily implemented. Divide your gardening space into quarters and plant a different category in each quarter. The next year, just rotate by one bed. That way, fruiters are followed by root vegetables. After that, we plant legumes and in the fourth year, leafy vegetables and brassicas.
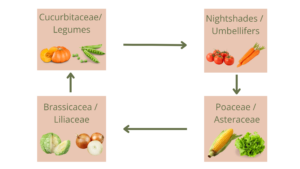
Crop Rotation by Plant Family
If you want to rotate your vegetables by plant family, you must first look at their nutrient needs. Basically, you plant medium feeders after heavy feeders and then cultivate nitrogen fixers to replenish the soil. This could look as follows:
Brassicaceae (cabbage family) need lots of nitrogen, so they are best planted after legumes, which are nitrogen-fixers.
Root vegetables break up the soil, which makes it great for potatoes and tomatoes that need to grow deep.
Legumes like peas and beans love the loose soil that, for example, potatoes leave behind.
Members of the umbelliferae family, like carrots and parsnips, are light to medium feeders and can follow vegetables of any other group.
Rotating by plant family can be a bit trickier at first, but it also gives you more alternatives to mix your vegetables, especially when it comes to succession planting and follow-up crops.
Nightshades and Umbellifers (tomatoes, pepper, eggplant, etc. and carrots, celery, parsley, etc.) – Poaceae (corn) and Asteraceae (lettuce, salsify) – Brassicaceae (cabbages, radish) and Liliaceae (onions, chives, garlic) – Cucurbitaceae (cucumbers, melons, pumpkins, zucchini) and Legumes (peas, beans)
Crop rotation and succession planting
Most vegetables don’t occupy the garden for the whole season, so we plant fast-growing crops before or after them. This is called succession planting, and we also need to observe the rules of crop rotation here. It’s not good to plant late cauliflower after early broccoli, for example, because, as you know by now, they are from the same family and category and thus have the same nutrient requirements and attract the same pests and diseases. You’ll find more details on succession planting over here.
A cleverly planned succession of vegetables will leave your soil healthy and nutrient-rich, while your plants will benefit from one another and produce a great harvest.
Here are some examples of succession planting that take crop rotation into account:
Plant late cabbage varieties, lettuce or onions after potatoes
Cultivate radishes, lamb’s lettuce, spinach or kohlrabi after broad beans
When you’ve harvested garlic, plant strawberries on that bed or sow broad beans; the year after that, the bed is ready for heavy feeders like cabbage or Cucurbitaceae.
After onions, you can sow endives, radicchio, beetroot, or Swiss chard.
Plant bush beans, spring onions, Swiss chard, spinach or late cabbage varieties after fennel.
How to rotate crops in small gardens
You may only have a small space for vegetable gardening, and that’s okay. In fact, most home gardens are not very large, and that may make it difficult to rotate and effectively space apart different veggies. Nevertheless, you should still try to do it as best as possible to keep pests and diseases at bay and help maintain soil fertility.
Here are a few tips on how to rotate crops in small gardens:
Raised beds
If you have only a small space for gardening, building three to four raised beds may be a good idea. That way, you can rotate your crops according to one of the plans above while having a solid barrier between each area, although they may be close to one another.
Container gardening
Using containers is similar to raised beds, and I especially recommend it for vegetables that are prone to diseases, like tomatoes. Like with raised beds, there is a physical barrier between the containers and the rest of your vegetable garden and the risk of spreading diseases across beds is minimal.
Scattered beds
Who says that all vegetables must be grown in one place? Admittedly, when it comes to watering or harvesting, it’s easier to have all vegetables in the same location, but you can also create “pockets” and grow veggies on beds scattered around your garden. That way, it’s easy to rotate crops and make sure that diseases do not spread.
Advanced Crop Rotation Strategies
Integrating cover crops into your rotation schedule
Cover crops are great for replenishing nutrients while at the same time covering the soil. Cultivating cover crops counts as fallow in the vegetable garden, whether it’s during the whole season or just a part of it. However, cover crops also belong to plant families and can be “siblings” of our veggies. It’s important to know, therefore, who is related to whom to avoid leaching the soil and spreading pests and diseases.
Here is an overview of common cover crops and their family membership:
Family: Legumes Members: Cowpea, red clover, white clover, crimson clover, sun hemp
Family: Brassicaceae Members: Rapeseed, yellow mustard, oilseed radish, field turnip
Make sure to consider these family memberships when planning your crop rotation. For example, don’t grow any cabbages in a bed where brassica cover crops like rapeseed or mustard were grown before. Also, cultivating corn after, for example, winter barley or oats, may be difficult.
Companion planting and crop rotation
Companion planting means planting those vegetables together (that is, alternating or in proximity to each other) that help each other grow better. For example, corn and beans are amazing plant buddies: corn provides a natural support for bean vines to climb, while beans add nitrogen to the soil, which helps corn grow stronger. Another great pair is tomatoes and basil – basil helps keep pesky insects away from tomato plants, acting like a natural bodyguard. If you want to learn more about companion planting, you’ll find a comprehensive guide here.
When we use companion planting within our crop rotation system, we’re basically creating a superhero team of plants. Each plant brings its own special power to the garden. Some plants, like marigolds, can chase away harmful insects, while others, like clover, can improve soil health by adding nutrients. This method is not just smart gardening – it’s a way of working with nature instead of fighting against it, helping to grow healthier crops and take better care of the earth.
Companion Planting in Crop Rotation: Four Strategic Examples
Nitrogen-Fixing Legume Rotation with Heavy Feeders
Rotation Sequence:
Year 1: Plant bush beans or peas (nitrogen-fixing legumes)
Year 2: Follow with heavy-feeding corn or brassicas
Companion Planting Strategy:
Interplant beans with carrots and radishes
Plant pumpkins with corn to cover the soil
Benefits: Beans naturally enrich soil with nitrogen, supporting next year’s nutrient-hungry crops
Brassica and Allium Rotation with Root Crops
Rotation Sequence:
Year 1: Grow cabbage family crops (broccoli, kale, etc.)
Year 2: Plant root crops like carrots and parsnips
Companion Planting Strategy:
Interplant onions and garlic with carrots to deter carrot flies
Use calendula as a trap crop to attract beneficial insects
Benefits: Breaks pest cycles, improves soil structure, reduces disease pressure
Nightshade Family Rotation with Soil-Building Crops
Rotation Sequence:
Year 1: Tomatoes and peppers
Year 2: Cover crops or green manure (like clover or buckwheat)
Companion Planting Strategy:
Plant basil near tomatoes to improve flavour and repel pests
Grow marigolds around nightshades to deter nematodes
Benefits: Restores soil health, interrupts pest and disease cycles
Cucurbit and Herb Companion Rotation
Rotation Sequence:
Year 1: Cucumbers, squash, and melons
Year 2: Grow nitrogen-fixing legumes
Companion Planting Strategy:
Plant dill and nasturtiums with cucumbers
Interplant radishes to deter cucumber beetles
Benefits: Enhances pollination, natural pest control, and soil nutrition improvement
How do you know if your rotation is working?
How would you know if your rotation system is working? Well, first of all, take a close look at your soil. It should have a deep brown to almost black colour, which indicates an increased amount of organic matter and a high nutrient content.
Secondly, track pests and diseases over several seasons and check if they have at least not spread, at best diminished.
The harvest yield, of course, is also a good indicator of whether your rotational system works. A good harvest shows good, rich soil, which will be a result of a well-working crop rotation.
Start crop rotation now!
Implementing crop rotation in your vegetable garden is one of the smartest decisions you can make for long-term gardening success! The guidelines in this post show you what to do to keep your soil healthy, diminish pests and diseases and have a great harvest year after year.
And remember that even small gardens benefit enormously from crop rotation!
Start planning your garden’s crop rotation right now, and I promise you that by this time next year, you’ll be amazed at the difference in its productivity and health! Your soil will be replenished with nutrients, you’ll have healthy plants and above all, you’ll gather an abundant harvest.
Wanna read more about vegetable gardening? Browse my gardening library for step-by-step guides on every aspect of vegetable growing, from planning to harvest.
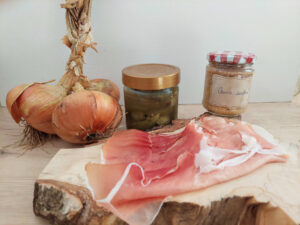
Hearty German beef rolls, the so-called “Rouladen”, are a popular dish for Sunday lunch or holiday feasts here in Southern Germany. Traditional restaurants have this delicious comfort food on their menus, and although they may seem “vintage”, they are still a big hit.
When my mom made beef rolls – or Rouladen as we call them – I loved to watch her as she worked methodically, spreading mustard over thin slices of beef, tucking in bacon, onions and pickles and then rolling them into neat packages. She had been taught how to do it by her mom, who had it from her mother.
Rouladen aren’t just dinner – they’re history on a plate. Back in the days when times were lean, those beef rolls were a clever solution to transform ordinary ingredients and very thin slices of meat into something spectacular.
Many families have slight variations of the recipe, but these differences are more than just tweaks; they’re family legacies and regional identities.
So, when you slice into a perfectly cooked Roulade, you’re not only enjoying dinner, but you’re participating in a tradition that has nourished generations!
A few weeks ago, my brother slaughtered an ox, and I—like my siblings—got a mix of meat cuts, including beef rolls. Last Sunday, then, when the inevitable question of “What’s for lunch?” came up, I could tell my sons that I’d make Rouladen with Spaetzle. You should have seen how their eyes lit up, and they looked at me like starving men who are offered a feast. My eldest even delayed a trip for several hours so that he could have lunch at home! As if we only had water and bread all year round…
As it was such a hit, today, I’m going to share my variation of Rouladen with you. This simple recipe for classic German beef rolls doesn’t require many ingredients and is easy to make.
Classic Rouladen are really easy to make
Making beef rolls is super simple – a lot simpler than you may think. The most important ingredient is time for chopping vegetables and cooking the meat. But believe me: it’s so worth it! It’s also a great dish to serve guests or to impress the in-laws because, besides it being delicious, you’ll have plenty of time to make everything, including yourself, pretty while the beef is cooking.😉
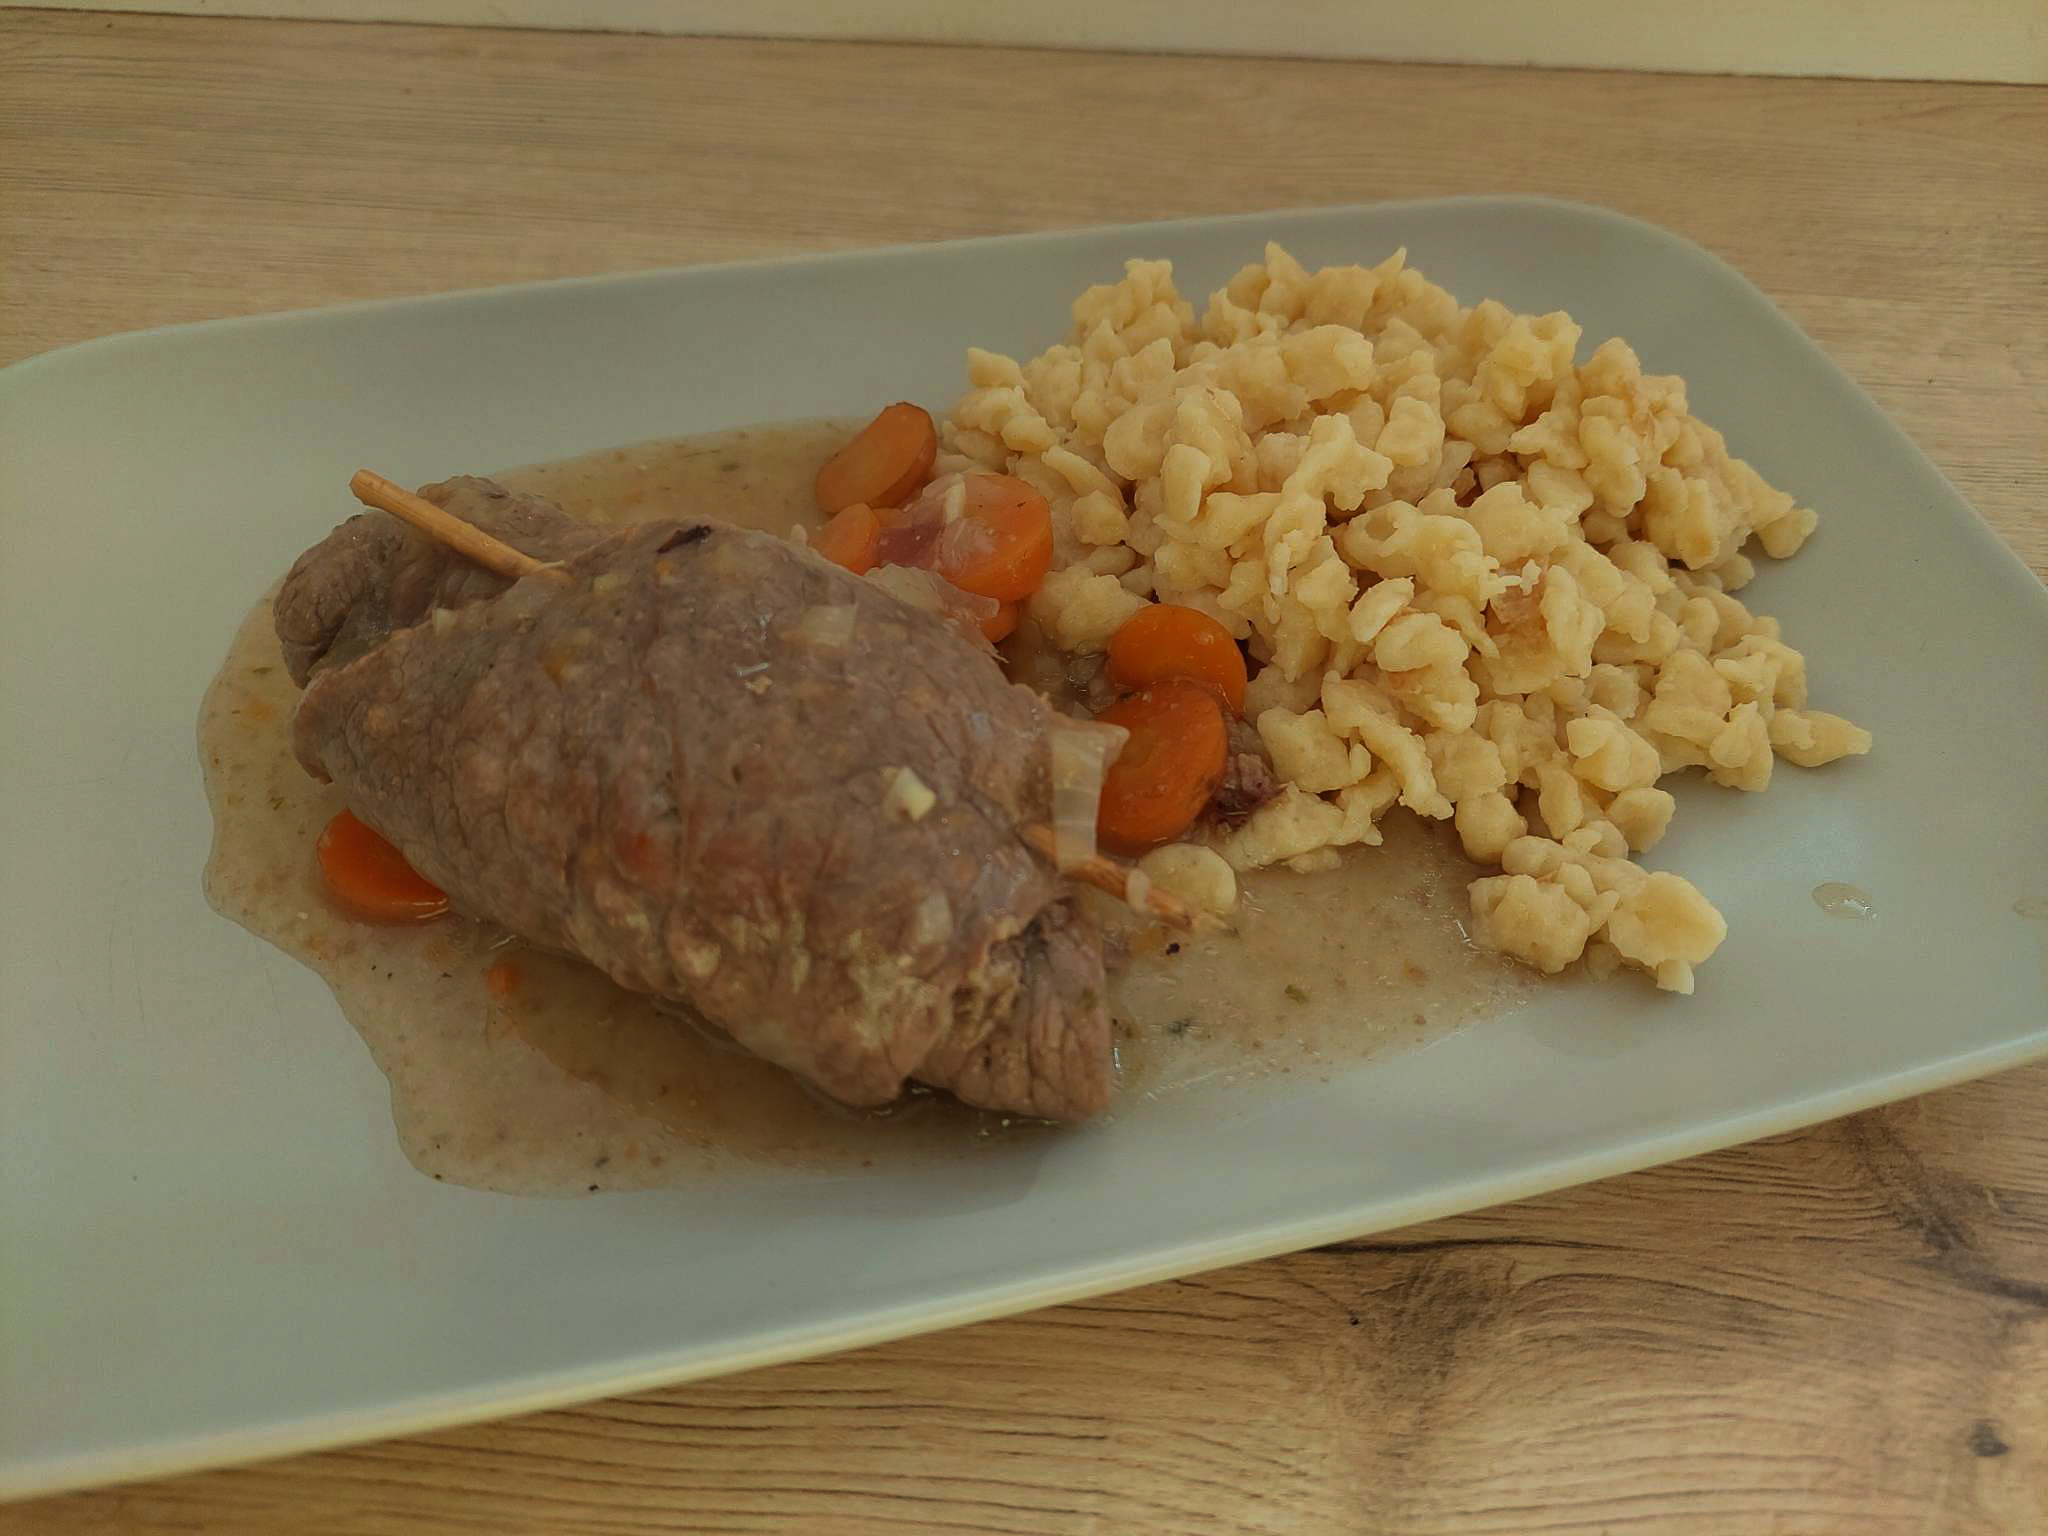
Beef rolls go well with bread dumplings or homemade spaetzle (a kind of Bavarian pasta) as well as mashed potatoes and vegetables.
What you need to know about my beef roll recipe
In some recipes, you get an exact amount of ingredients, but I find that very difficult to work with. After all, the size of the rolls differs from butcher to butcher and depends on which part of the meat they have been cut off. Please bear that in mind when you make this recipe and take more or fewer onions, pickles and mustard. You’ll see for yourself when the filling is too thick to roll.
There are lots of recipe variations, and every family has their own, I think. This is my favourite recipe for classic Bavarian beef rolls.
root vegetables like carrots, celery, parsnips, roughly chopped
1 tbsp tomato puree
¼ l red wine
¼ – ½ l vegetable broth
½ – 1 tbsp flour
Instructions
Carefully flatten the beef slices with a meat tenderiser or by pressing them with a pan.
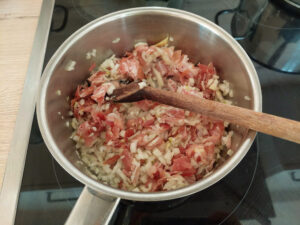
Prepare the filling: finely chop the onions, the bacon or smoked ham and the parsley. Sauté the mixture in a bit of butter or tallow.
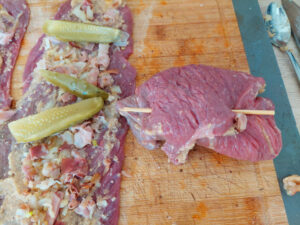
Spread each beef slice thinly with mustard, then with the filling.
Beef rolls in preparation: left with mustard, middle with onions and bacon and right with pickles, ready to be rolled.
Quarter the pickled gherkins lengthwise, or slice small ones in half and put them onto the beef slices.
Roll the filled slices carefully so the filling doesn’t spill out. Close the rolls by binding them with kitchen yarn or by fixing them with a skewer.
Salt and pepper the beef rolls and roll them in flour.
Chop the onion; heat tallow in a large pan or pot and sear the beef rolls until they are browned.
Add the onions, vegetables and tomato puree to the pot and brown them as well.
Deglaze it all with the wine and let it simmer for a few minutes. Then, add the broth and let the whole thing simmer for 1.5 hours (40 minutes if you have loin beef) or 25 – 30 minutes if you stew it in a pressure cooker.
After stewing, remove the rolls from the sauce and blend it with a hand-blender. If the sauce is too thin, mix a tbsp of flour with some water into a thin liquid and add it to the sauce. Bring it to the boil and thus thicken the sauce.
Classic Bavarian Beef Rolls go well together with Bavarian Spätzle (a kind of noodles), pasta, bread dumplings or mashed potatoes as well as steamed vegetables or salad.
German Beef rolls
Hearty German beef rolls, the so-called "Rouladen", are a popular dish for Sunday lunch or holiday feasts here in Southern Germany.
mustard to tastehomemade quince mustard for example
For the filling:
100gbacon or smoked ham
2onions
parsley
2– 4 pickled gherkins
For braising:
40– 50 g fat
1onion
root vegetables like carrotscelery, parsnips, roughly chopped
1tbsptomato puree
¼lred wine
¼ - ½lvegetable broth
½ - 1tbspflour
Equipment
1 Pressure cooker optional
Method
Carefully flatten the beef slices with a meat tenderiser or by pressing them with a pan.
Prepare the filling: finely chop the onions, the bacon or smoked ham and the parsley. Sauté the mixture in a bit of butter or tallow.
Spread each beef slice thinly with mustard, then with the filling.
Quarter the pickled gherkins lengthwise or slice small ones in halves and put them onto the beef slices
Roll the filled slices carefully so the filling doesn’t spill out. Close the rolls by binding them with kitchen yarn or by fixing them with a skewer.
Salt and pepper the beef rolls and roll them in flour.
Chop the onion; heat tallow in a large pan or pot and sear the beef rolls until they are browned.
Add the onions, vegetables and tomato puree to the pot and brown them as well.
Deglaze it all with the wine and let it simmer for a few minutes. Then, add the broth and let the whole thing simmer for 1.5 hours (40 minutes if you have loin beef) or 25 – 30 minutes if you stew it in a pressure cooker.
After stewing, remove the rolls from the sauce and blend it with a hand-blender. If the sauce is too thin, mix a tbsp of flour with some water into a thin liquid and add it to the sauce. Bring it to the boil and thus thicken the sauce.
Notes
Classic Bavarian Beef Rolls go well together with Bavarian Spaetzle (a kind of noodles), pasta, bread dumplings or mashed potatoes as well as steamed vegetables or salad.
There you have it—the Rouladen recipe that’s been warming German hearts (and bellies) for generations. Do you have your own family variation? Maybe your grandmother used a different mustard, or your mom had a secret ingredient? I’d be fascinated to hear how different families make this classic their own.
Looking for a dessert after this feast? Try this one: