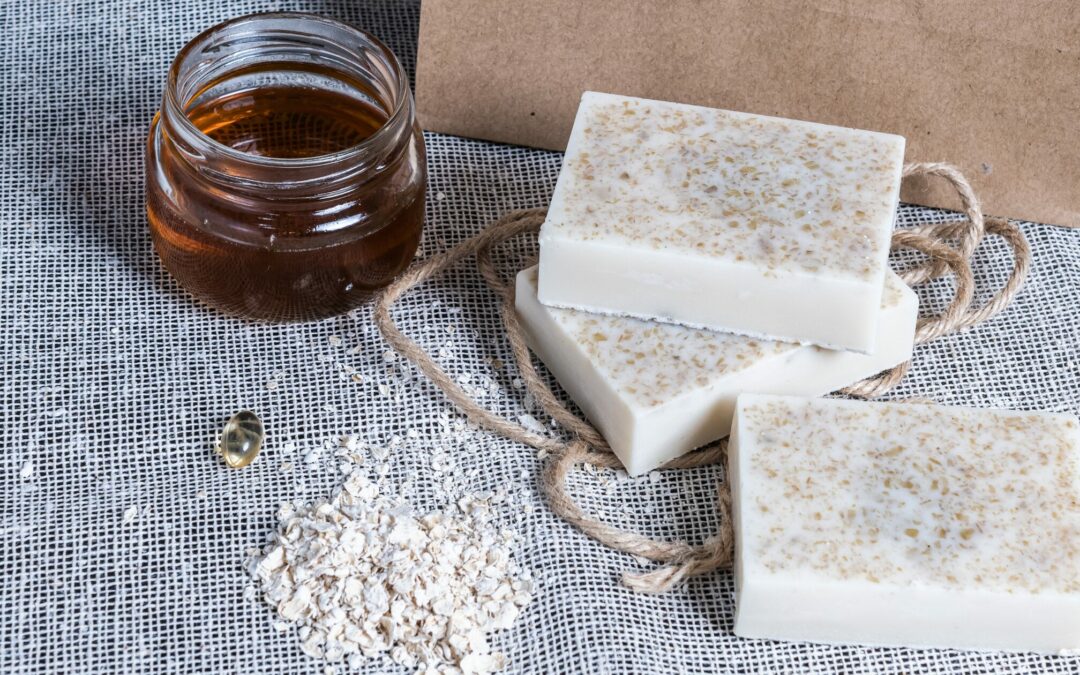
Soap is the oldest and most used washing detergent in the history of mankind. The oldest soap recipe that has been found is thousands of years old! And the best thing is: we still know how to make soap. The process differs a bit from that of our ancestors; after all, who would want to make lye from wood ash and boil it for hours with animal fats until it becomes a (stinky) bar of soap? The chemical principle or rather, the science behind soapmaking, however, stays the same and understanding the science behind it helps you to avoid mistakes, create your own recipes and stay safe during the process.
I was never good at chemistry, however. On the contrary, all things chemistry have always been a bit like magic for me. I mean, you take one thing and bring it together with another and you get something completely different! Weird, huh? In this post, therefore, I will explain all this science stuff very simply – because that’s how I get it best. And I hope you, too.
The science behind soapmaking: What is soap?
Let’s start with the most mundane question: What is soap?
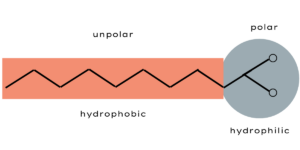
Soaps are surfactants and are used in combination with water as a cleaning agent. Surfactants are wash-active substances that reduce the surface tension of liquids. By that, they cause two normally immiscible substances, for example fat and water to unite. Why is that so? A fat molecule consists mostly of long chains of carbon and hydrogen atoms. The electricity is evenly distributed in these chains and therefore fat molecules are electrically non-polar.
Water, on the other side, consists of a negatively charged oxygen atom and two positively charged hydrogen atoms. Due to their structure, one side of the water molecule is negatively and the other is positively charged. This uneven distribution of charge is called “polar”. The negatively charged oxygen side attracts the positively charged hydrogen side of another water molecule like a magnet which is why water molecules are usually formed into clusters. They can’t, however, connect with the non-polar fat molecules.
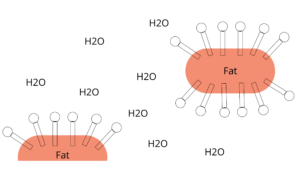
Soap, now, works as an “agent” between fat and water on their molecular basis. The soap molecules have a water-attracting (hydrophilic) and a water-repellent (hydrophobic) side.
The hydrophobic side attracts fat and encloses the fat droplets in small circles. The hydrophilic end connects to water. The result is an oil-in-water mixture, a so-called dispersion.
By washing (that is rubbing your hands), the fats contained in the dirt come off and the fat-dirt-dispersion is rinsed off with water.
I told you: it’s magic!
What is soapmaking?
I’d love to have a time machine and go back to that one day when someone discovered by accident that by cooking fats with alkaline pot ash you’d get a washing-active substance that dissolves dirt and fat.
The principle of breaking down fats with alkaline substances (that is: lyes) has not changed since that first day of soapmaking. Today, we know the chemical reaction of soapmaking, in chem-talk also known as saponification. As lyes, we use sodium hydroxide or potassium hydroxide. When saponification is carried out with sodium hydroxide we get hard soaps, with potassium hydroxide we get soft to semi-soft soaps. The lye breaks down the fat into soap (or water-soluble alkaline salts) and glycerin, or, in chem-talk:
Fat + Lye = alkaline salt (soap) + glycerin
Plainly said: Fats react with lye to create a soap with a small amount of glycerin through saponification.
In soapmaking for skin and hair, we use a sodium hydroxide solution as a lye. Sodium hydroxide can be bought as crystals or flakes and it needs to be dissolved in a liquid (mostly water) so that we can mix it with the oil.
Saponification value
When lye is added to a liquid, an exothermic (=heat-producing) reaction occurs. It’s fascinating to watch the red bar on the thermometer climbing up! When we use water, temperatures reach about 90 – 100 °C, when other liquids are used the temperature is often hotter.
The amount of lye needed to make soap depends on the oils used and is called the saponification (SAP) value. Oils are made of short- and long-chain fatty acids which dictate the amount of lye. For example, coconut oil contains about 85 percent saturated fatty acid which is responsible for the fact that palm oil is solid at room temperature. Olive oil, on the other hand, contains mostly unsaturated fatty acid which makes it liquid at room temperature. Coconut oil reacts radically differently than olive oil when mixed with sodium hydroxide and thus, both oils require different amounts of lye to turn them into soap.
Superfatting
As described above, soap works by clinging its lather to dirt, both of which are rinsed away by water. This process, however, can also take away the skin’s natural oils. To prevent the skin from drying out after washing, we add extra oil to the soap, a process called “superfatting” or “lye discounting”.
If we make soap with a recipe that uses the exact amount of lye that is necessary to turn all the oil into soap has a zero percent lye discount or is zero percent superfat. That means it has no excess oil after saponification which makes it a hard bar of soap but is not very gentle to the skin.
A soap with excess oil, on the other hand, makes a softer bar of soap that has a decreased shelf life.
Most soapmakers keep their superfat to under 10 percent, I mostly use superfats between three (hair soap) and nine percent.
Different methods of soapmaking
There are different methods of soapmaking.
Hot-Process
To accelerate the breaking down of the fats, we heat the soap batter to 100 °C, accelerating the reaction as well as water vaporization. When the soap has cooled down, the process of saponification is finished. I haven’t tried out this process yet but it’s only a question of time.
Cold-Process
Here, no external heat is added but the chemical reaction releases heat (= exothermic reaction). Saponification takes a longer time (24 – 48 hours) and we have to leave the soap for that time in a mould. Afterwards, the soap must be cured for several weeks before it is ready to use. This is the classic method for making body and face soaps and I have loved it since the first soap I made!
Melt and pour
With that method, you melt a premade soap base, customize it with fragrances and colourants and pour it into a mould. This is a method I don’t use.
The science behind soapmaking: Ingredients
As described above, soap consists of fats and lye and – if you like – additives. Let’s have a closer look:
Fats
Our basic raw materials are oils or fats of plant or animal origin. The most commonly used fats/oils for soapmaking have a high content of saturated and monounsaturated fatty acids like olive oil, coconut oil, palm fat, babassu oil and high-oleic oils like sunflower oil, rapeseed, peanut and safflower oil.
These fatty acids make solid soaps with a good storage time.
By a skilful combination of different fats and oils, the soaps’ characteristics can be optimized. That’s why we use mostly mixtures of fat/oils.
Lye
To produce solid hand and body soaps we saponify fats/oils a lye made of water and sodium hydroxide (NaOH). This lye has a pH value of 14 and therefore is strongly alkaline. NaOH is a white hygroscopic (i.e. water-attracting) solid and can be bought as crystals or flakes.
Any lye is a hazardous substance! You must know the risks and dangers and be very careful when working with it!
Additives
Depending on the purpose of our soap, we can add additives to optimize its properties or enhance its sensory effects. However, additives should be used sparsely and only in the best possible quality.
Fragrances
Although fragrances make only a small part of the overall soap amount, they determine (together with colourants) the first impression and influence our perception.
Essential oils
Essential oils are mostly gained by water vapour distillation of aromatic plants. Their shelf life varies with oils from citrus fruit having the shortest. We differentiate:
untreated essential oils (gained from the plant)
natural essential oils (consisting of several untreated components which haven’t all been gained from the plant it’s named after; no synthetic additives)
nature identical essential oils (synthetic oils, composed acc. to a natural model)
natural / nature-identical essential oils (mixtures of untreated and synthetic oils)
artificial essential oils (artificial fragrances; often classified as health critical
Essential oils are irritating to skin and mucous membranes (work safety!) and may cause allergies.
Synthetic fragrances
Nowadays, synthetic fragrances are commonplace. Production is cheap, they have a long shelf-life and replace essential oils in many products. However, synthetic fragrances are chemicals and may contain components that are harmful to the organism. they may lead to contact allergies and allergies through inhalation. They degrade slowly and accumulate in the air.
Fragrancing of soaps
Fragrances, even in a low percentage, influence the physical properties of soaps, for example their solubility, emulsification, hardness and brittleness. It is therefore recommended, to use 2 – 3 percent (related to the whole fat amount) at the most. In soaps or sensitive skin or children, fragrances should not be used at all.
All fragrances used in soapmaking must be alkali-resistant, that is they must not be affected by the lye. Additionally, they must withstand the temperature at soapmaking. Fragrances based on alcohol are unsuitable as alcohol disrupts saponification.
Colour additives
Chemically speaking, we differentiate between inorganic and organic colour additives. Further differentiation is made according to the colourant’s capability to dissolve in the application medium (soap, water or oil).
Colour additives are classified as chemicals and may cause contact allergies. Some are even toxic or are classified as environmentally dangerous. When using colour additives, you must observe the safety instructions.
Colourants
Colourants are chemical compounds that dissolve in the application medium and dye other materials. There are natural and synthetic colourants. Natural colourants can be of animal or plant origin, with animal colourants deriving from bodily fluids like gall or blood and plant colourants deriving from woods, barks, roots, fruits, leaves and seeds. Their quality depends on climate, area, soil properties, etc.
Synthetic colorants on the other hand show a consistent quality as they are made under standardized production conditions. They are light- and heat-resistant and have an almost unlimited shelf-life.
Pigments
Pigments are colouring substances in the form of very fine particles that don’t dissolve in the application medium. The smaller the particles the more intense the colouring. Pigments can either be inorganic or organic, natural or synthetic.
Anorganic natural pigments are obtained from soils and minerals.
Inorganic synthetic pigments are produced with different chemical procedures and in high quantities, for example iron oxide pigments, metal effect pigments, white pigments (e.g. titanium oxide)
Organic natural pigments are made of animal and plant parts
Organic synthetic pigments are unsoluble
Water
For soapmaking, normal, still water is good. Tap water is ok as long as it doesn’t contain too much lime. Alternatively, you can use hydrolates, and alcoholic beverages like wine beer or milk (of animal or plant origin). With alcohol and milk, however, the soapmaking process is slightly different as these two heat too much and thus must be treated differently.
Resume
You see now, as simple as soapmaking may be at its core, it’s also very flexible and adaptable. By mixing different oils, using alternative liquid possibilities, and adding fragrances and colours you have almost infinite possibilities to create your own recipes.
I’m sure you can’t wait to learn how to make your first soap, right?! Get acquainted with the safety instructions, look how it works and then: make your first soap with this easy beginner-friendly recipe!
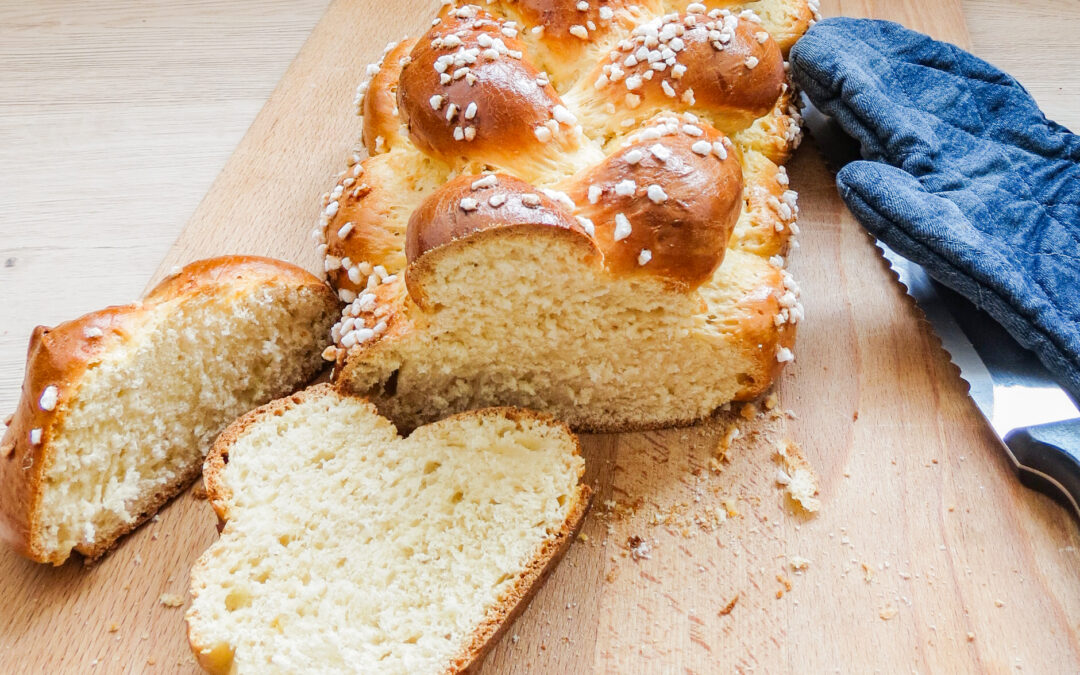
When I was a child, my mum made a braided yeast bun almost every weekend. When on Saturday evening the smell of freshly baked yeast dough wafted through the house, we knew that we were in for a treat. Unfortunately, waiting wasn’t a strength of any of us and more often than not, somebody (usually my dad) stole a piece of the bun before it had even cooled off!
When I was old enough to bake myself, Mum gave me her recipe which I still think is the best. There are many variations to braided yeast buns: you can make them with raisins, nuts or different flavours, add fillings and form them not only like a braid but in many different shapes.
The classic braided yeast bun, however, is my favourite and I love making it for my family.
Braided yeast bun
Ingredients
750 g all-purpose flour (I usually use spelt, but wheat is also ok) 1 tbsp sugar 1 tbsp vanilla sugar 1 pinch of salt 1/4 l lukewarm milk 7 g dried yeast or 40 g fresh yeast 100 g soft butter 3 eggs, medium size 1/2 tbsp grated lemon or orange zest 100 g raisins OR 100 g almond slivers (both optional)
Instructions
If you use fresh yeast, activate it by crumbling it into a bowl, adding the sugar and a bit of the lukewarm milk. Stir until it’s dissolved and let it rest for 10 – 15 minutes until you can see air bubbles and the liquid starts to expand.
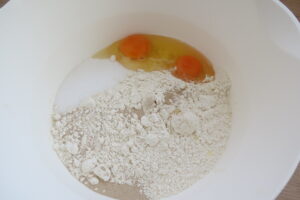
Sieve the flour into a bowl and mix it with sugar and salt. If you use the dry yeast, add it to the dry ingredients, otherwise, add the activated fresh yeast. Dissolve the butter in the (remaining) milk, add the liquid and 2 eggs to the flour and mix it well.
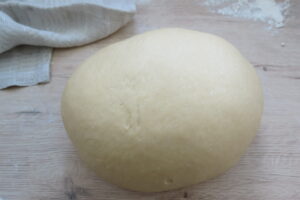
Knead the dough on a floured surface for 5 minutes until it is smooth and elastic. My mom always said: “It has to lay in the bowl like a freshly bathed baby!”
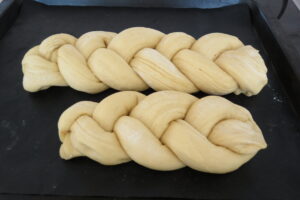
Put the dough into a bowl, cover it with a cloth and let it rest for one hour until it has risen well. Divide the dough into two pieces, the smaller one about one-third of the whole. Divide each dough piece into three parts, roll them into “cords” and make a large and a smaller braid.
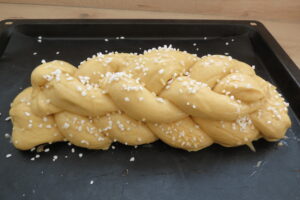
Preheat the oven to 200 °C /fan oven 180 °C. Cover a baking tray with baking parchment and set the larger braid onto the tray. Put the smaller one on top, cover the bun with a cloth and let it rest for 30 minutes.
Brush the whole braid with the beaten egg. You can now sprinkle it with sugar crystals or almond slivers or leave it like that.
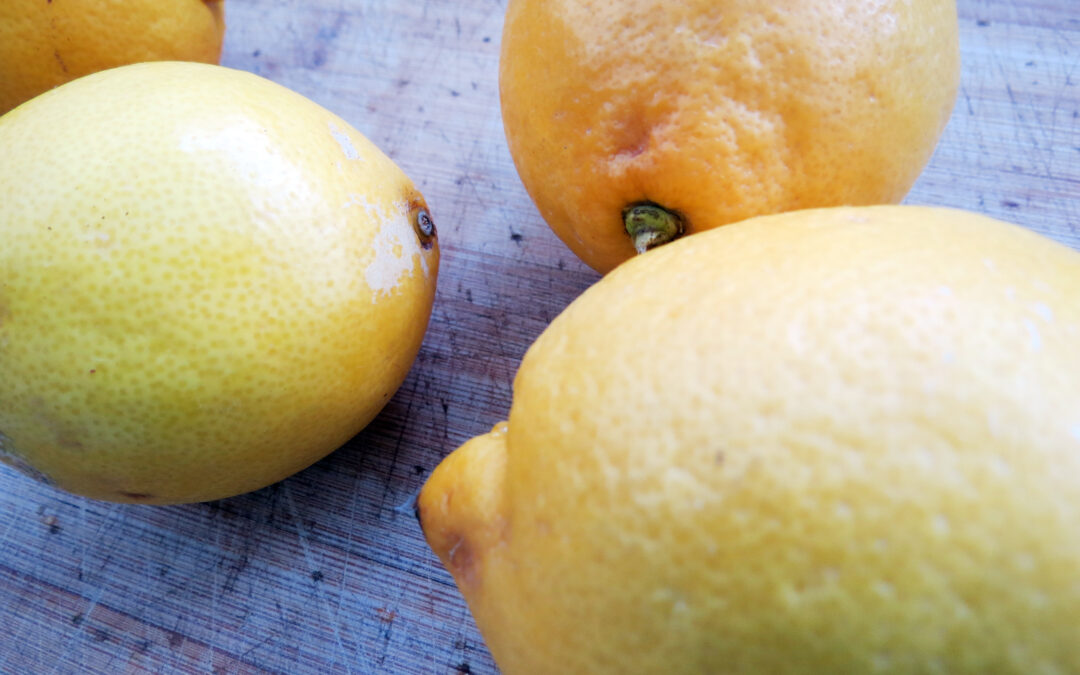
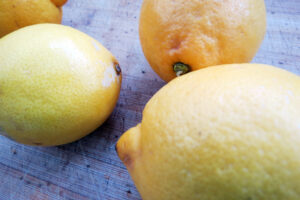
When I first heard about fermented lemons, I wondered what you could use them for. After all, if you wanted to taste something salty, you’d simply add salt, wouldn’t you? And if you wanted a dish to taste more lemony, you’d add lemons, right? But like so often, you have to try something to form an opinion. I’ll never forget the moment I first tried fermented lemons: the taste of the lemons was so enhanced, yet neither too acidic nor too salty. It was bursting with flavour and (for a short time) it rendered me speechless. A whole new world of taste had opened up and I had to have them at home. You’ll be delighted to hear that it is super-easy to make fermented lemons by yourself!
Fermented lemons
Ingredients
8 whole lemons, organic! 90 – 150 g unrefined salt 2 tbsp freshly squeezed lemon juice as necessary
Instructions
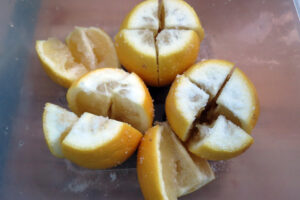
Wash the lemons in cold water, cut off the fruits’ edges (about 5 mm) and cut the lemons lengthwise twice almost (!) through. If you’ve done it right, your lemons have four wedges that are held together at the bottom. Remove the pips and put the lemons into a bowl. Sprinkle the salt into the cuttings and around the lemons.
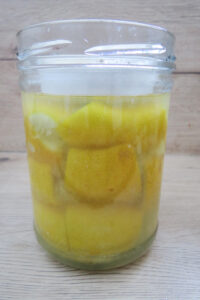
Press the lemons into your fermentation container so that the brine shows on the surface. If the lemons are not completely covered, add some lemon juice. Sprinkle the surface with 2 tbsp salt, put a weight in so that the lemons stay under the brine and close the container.
Put the container onto a tray and let the lemons ferment for 21 – 30 days at a cool place without direct sunlight. Check from time to time if they are still covered with brine.
After 21 days, the fermented lemons are ready, but you can let them ferment longer which only adds to the taste. With time, the brine becomes a bit thicker and the lemon flavour intensifies.
Store the fermented lemons in the basement or the fridge for up to 18 months.
Variations
Add spices to your fermented lemons such as cinnamon sticks, cloves, coriander seeds, peppercorns, juniper berries or bay leaves. Or you can try out limes instead of lemons and add onions, garlic, coriander seeds, cilantro and chillis. There are still so many variations to try. If you’ve further ideas, leave a comment below.
For beginners, fermentation might seem intimidating. What if it goes wrong and you accidentally poison somebody? First of all, serious illness from a properly prepared vegetable ferment is extremely uncommon, as there are some unmistakable signs of spoilage. Some occurrences, on the other hand, are quite normal. This guide will help you identify the most common fermentation problems and determine whether your ferment is perfectly safe, needs a simple adjustment, or should be discarded.
Before we dive into troubleshooting, it’s worth noting that fermentation and pickling are not the same thing. Fermentation relies on beneficial microorganisms to preserve food, while pickling uses vinegar. If you’re unsure about the difference, read my guide on fermentation vs. pickling first.
Why Fermentation Goes Wrong
Most fermentation problems can be traced back to one of four causes:
Too much oxygen
Incorrect salt concentration
Temperatures that are too high or too low
Poor-quality vegetables
Understanding these four factors will help you prevent most fermentation issues before they start.
What Healthy Fermentation Looks Like
Many beginners mistake normal fermentation for failure. But many of the signs that may irritate us are actually normal occurrences in a healthy ferment.
Signs of a healthy ferment
Bubbles: Lactic acid bacteria consume natural sugars in the vegetables and produce (amongst others) carbon dioxide, which shows as bubbles
Cloudy brine: tiny traces of microorganisms make the brine cloudy
Slight sour smell: as the name “lacto-acid fermentation” indicates, acid is produced, which makes the ferment smell sour
Colour changes: during the process, vegetables may change their colour; an example is these fermented radishes that turn from a bright magenta to a pastel pink
Sediment at the bottom: traces in the brine can settle at the bottom
Floating spices: spices are lighter than brine and sometimes get past the weight on top and float around
Quick takeaway box:
Usually normal
✔ Bubbles
✔ Cloudy brine
✔ Sour smell
✔ White sediment
Quick Fermentation Troubleshooting Guide
Problem
Safe?
What to do
Kahm yeast
✔ Usually safe
Remove surface layer
Mould
❌ No
Discard ferment
Cloudy brine
✔ Normal
No action needed
Floating vegetables
⚠ Fix it
Re-submerge
Mushy vegetables
✔ Usually safe
Improve temperature/salt
No bubble
✔ Often normal
Check smell and taste
Overflowing brine
✔ Normal
Use tray
Too salty
✔ Safe
Rinse before eating
New to fermentation? Download my free Fermentation Starter Checklist and learn the simple steps that prevent most fermentation problems before they happen.
You should know that fermentation is remarkably forgiving, and most problems we may encounter in fermentation look scarier than they actually are. White films, bubbles, strange smells, and cloudy brine, for example, are normal signs of a fermentation going right.
When I started fermenting, I worried every time the brine turned cloudy or a few spices floated to the surface. Over time, I learned that many of the things that look alarming are actually signs that fermentation is working exactly as it should.
There are, however, a few indicators that our ferment is spoiled. Knowing the difference between harmless changes and genuine spoilage is key.
So let’s have a closer look at what could make you wonder.
White Film on Top of the Brine
Sometimes, a very thin white, cloudy film can form on a ferment’s brine surface. When you try to remove it, it breaks into tiny fragments that are difficult to get onto a spoon.
This film is most likely Kahm yeast – and it’s harmless.
What is Kahm Yeast?
Kahm yeast is a layer of wild yeasts that forms on lacto-fermented goods. It always appears on the surface; that is exactly where the ferment has contact with oxygen. Its typical appearance is flat and sometimes slightly wrinkled, but it never shows a furry structure. And that’s the great difference between Kahm yeast and mould.
Important: Kahm yeast is not mould. It occurs when oxygen comes into contact with the ferment.
Reasons for Kahm Yeast in Fermentation
Kahm yeast is not an accidental occurrence but the result of certain conditions that have gone out of balance:
Oxygen: Fermentation works best in an anaerobic environment, that is, without oxygen. When the vegetables are not fully submerged under the brine, there’ll be an area on the surface where wild yeasts can grow.
Salt: A common reason for Kahm yeast is too little salt. Salt is not only important for the taste, but it also controls which microorganisms can grow. When you use too little salt, unwanted yeasts get a head start.
Floating vegetables: All vegetables or parts of them that are above the brine surface come in contact with oxygen, and that’s where Kahm yeast grows. To prevent that, we use weights in fermentation. Find more information about weights in my article about fermentation equipment.
Temperature: When it’s too warm, fermentation processes work faster – unfortunately also the ones we don’t want. Kahm yeast grows fast in temperatures above 25 °C (77 °F). The ideal temperature range for fermentation lies between 18 and 22 °C (65 – 72 °F).
Hygiene: Although you needn’t sterilise the jars and lids you use for fermentation, they shouldn’t be dirty either. Wash all your equipment – and your hands! – well with warm water before you start.
Is Kahm Yeast dangerous?
The short answer is: No. In most cases, Kahm yeast is harmless. But it can affect the ferment’s taste and make it slightly musty. Most importantly, it’s a sign that there’s oxygen in the ferment and that’s where mould can grow.
When you detect Kahm yeast on your ferment, there’s no need to discard the whole jar. Carefully remove the yeast from the surface with a spoon, then wipe the jar and the fermentation weight clean.
Afterwards, smell the ferment: when it smells fresh and slightly sour, everything’s ok. If the smell is unpleasant or “weird”, discard it.
White Sediment at the Bottom of the Jar
Often, there’s a white sediment forming at the bottom of the jar, especially some time after the initial fermentation process has ended. This sediment is completely normal.
During fermentation, dead lactic acid bacteria and vegetable particles can settle at the bottom of the jar. This white sediment is harmless and a normal sign of fermentation.
When Should You Worry?
If the sediment becomes fuzzy, colourful, or is accompanied by a rotten smell, discard the ferment.
Vegetables Floating Above the Brine
All vegetables, herbs and spices must at all times be submerged in the brine. Sometimes, however, parts of them may pop up and float above the brine.
This is a problem, because exposure to oxygen increases the risk of Kahm yeast and mould.
Why It Happens
Carbon dioxide production: in lacto-fermentation, gases like carbon dioxide form, which is why ferments bubble for a few days. These bubbles can push the vegetables upwards and sometimes above the brine.
Trapped air pockets: When the vegetables are not pressed tightly into the jar, air pockets may remain where the brine won’t get in.
Solutions
Always use fermentation weights to keep the vegetables under the brine.
Gently press the vegetables under the brine, keep them down with a weight and, if necessary, top the jar up with salt water.
Check your jars daily during fermentation. That way, you can spot air pockets or floating vegetables early on and act accordingly.
Mould Growing on the Surface
Contrary to Kahm yeast, mouldy ferments must always be discarded.
How Mould Looks Different
While Kahm yeast is flat, even and like a white film on the surface, mould grows in sections. It’s often coloured – either green, black, blue, or even pink – and, most importantly, it has a fuzzy, hairy appearance.
Why Mould Develops
The reasons for mould growth on a ferment are similar to those of Kahm yeast:
Oxygen: Mould needs oxygen to grow. So, when there’s oxygen in the ferment, mould can develop.
Salt: Too little salt cannot keep harmful bacteria or fungi, like mould, at bay.
Floating vegetables: All vegetables or parts of them that are above the brine surface come in contact with oxygen, creating a perfect environment for mould. Use fermentation weights to keep everything under the brine.
Overripe or defective vegetables: they may already contain mould spores that grow further in the ferment.
Hygiene: Wash all your equipment – and your hands! – well with warm water before you start.
Is Mould Dangerous?
Yes, it is, and for that reason, you must discard ferments that have become mouldy.
My Ferment Smells Bad
When you’re new to fermentation, the right smell may be unknown to you. So let me tell you what good fermentation smells like:
The contents of a jar of lacto-fermented vegetables should smell sour, tangy and a little bit yeasty.
When, instead, you get smells like rotten meat, putrid, or like sewer or even vomit, that’s a clear warning sign! Always discard ferments that smell bad.
Why it happens
Salt: The most likely cause for a bad-smelling ferment is contamination with harmful bacteria, and that’s almost always due to an improper salt ratio.
Temperature: When temperatures are too high, harmful bacteria may grow faster than the beneficial ones.
Solutions
Always stick to the required amount of salt, which should be at least 2, better 3 – 5 % of the weight of the vegetables.
Keep an eye on the temperature: the ideal fermentation temperature range is between 18 and 22 °C (65 – 72 °F).
Soft or Mushy Vegetables
Usually, fermented vegetables stay crunchy. Yet, sometimes they may go soft and mushy. I’ll tell you why.
Why it happens
Temperature: When temperatures are too high (above 25 °C/77°F), the vegetables can become softer
Time: With time, ferments become softer or mushy, even though they have been stored in a cool place, where fermentation slows down but never really stops completely.
Salt: As with the other problems, the correct amount of salt can prevent this problem, as well.
Naturally softer vegetables: cabbage, carrots, and radishes are crunchy, but vegetables like pumpkin or zucchini are naturally a lot softer and thus can become mushy during fermentation.
How to Prevent It
Always stick to the required amount of salt, which should be at least 2, better 3 – 5 % of the weight of the vegetables.
Keep an eye on the temperature: the ideal fermentation temperature range is between 18 and 22 °C (65 – 72 °F).
Use fresh vegetables, at best directly after harvesting.
The Ferment Is Not Bubbling
A sure sign of a successful fermentation start is the formation of bubbles, but what if there’s no sign of them?
Why it happens
Temperature: While temperatures above 25 °C / 77 °F increase the risk of mould or Kahm yeast, temperatures below 18 °C / 64 °F can slow down the fermentation process or take longer for it to start.
Slow starter culture: if you use a starter culture like brine from an earlier ferment, it may contain only a small amount of active microbes. It’ll take them some time to reproduce and do their work.
Fermentation already completed: bubbles only form at the beginning of the process. When the main work is done, they’ll disappear – a sure sign to put the jars in a cool place.
Small batch size: the larger the container, the more vegetables you use and the more microbes are in the ferment. In reverse, that means the smaller the batch, the fewer microbes you have.
How to Tell if It’s Still Working
Before you give up, look out for
Aroma changes: smell the ferment and look for all the signs I described earlier.
Brine cloudiness: it’s a sure sign of an active fermentation when the brine gets cloudy.
Taste changes: when the ferment tastes sour, tangy and slightly yeasty, it has been fermented.
Brine Overflowing From the Jar
Overflowing brine is actually a clear sign of active fermentation!
Why It Happens
Lactic acid bacteria convert vegetable sugars into lactic acid and carbon dioxide. This gas forms the bubbles and develops a certain pressure within the jar, which can press the brine out of the jar.
What To Do
Always place the jars on a tray where the brine collects and can be removed later.
Leave adequate headspace: leave at least 2 cm (about 1 inch) between brine surface and lid so that there’s room for expansion.
Brine Level Has Dropped
When brine flows out of the jar, it sometimes occurs that there’s too little left in the jar. Another cause for a dropped brine level is evaporation or the shrinkage of vegetables due to water loss.
Solutions
If that happens, you can simply add more brine. Just mix 20g salt per 1 litre of water, mix it thoroughly until the salt has dissolved, and top the jar up.
My Ferment Is Too Salty
While a certain salty taste is normal, too salty is too much.
Why It Happens
Measuring by volume: always weigh the vegetables and calculate the amount of salt necessary. This is way more accurate than measuring by volume.
Salt: the salt concentration should be between 2 and 5 %.
But what to do when the ferment is too salty?
Solutions
Rinse before eating: take out the portion you want to eat and put it into a bowl with clear water. Rinse it and repeat this process until all the salt has been washed out. Let it drain in a sieve (plastic or acid-proof metal) for 15 minutes and taste it.
Mix with fresh vegetables
Use it in cooked dishes, for example with extra sauce to dilute the salt.
My Ferment Isn’t Sour Enough
Imagine opening a jar of homemade sauerkraut, only to discover that it’s just kraut without the sour.
Why it happens
Fermentation time: this is the most common reason for ferments that are not sour enough. Fermentation and the development of lactic acid takes its time.
Cool temperatures slow down the fermentation process, and it takes longer to create that sour taste.
Solution
That’s easy: simply ferment the vegetables longer. Fermentation cannot be rushed, and patience is the key.
When Should You Throw a Ferment Away?
More often than not, a ferment is perfectly safe to eat. There are, however, a few warning signs that indicate a ferment should be discarded.
Discard it if you see
Usually safe
❌ Fuzzy mould
✔ Cloudy brine
❌ Pink mould
✔ Bubbles
❌ Black mould
✔ White sediment
❌ Orange mould
✔ Kahm yeast
❌ Rotten smell
You can download my fermentation starter checklist, a free printable with all the ingredients for a successful fermentation at home.
Frequently Asked Questions About Fermentation Problems
Can I scrape mould off fermented vegetables?
No. If mould is present, discard the entire ferment.
Is Kahm yeast dangerous?
No. Kahm yeast is usually harmless but may affect flavour.
Why is my brine cloudy?
Cloudy brine is typically a sign of active fermentation.
Why isn’t my ferment bubbling?
Temperature, batch size, or fermentation stage may be responsible.
Can fermented vegetables be too salty?
Yes, but they can often be rinsed before eating.
Can I eat vegetables that floated above the brine?
If they were only briefly exposed and show no signs of mould, they are usually safe. Re-submerge them as soon as possible.
Is white sediment mould?
No. White sediment at the bottom of the jar is usually dead lactic acid bacteria and is perfectly normal.
Fermentation problems can happen – know how to deal with them.
Every experienced fermenter has encountered cloudy brine, floating vegetables, overflowing jars, or a layer of Kahm yeast at some point. Fermentation is a learning process, and most problems are easy to prevent once you understand what’s happening inside the jar.
Trust your senses, follow a few key fermentation principles, and you’ll soon discover that fermentation is far less intimidating than it first appears.
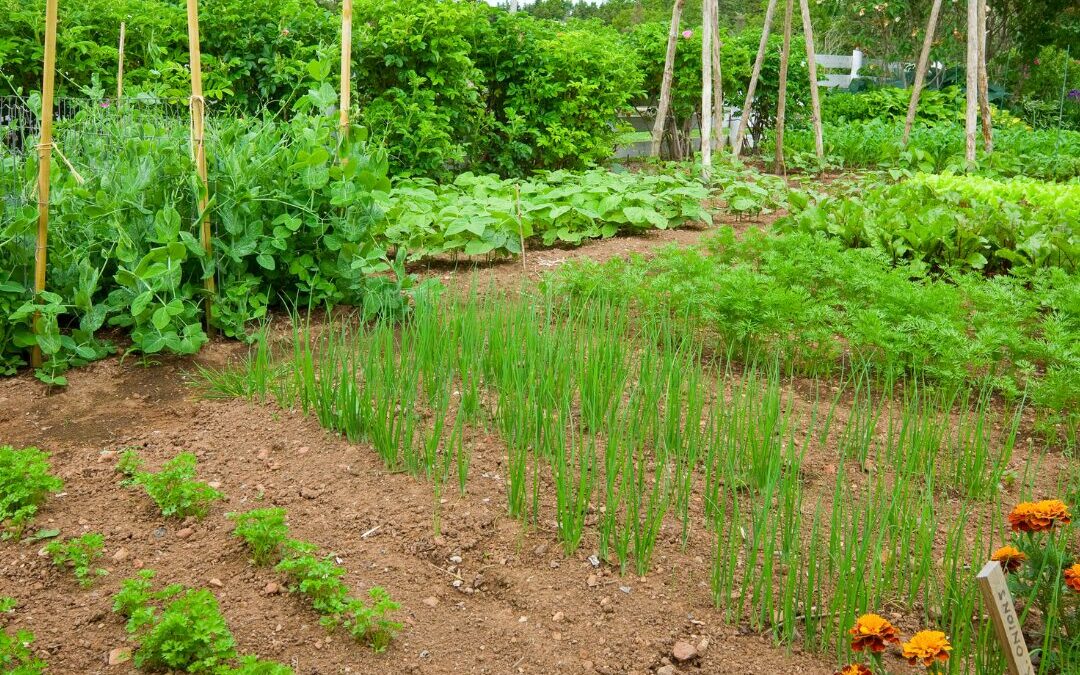
Are you dreaming of starting a vegetable garden and harvesting fresh produce:? A small vegetable patch is the first step to a whole new quality of life: the best food, fresh air and a contribution to a “greener” world. Let’s take this fantastic step together so that you can make your dream come true!
How to make a vegetable patch
You want to make a vegetable patch, maybe even a whole vegetable garden? You want to dig into the soil with your hands, and inhale this wonderful earthy scent? And you want to harvest vegetables that are fresher and tastier than anything you can buy in a shop?
That’s wonderful!
In this article, I show you step by step how you can create low-maintenance and fertile vegetable patches without tilling, and superfast, too. With a few tricks, it’ll not only be fertile from the beginning but it’ll also stay weed-free.
Let’s dive in.
Why no digging when creating a vegetable patch?
Admit it: when you think about creating a vegetable patch, you first think about digging up the earth, right? I know it was common in most gardens for a long time. Today, however, science tells us that it’s probably better for our soil to not dig at all. Which is great for both, the microorganisms and our backs.
Did you know that there are more microorganisms in a handful of garden soil than human beings on the earth? These tiny invisible helpers are immensely important for fertile soil.
Imagine an earthworm, for example, who usually looks for food at the surface of the earth but has to go hungry if you dig up the soil. He suddenly finds himself out there while his food is three floors below. That’s a catastrophe – not only for the earthworm without any sunscreen but also for soil fertility.
The trick is now to NOT disturb the microorganisms but to work with them from the very beginning. That’s why we create our vegetable patches without digging.
Start a vegetable patch in 5 steps
Let’s create a low-maintenance and high-yield vegetable patch!
Step 1: Prepare the ground
The first step is easy! The only thing you have to do is wait until the grass is long. When the grass is too short it cannot be bent. Then the pointy tips can easily penetrate the cardboard that we put onto the lawn. The cardboard suffocates long bent grass and it dies.
So, the first step in creating a vegetable patch: let the grass grow under your feet 😊!
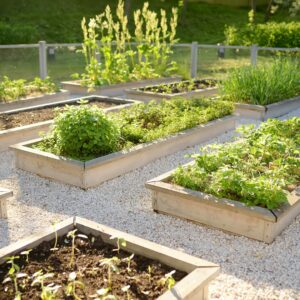
Step 2: Dig in a lawn edging border
When making a vegetable patch, dig in a lawn edging border along the outer edge of your patch. Weeds and grass must stay outside. With a lawn edging border you make sure that no uninvited guests grow into the patches and reconquer them. To kill to birds with one stone, you can use a metal snail barrier which not only keeps the weeds but also the snails out. I have chosen to use that, as my garden is on a meadow.
Dig a v-shaped hole into the ground and put in the border so that about five centimeters are showing. I prefer this lawn edging border that also works as a slug barrier. It’s made of metal which is more durable than plastic edges that release microplastic into the garden when decomposing.
My patches are all 1,2 m broad because I can work them without contorting. I can reach the middle of the patch from every side without balancing or doing acrobatics.
Step 3: create bed borders (optional)
The lawn edging border is not very appealing and you sometimes may even stumble over them. For that reason, you may conceal it a bit. How about a bed border made from wooden trunks? Stabilize them with small stakes so that they are firmly in place and cannot roll away.
Other possibilities may be stones, boards, tiles, or deadwood. Many things are possible. Just make sure that the bed borders are not too high and throw a shade onto your vegetables.
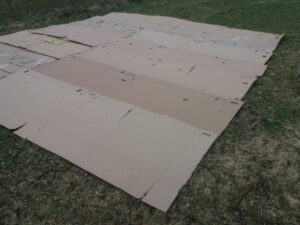
Step 4: Cardboard, gimme cardboard!
Now you get blank cardboard. It’s important to remove all tapes and staples so they do not get into the soil. Put the cardboard within the bed borders, overlapping at least 10 centimetres.
If you don’t have enough cardboard: ask your local bike shop. They have large cardboard transport boxes from the bikes which are great for a vegetable patch. They are huge and usually without print.
If you don’t want to use cardboard, anti-weed fabrics made of natural fibers that break down without any remnants are a good alternative.
Another possibility is to replace the cardboard with a layer of mulch. Apply 10 cm lawn cuttings or leaves and let it dry thoroughly. Then, distribute compost evenly on it.
Step 5: Spreading compost
Attention, ladies and gentlemen: here comes our star guest: his Royal Highness the Compost honors us with his entry into the garden!
That means you spread a 10 – 15 cm thick layer of mature compost on your beds
If you don’t have enough mature compost (which is likely when you want to start a vegetable garden), ask your local composting plant if you can buy some. It’s usually cheaper than a garden centre. In any case, make sure that the compost is made of organic material. Otherwise, it may contain lots of plastic – and we don’t want that in your vegetable garden!
I recommend using compost from green cuttings.
Bonus: Garden paths
Congrats: you now know everything about how to make vegetable patches. But also keep in mind that you may need garden paths, especially when you are creating several patches. You may separate them with woodchip paths. Plan the paths about 40 cm wide so that you can pass through with a wheelbarrow. Just spread the woodchips onto the cardboard. That way you can create easy-care garden paths in no time.
The patch is ready – what now?
The patch is ready, now it’s time for planting and/or sowing. You can plant or sow directly into the compost beds. The cardboard will decompose very soon so that the plant roots can grow through it without difficulty.
And earthworms, by the way, love soggy cardboard. Don’t worry: they’ll find their way to the surface.
You see: creating a vegetable patch is totally easy. The only thing you have to do is go outside and start! With these tips and tricks, you’ll create a vegetable garden in no time 😊