.
You wanna start fermenting and dread what you have to buy for it? No worries! The cool thing about fermentation is that you don’t need any fancy fermentation equipment. A bowl, a cutting knife and board, glass jars or other containers as well as a weight to press the vegetables under the brine are enough to start. Let’s have a look at the basics you need and some of the fancy stuff you might want to buy later:
Fermentation equipment: Containers
First of all, please make sure that you don’t use any containers made of metal or plastic. Metal reacts with acid which can lead to a dissolving of metals into the brine. This can cause serious health problems! The same applies to plastic: not all plastics are acid-resistant. The softer the material the stronger it reacts to acid. If you use freezer bags as weights, make sure they don’t contain PVC or BPA.
Fermentation crocks
Traditional fermentation crocks have proved their worth as they store the vegetables dark and cool. If you buy a new one, check out its net weight as they are usually very heavy. Then add the weight of the vegetables and brine and think about if you can lift it when it’s full.
Glass jars and lids
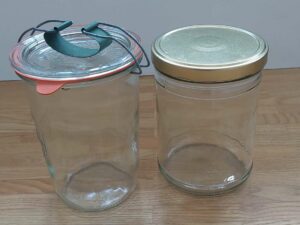
I usually use twist-off or flip-top jars. They are cheaper than crocks and you can ferment smaller portions. Additionally, you can see through the glass what’s going on inside. On the other hand, it’s more likely that brine will bubble over the rim and you’ll have to put it on a dish or into a bowl to prevent a mess.
Airlock systems grow in popularity because they make things a whole lot easier. With an airlock, you can leave the whole thing to itself. You must make sure, however, that you leave enough space from the top of the brine to the top of the glass jar, at least 2 – 3 fingerbreadths.
Note: I know that many people just use clean cloth to cover their jars or open the jars every day during fermentation but the risk of mould-forming is so much higher with these methods! I always use the lid and – in case of twist-off jars – secure it loosely or – in case of flip-top jars – secure it tightly. The gases can leak out either under the lid or the rubber ring and you minimize the risk of mould-building.
Cutting devices
It’s great if you have a cabbage slicer as part of your fermentation equipment, especially when you want to make sauerkraut or ferment other cabbages. As the name indicates, it’s great for cabbage slicing and it’s way faster than cutting cabbages with a knife.
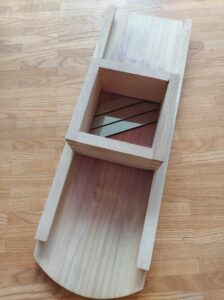
If you’re just starting, however, you don’t need a slicer as you can also do the job with a knife and a cutting board.
I know that some people use the cutting or grating device of their kitchen machine. Go ahead if you like, but make sure that the slices are not too thin and mushy.
Bowls
Nothing to add: you just need a bowl of any kind (glass, metal or plastic) where you can gather all your sliced vegetables and mix them or knead them if you make sauerkraut.
Weights
Some people don’t use weights for fermentation, but I find them extremely helpful to keep the vegetables under the brine. Crocks usually come with suitable weights but if you don’t have any, you can use a dish for example.
You can also use stones but depending on their lime content they might react with the acid. You should at least boil them for 10 minutes before using.
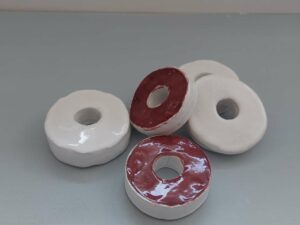
There are also glass weights which are great, especially regarding hygiene. They are, however, comparatively expensive.
For beginners, I recommend using freezer bags. Fill them with water or pebbles and put them onto the covering (e.g. a cabbage leaf) to keep the veggies under the brine.
As I ferment a good deal and neither wanted to add to the waste with all those freezer bags nor wanted to sell my soul for good fermentation weights, I decided to make my own out of clay. I cut out circles of a 1 cm thick slice of clay, making their diameter slightly less than the opening of my jars. Then I cut a hole in the middle and glazed and baked the clay weights. During baking, they shrank a bit further and now their size is perfect for my jars.
You can also make weights from hardwood that doesn’t secrete resin like walnut. Keep in mind, though, that wood swells in brine! Saw a circle with a diameter of one centimeter less than the opening and drill a hole into the middle where the brine could get through. Put the wooden weight into water for one to two days and look how much it swells before you use it. I’ve never used them as I find the clay weights perfect for my needs but go ahead and try making wooden weights if you like and leave me a comment about it!
Tamper

Again, it’s great if you have a wooden cabbage tamper to squeeze the cabbage (or other vegetables) into the jars really tightly, but it’s not necessary to start fermenting. You can always use your hands or a (clean!) empty bottle to press the vegetables into your containers.
I’m sure you’ll find all the necessary fermentation equipment in your kitchen and don’t have to buy anything new. You can always add fancy things to your birthday list 😉 Let’s start fermenting!