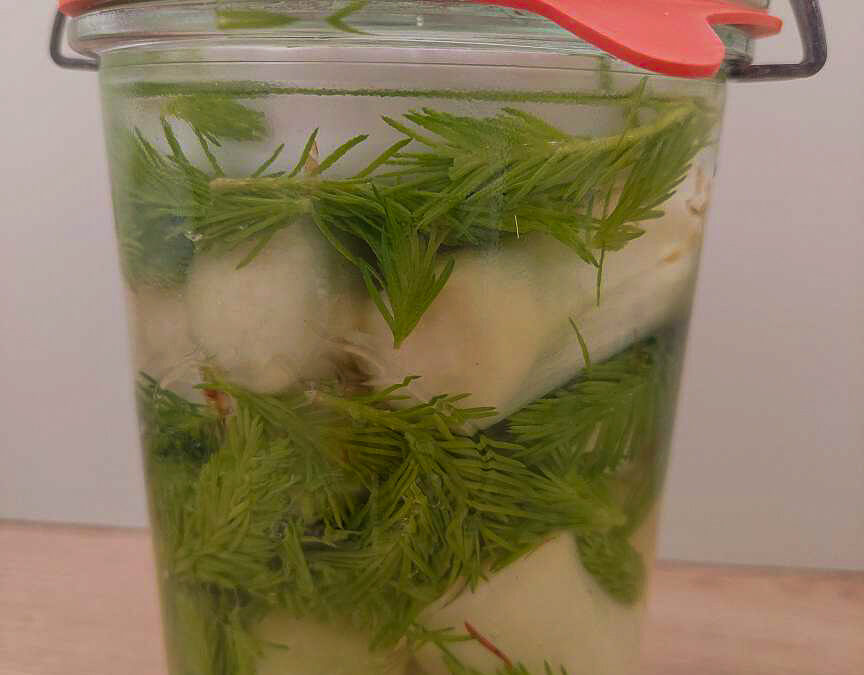
For quite a long time, I only ate asparagus with sauce hollandaise and young potatoes, topped with some bacon if I felt adventurous. Not because I like asparagus best that way but because I didn’t know it in any other way. So, when a short while ago, I tasted raw white asparagus for the first time I was thrilled by its fresh taste of young shoots. These days, whenever I buy asparagus, I have to force my willpower not to eat the whole bunch just like that. Spruce tips have a lemony, slightly dry taste and go well with the crisp asparagus. You can forage the spruce tips in April and May. The younger they are, the more delicate they taste. Alas, nothing is forever, and the season for both, asparagus and spruce tips is very short. What would be more logical than preserving both for when they won’t be available? And what better way than fermenting to keep the asparagus crisp and all the nutrients alive. The best thing is: you won’t need many ingredients for this simple recipe for fermented asparagus with spruce tips.
Fermented asparagus with spruce tips
Ingredients
Shelf life: several months
500 g white asparagus
salt
water
1 handful of spruce tips
Instructions
1. Peel the white asparagus and cut it into pieces of 4 – 5 cm (about 2 inches).
2. Mix the asparagus and the spruce tips with 30 g salt in a bowl and let it rest for 30 minutes.
3. Put the asparagus and spruce tips into glasses and fill them up with a salt solution of 3 % (30 g salt on 1 litre of water). Put a weight on top of the asparagus to keep everything well under the brine.
4. Close the lid and let the vegetables ferment at a dark and warm place for about one week.
5. When the taste is to your liking, store the asparagus in the fridge.
Both, asparagus and spruce tips are such great foods to experiment with. For example, have you tried out this recipe for tarte flambée with asparagus and walnuts? It’s delicious. Or get over here and read how you can make a very easy homemade spruce tip honey and preserve the flavour of a spring forest. I’m not done with trying out new recipes either. Stay tuned!
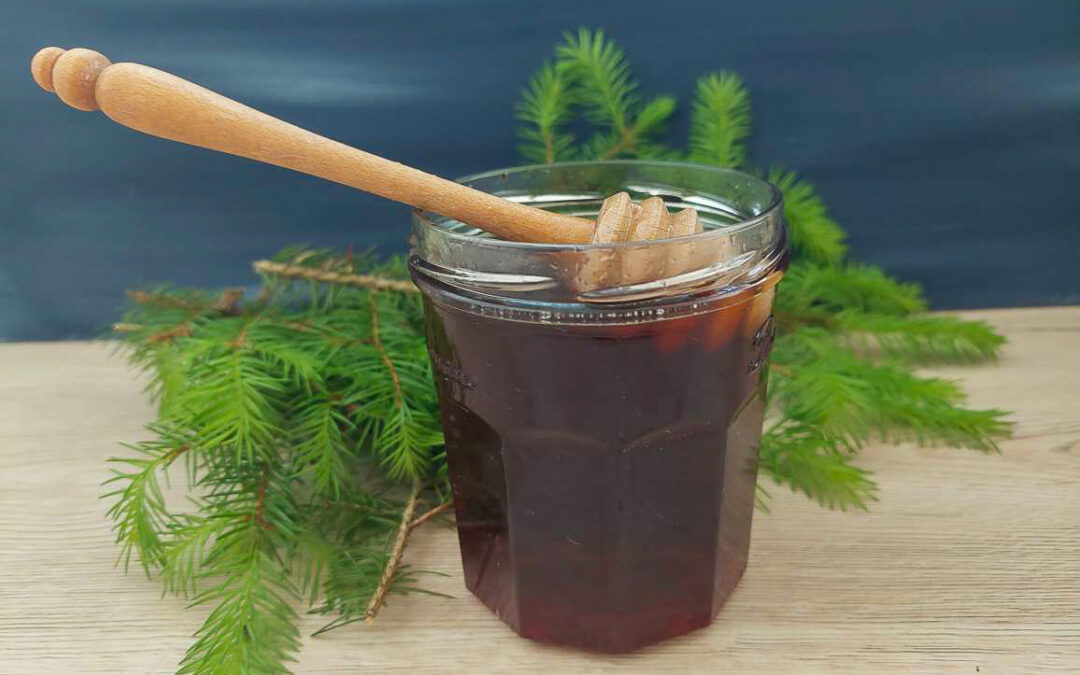
Every spring, the firs and spruces grow new, light green tips filled with the fresh scent of the forest. These tender shoots taste surprisingly citrusy – and with a little patience, you can transform them into a delicious golden-rosy syrup known as spruce tip honey.
I have been harvesting spruce tips every spring for years, and this recipe has become my favourite way to preserve their flavour.
This simple recipe captures the flavour of a spring forest and preserves it for the entire year.
Spruce Tip Honey at a Glance
🌲 Best harvest time: April–May
⏱ Active cooking time: about 2–3 hours
🫙 Yield: approx. 1.2 kg
🌿 Difficulty: Easy, but slow
🍯 Taste: citrusy, resinous, honey-like syrup
📅 Shelf life: at least 1 year
Is Spruce Tip Honey Real Honey?
Homemade spruce tip honey is not real honey; that’s only made by bees. It is, however, a vegan alternative made from foraged spruce tips and sugar.
The advantage is that we can benefit from all the valuable ingredients in the young spruce tips.
Fir and spruce tips contain a high amount of vitamin C and essential oils that are said to be expectorant, antibacterial and soothing.
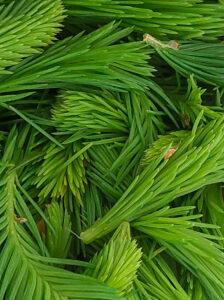
What Are Spruce Tips?
Spruce tips are the young shoots that grow on the ends of spruce tree twigs. They start growing in April through May and can be identified by their light green colour, which distinguishes them from the older, dark green needles.
Spruce tips contain essential oils, but not as much as the older needles and the wood. They taste slightly citrusy and sweet, and you can eat them directly from the tree.
When to Forage Spruce Tips
Note on foraging:
Only take what you can classify without any doubts. Foraging and using foraged plants is at your own risk. Remember that some plants are toxic.
Children, pregnant women, people under medication and those with chronic diseases should additionally consult with their medical practitioner before consuming foraged plants.
Never forage near busy roads.
Depending on the weather, you can forage spruce tips from mid-April until the end of May, just as long as they are still light green. When they get darker and their colour adjusts to that of the older needles, their content of essential oils decreases, and they become harder and more resinous.
To ensure that we don’t weaken the trees, we only pick 2 – 3 spruce tips per twig – we don’t want to steal all the new needles from the tree. Even better, pick the tips from different trees.
By the way, this is a great project for children, especially as the outcome will be something sweet. 😊
How to Identify Spruce Tips Safely
Spruces (Picea) are common needle trees in Mid- and Northern Europe and Northern Asia, as well as in large parts of North America and Canada.
Their needles grow regularly around the twig (in contrast to firs that grow their needles vertically). When you touch a spruce twig, the needles will prick (again in contrast to firs, which are soft to the touch).
Spruce cones hang down from the twig, whereas fir cones grow upwards.
If you’re completely new to the topic of trees, there’s a slight risk of confusing spruce (or fir) with yew trees, which are highly toxic. To avoid that, check the needles (yews’ are very round, soft and dark green to almost black). Also, yews don’t have cones but red berries, and they grow bulbous instead of conical.
Spruce tips have been traditionally used in Northern and Central European herbal traditions for syrups, cough remedies, and spring tonics.
Let’s dive into how to make spruce tip honey at home.
Spruce Tip Honey
Ingredients
Yield: about 1,2 kg spruce tip honey
Shelf life: at least one year
300 g spruce tips
1 litre of water
approx. 750 g sugar
1 organic lemon (optional)
How to Know When the Honey is Ready
If you’ve never made spruce tip honey before, it can be a bit tricky to know when it’s ready to fill into jars. Believe me, I know what I’m talking about…
Too early, and it stays runny and will drip off your toast; too late, and it becomes too thick to spread, and you’ve got to hammer it out of the jar.
However, making spruce tip honey is less about timing and more about learning to read the syrup.
There are a few indicators you can observe to check when the honey is ready for filling:
The syrup’s colour turns to gold or rosy
The simmering mixture develops a fine bubbling foam on the surface
The syrup covers the back of a spoon and slowly drips off
When you pour some drops on a cold (!) plate, it thickens to a honey-like quality
The honey becomes even thicker when it’s cool, so it’s better to fill it sooner rather than later.
Before You Start: Helpful Tips
Once you get the knack of it, spruce tip honey is an easy-to-make staple. Just observe these tips and avoid the following mistakes:
Forage “clean” plants, that means get into the forest and never forage near busy roads.
Harvest only soft, light-green tips. Older ones don’t taste as good and are too thick to release essential oils.
Don’t skip the soaking, cooking and resting time. Each step releases flavour and essential oils.
Stay near the syrup when you boil it and stir it regularly so that it doesn’t scorch.
Check your honey for readiness and fill it immediately.
2. Wash the spruce tips and put them into a pot. Pour the water over them and cover them with a plate so that they stay beneath the surface level. Let them rest there for about 12 hours (best overnight). During soaking, the spruce tips release pollen and thus flavour into the water.
3. Cut the lemon into slices and add them to the water and spruce tips.
4. Bring the mixture to the boil and keep it at a low simmer for about 45 minutes. The water will turn cloudy; that’s perfectly normal, it’ll turn transparent again during cooking.
This simmering process slowly releases the essential oils.
5. Let the brew cool down and let it rest for another few hours. I usually let it rest overnight, which is perfectly fine.
6. Now, strain the mixture through a fine sieve or cheesecloth off the spruce tips and collect the liquid. Press the tips out thoroughly.
7. Measure the amount of liquid you gathered and add the same amount of sugar.
8. Bring the mixture to the boil while constantly stirring. Make sure that the sugar has dissolved completely. Let it simmer over a low flame for about 1-2 hours (mine took 1.5 hours). Make sure you stir the mixture from time to time so that it doesn’t scorch.
9. When the mixture starts to form a bubbly foam and gets slightly thicker, check if it’s ready (see “How to know when the honey is ready”) and fill it into the jars.
10. Securely close the twist-off lids and let the honey cool down.
For a printable version with exact measurements, use the recipe card below.
Spruce Tip Honey
Capture the essence of a spring forest with this delicate spruce tip honey that transforms young evergreen shoots into liquid gold with bright, citrusy notes.
Sterilise the jars and lids you want to use for your homemade spruce tip honey.
Wash the spruce tips and put them into a pot. Pour the water over them and cover them with a plate so that they stay beneath the surface level. Let them rest there for about 12 hours (best overnight).
Cut the lemon into slices and add them to the water and spruce tips.
Bring the mixture to the boil and keep it at a low simmer for about 45 minutes. The water will turn cloudy.
Let the brew cool down and let it rest for another few hours or overnight.
Now, strain the mixture through a fine sieve or cheesecloth off the spruce tips and collect the liquid. Press the tips out thoroughly.
Measure the amount of liquid you gathered and add the same amount of sugar.
Bring the mixture to the boil while constantly stirring. Make sure that the sugar has dissolved completely. Let it simmer over a low flame for about 1-2 hours (mine took 1.5 hours) and stir it regularly.
When the mixture starts to form a fine bubbling foam and gets slightly thicker, check if it's ready (see "How to know when the honey is ready") and fill it into the jars.
Securely close the twist-off lids and let the honey cool down.
Notes
Stored in a cool and dark location, spruce tip honey can be stored for at least one year. Once open, store the jar in the pantry and consume it within several months.
How to Store Homemade Spruce Tip Honey
Once the honey is cool, store the jars in a cool and dark place (like a basement or pantry). There it’ll last for at least one year. I usually store mine in the pantry, where it easily lasts until the next spring harvest.
Boiled sugar syrups can last significantly longer, but, honestly, I can’t tell you from experience how long, as we always eat it up well before the first year’s up.
Once a jar is opened, you can keep it in the pantry (no need for refrigeration). It can crystallise when it stays open for too long, but that’s only a matter of aesthetics and won’t alter the taste.
Uses for Spruce Tip Honey
Spruce tip honey is a wonderful vegan alternative to bees’ honey, and it can be used exactly like that.
Spread it on a warm buttered slice of bread and enjoy it for breakfast.
Sweeten your tea with a teaspoon of spruce tip honey. Its essential oils are said to help fight off colds.
Instead of sugar, add homemade spruce tip honey to salad dressings
Glaze roasted vegetables with spruce tip honey.
Use it in marinades for meat and fish. It adds a more complex array of flavours.
No — spruce tip honey is not made by bees. It is a thick herbal syrup made by extracting flavour from young spruce tips with water and sugar. Because of its colour, texture, and sweetness, it can be used much like traditional honey.
2. When is the best time to harvest spruce tips?
Spruce tips can usually be foraged from April to late May, depending on the weather and altitude. Harvest them when they are still soft, bright green, and easy to pinch off. Once they darken and become firm, they develop a stronger resinous flavour.
3. How do I know if I picked the right tree?
True spruce trees have:
sharp needles growing individually from the branch
needles that roll easily between your fingers
hanging cones (if present)
Always identify trees with certainty before harvesting, as some evergreen species are toxic.
4. How long does spruce tip honey last?
When poured hot into clean jars and sealed properly, spruce tip honey keeps for at least one year in a cool, dark place. After opening, store it in the pantry and use it within several months.
5. Why is my spruce tip honey too runny?
The syrup usually thickens as it cools. If it remains too thin, it likely needs more simmering time to reduce the liquid. You can gently reheat it and simmer a little longer until it coats the back of a spoon.
6. Can I reduce the amount of sugar?
Sugar is essential for preservation and texture. Reducing it significantly may shorten shelf life and result in a thinner syrup. If you prefer a less sweet version, make a smaller batch and store it refrigerated.
7. What can I use spruce tip honey for?
Spruce tip honey is wonderfully versatile. Try it:
in tea or warm water
drizzled over yoghurt or porridge
in salad dressings and marinades
as a glaze for vegetables or cheese
as a soothing syrup during the cold season
Spruce Tip Honey – a Cheap Evergreen Staple for Your Pantry
We gardeners, homesteaders, cooks and bakers always try to make the most of all we can harvest. It’s only natural, then, that we want to preserve the flavour of each season to use it all year round.
Making spruce tip honey is more than a recipe — it is a way of bottling spring itself. Long after the fresh green tips disappear from the trees, their bright forest flavour remains in every spoonful.
And whenever you flavour your morning toast or yoghurt with homemade spruce tip honey, when you glaze an array of roasted vegetables with it or when you stir it into your tea on a cold winter evening, you’ll not only remember the wonderful time in spring but also bite into the concentrated flavour of the forest.
For more information about preserving, you can visit my preserving site, and if you’re also interested in gardening, you might want to look at my gardening hub.
A meadow full of blooming dandelions looks like the sun is shining from the ground upwards. It’s such a pretty sight! Thinking about the lifeforce and vitality of dandelions, however, I have seen gardeners go crazy: no matter how often you cut them off, they’ll always get back. Even if you try to pull out their roots and not get every last bit out, they’ll be right here again. And once they start to develop those pretty little seeds, you know you’re doomed.
Instead of fighting against those little bursts of sunshine, however, we can use them for our health and palates! A wonderful way to preserve not only the taste but also the health benefits of dandelions is by making a “honey” out of the dandelion flowers.
In my garden, there are rarely any dandelions. I’ve eaten them all. It’s still lovely to watch the look of horror passing over people’s faces when they watch me eating a dandelion flower. Ah, the little pleasures in life… Anyway, on the adjoining meadow there are numerous dandelion flowers every spring and believe it or not, I’m grateful for that. Where would I else get the flowers for a sweet and tasty dandelion honey?
Dandelion honey – Recipe
Yield: 5 to 6 glasses (ca. 120 ml)
Ingredients:
about 500 g dandelion flowers (about 4 hands full)
1,5 l water
1 kg sugar
juice of one lemon
Instructions:
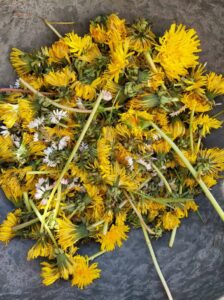
1. After you’ve gathered the dandelion flowers, put them into a bowl or flatly onto a tray and put them outside for about an hour. All the insects, especially those little black beetles will go away. Wash the flowers carefully and put them into a large pot.
Freshly picked dandelion flowers. As you see, I’ve also added some daisies.
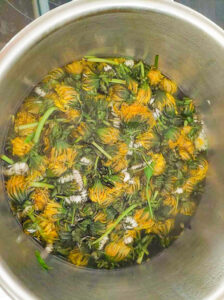
2. Fill the water into the pot and press the flowers down into the water so that they are covered by it. Let them sit for two hours.
3. Bring the water with the flowers to the boil. Boil rapidly for 20 seconds, remove the pot from the heat and let it sit overnight (12 – 24 hours).
4. The next day, remove the flowers with a slotted spoon and ladle them into a cheesecloth. Press them out thoroughly, every drop counts.
5. Add the sugar and lemon juice to the dandelion brew and bring it to a boil under constant stirring. Make sure the sugar dissolves completely, otherwise it may set at the base of the pot and burn.
6. Let the syrup simmer without a lid for about two hours. Remove the pot from the heat and let it cool down for about half an hour (or completely if you have more urgent things to do.
7. Bring the syrup back to a boil and let it simmer again while stirring it from time to time. Do not leave the pot for long. When bubbles start to form that will not dissolve when you stir, the time to pour the thickened “honey” into jars has come. Even if it seems to be too liquid, don’t worry. It’ll thicken up when it has cooled down.
When the dandelion honey starts to look like that, it’s ready to be filled into jars.
Determining the right time to fill the jars can be tricky but when you’ve made some “honeys”, you’ll get the experience. If you’ve filled the honey too soon, it’ll stay a bit too liquid to spread onto your bread. In that case, just put the stuff back into a pot and let it simmer a bit longer. If you’ve waited too long, however, the honey may get a slightly burned taste and become too thick, sometimes even solid. In that case, the only thing you can do is throw off the whole batch (good luck with removing it from the jars). There is no chance of making a too-thick honey liquid again.
Dandelion honey: Tasting
Let the jars sit overnight until they’ve fully cooled down. Your sirup will now have a wonderful brown colour and a honey-like texture. Try it on some buttered bread or a braided yeast bun. It’s sweet, tastes a bit like a spring flower meadow and very similar to real honey.
This is a great way to not only get rid of unwanted weeds but also preserve them at next to no cost. Adding to that, it’s totally easy! You only have to watch out for the right time to fill the honey in jars (remember: better too soon than too late).
And when you open one of these jars next winter and thickly spread the honey onto your buttered bread, it will certainly bring back the sunshine to you.
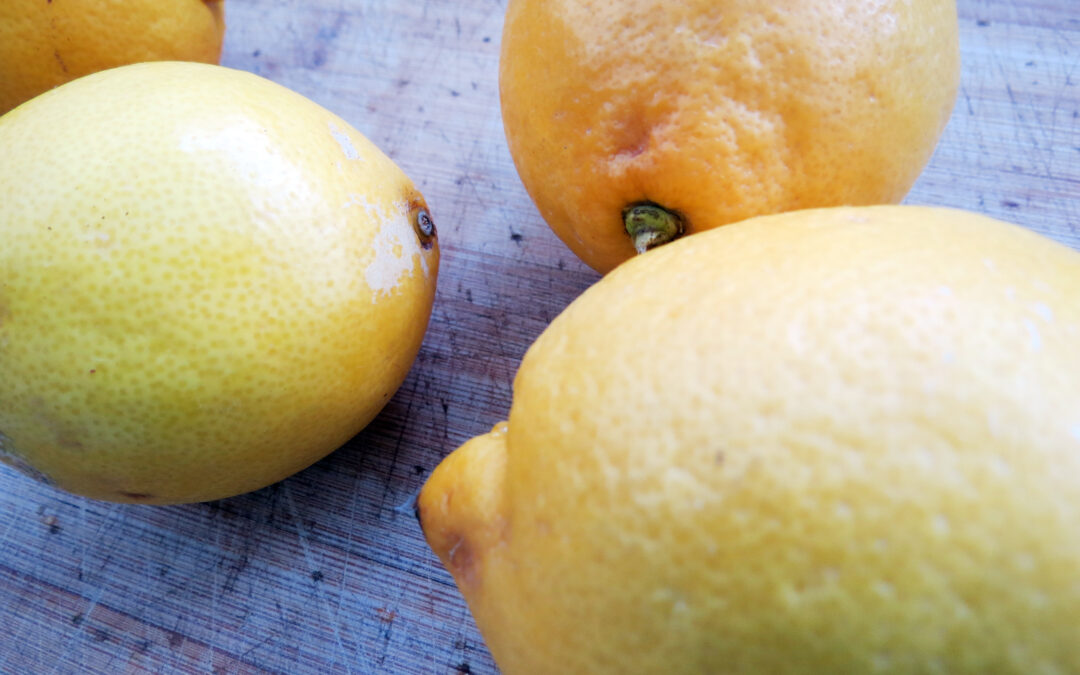
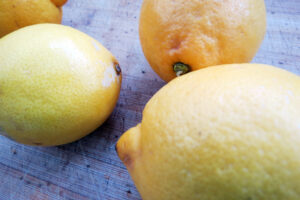
When I first heard about fermented lemons, I wondered what you could use them for. After all, if you wanted to taste something salty, you’d simply add salt, wouldn’t you? And if you wanted a dish to taste more lemony, you’d add lemons, right? But like so often, you have to try something to form an opinion. I’ll never forget the moment I first tried fermented lemons: the taste of the lemons was so enhanced, yet neither too acidic nor too salty. It was bursting with flavour and (for a short time) it rendered me speechless. A whole new world of taste had opened up and I had to have them at home. You’ll be delighted to hear that it is super-easy to make fermented lemons by yourself!
Fermented lemons
Ingredients
8 whole lemons, organic! 90 – 150 g unrefined salt 2 tbsp freshly squeezed lemon juice as necessary
Instructions
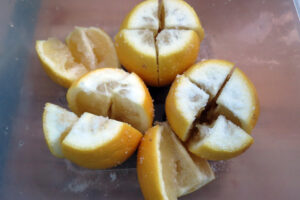
Wash the lemons in cold water, cut off the fruits’ edges (about 5 mm) and cut the lemons lengthwise twice almost (!) through. If you’ve done it right, your lemons have four wedges that are held together at the bottom. Remove the pips and put the lemons into a bowl. Sprinkle the salt into the cuttings and around the lemons.
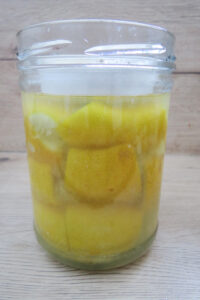
Press the lemons into your fermentation container so that the brine shows on the surface. If the lemons are not completely covered, add some lemon juice. Sprinkle the surface with 2 tbsp salt, put a weight in so that the lemons stay under the brine and close the container.
Put the container onto a tray and let the lemons ferment for 21 – 30 days at a cool place without direct sunlight. Check from time to time if they are still covered with brine.
After 21 days, the fermented lemons are ready, but you can let them ferment longer which only adds to the taste. With time, the brine becomes a bit thicker and the lemon flavour intensifies.
Store the fermented lemons in the basement or the fridge for up to 18 months.
Variations
Add spices to your fermented lemons such as cinnamon sticks, cloves, coriander seeds, peppercorns, juniper berries or bay leaves. Or you can try out limes instead of lemons and add onions, garlic, coriander seeds, cilantro and chillis. There are still so many variations to try. If you’ve further ideas, leave a comment below.
For beginners, fermentation might seem intimidating. What if it goes wrong and you accidentally poison somebody? First of all, serious illness from a properly prepared vegetable ferment is extremely uncommon, as there are some unmistakable signs of spoilage. Some occurrences, on the other hand, are quite normal. This guide will help you identify the most common fermentation problems and determine whether your ferment is perfectly safe, needs a simple adjustment, or should be discarded.
Before we dive into troubleshooting, it’s worth noting that fermentation and pickling are not the same thing. Fermentation relies on beneficial microorganisms to preserve food, while pickling uses vinegar. If you’re unsure about the difference, read my guide on fermentation vs. pickling first.
Why Fermentation Goes Wrong
Most fermentation problems can be traced back to one of four causes:
Too much oxygen
Incorrect salt concentration
Temperatures that are too high or too low
Poor-quality vegetables
Understanding these four factors will help you prevent most fermentation issues before they start.
What Healthy Fermentation Looks Like
Many beginners mistake normal fermentation for failure. But many of the signs that may irritate us are actually normal occurrences in a healthy ferment.
Signs of a healthy ferment
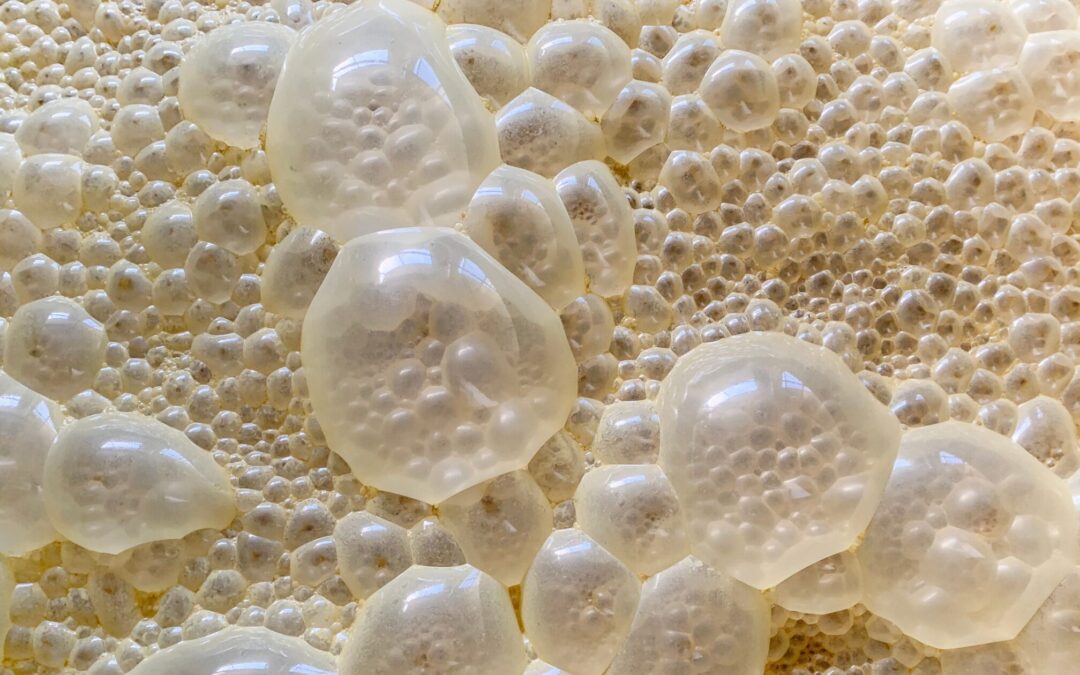
Bubbles: Lactic acid bacteria consume natural sugars in the vegetables and produce (amongst others) carbon dioxide, which shows as bubbles
Cloudy brine: tiny traces of microorganisms make the brine cloudy
Slight sour smell: as the name “lacto-acid fermentation” indicates, acid is produced, which makes the ferment smell sour
Colour changes: during the process, vegetables may change their colour; an example is these fermented radishes that turn from a bright magenta to a pastel pink
Sediment at the bottom: traces in the brine can settle at the bottom
Floating spices: spices are lighter than brine and sometimes get past the weight on top and float around
Quick takeaway box:
Usually normal
✔ Bubbles
✔ Cloudy brine
✔ Sour smell
✔ White sediment
Quick Fermentation Troubleshooting Guide
Problem
Safe?
What to do
Kahm yeast
✔ Usually safe
Remove surface layer
Mould
❌ No
Discard ferment
Cloudy brine
✔ Normal
No action needed
Floating vegetables
⚠ Fix it
Re-submerge
Mushy vegetables
✔ Usually safe
Improve temperature/salt
No bubble
✔ Often normal
Check smell and taste
Overflowing brine
✔ Normal
Use tray
Too salty
✔ Safe
Rinse before eating
New to fermentation? Download my free Fermentation Starter Checklist and learn the simple steps that prevent most fermentation problems before they happen.
You should know that fermentation is remarkably forgiving, and most problems we may encounter in fermentation look scarier than they actually are. White films, bubbles, strange smells, and cloudy brine, for example, are normal signs of a fermentation going right.
When I started fermenting, I worried every time the brine turned cloudy or a few spices floated to the surface. Over time, I learned that many of the things that look alarming are actually signs that fermentation is working exactly as it should.
There are, however, a few indicators that our ferment is spoiled. Knowing the difference between harmless changes and genuine spoilage is key.
So let’s have a closer look at what could make you wonder.
White Film on Top of the Brine
Sometimes, a very thin white, cloudy film can form on a ferment’s brine surface. When you try to remove it, it breaks into tiny fragments that are difficult to get onto a spoon.
This film is most likely Kahm yeast – and it’s harmless.
What is Kahm Yeast?
Kahm yeast is a layer of wild yeasts that forms on lacto-fermented goods. It always appears on the surface; that is exactly where the ferment has contact with oxygen. Its typical appearance is flat and sometimes slightly wrinkled, but it never shows a furry structure. And that’s the great difference between Kahm yeast and mould.
Important: Kahm yeast is not mould. It occurs when oxygen comes into contact with the ferment.
Reasons for Kahm Yeast in Fermentation
Kahm yeast is not an accidental occurrence but the result of certain conditions that have gone out of balance:
Oxygen: Fermentation works best in an anaerobic environment, that is, without oxygen. When the vegetables are not fully submerged under the brine, there’ll be an area on the surface where wild yeasts can grow.
Salt: A common reason for Kahm yeast is too little salt. Salt is not only important for the taste, but it also controls which microorganisms can grow. When you use too little salt, unwanted yeasts get a head start.
Floating vegetables: All vegetables or parts of them that are above the brine surface come in contact with oxygen, and that’s where Kahm yeast grows. To prevent that, we use weights in fermentation. Find more information about weights in my article about fermentation equipment.
Temperature: When it’s too warm, fermentation processes work faster – unfortunately also the ones we don’t want. Kahm yeast grows fast in temperatures above 25 °C (77 °F). The ideal temperature range for fermentation lies between 18 and 22 °C (65 – 72 °F).
Hygiene: Although you needn’t sterilise the jars and lids you use for fermentation, they shouldn’t be dirty either. Wash all your equipment – and your hands! – well with warm water before you start.
Is Kahm Yeast dangerous?
The short answer is: No. In most cases, Kahm yeast is harmless. But it can affect the ferment’s taste and make it slightly musty. Most importantly, it’s a sign that there’s oxygen in the ferment and that’s where mould can grow.
When you detect Kahm yeast on your ferment, there’s no need to discard the whole jar. Carefully remove the yeast from the surface with a spoon, then wipe the jar and the fermentation weight clean.
Afterwards, smell the ferment: when it smells fresh and slightly sour, everything’s ok. If the smell is unpleasant or “weird”, discard it.
White Sediment at the Bottom of the Jar
Often, there’s a white sediment forming at the bottom of the jar, especially some time after the initial fermentation process has ended. This sediment is completely normal.
During fermentation, dead lactic acid bacteria and vegetable particles can settle at the bottom of the jar. This white sediment is harmless and a normal sign of fermentation.
When Should You Worry?
If the sediment becomes fuzzy, colourful, or is accompanied by a rotten smell, discard the ferment.
Vegetables Floating Above the Brine
All vegetables, herbs and spices must at all times be submerged in the brine. Sometimes, however, parts of them may pop up and float above the brine.
This is a problem, because exposure to oxygen increases the risk of Kahm yeast and mould.
Why It Happens
Carbon dioxide production: in lacto-fermentation, gases like carbon dioxide form, which is why ferments bubble for a few days. These bubbles can push the vegetables upwards and sometimes above the brine.
Trapped air pockets: When the vegetables are not pressed tightly into the jar, air pockets may remain where the brine won’t get in.
Solutions
Always use fermentation weights to keep the vegetables under the brine.
Gently press the vegetables under the brine, keep them down with a weight and, if necessary, top the jar up with salt water.
Check your jars daily during fermentation. That way, you can spot air pockets or floating vegetables early on and act accordingly.
Mould Growing on the Surface
Contrary to Kahm yeast, mouldy ferments must always be discarded.
How Mould Looks Different
While Kahm yeast is flat, even and like a white film on the surface, mould grows in sections. It’s often coloured – either green, black, blue, or even pink – and, most importantly, it has a fuzzy, hairy appearance.
Why Mould Develops
The reasons for mould growth on a ferment are similar to those of Kahm yeast:
Oxygen: Mould needs oxygen to grow. So, when there’s oxygen in the ferment, mould can develop.
Salt: Too little salt cannot keep harmful bacteria or fungi, like mould, at bay.
Floating vegetables: All vegetables or parts of them that are above the brine surface come in contact with oxygen, creating a perfect environment for mould. Use fermentation weights to keep everything under the brine.
Overripe or defective vegetables: they may already contain mould spores that grow further in the ferment.
Hygiene: Wash all your equipment – and your hands! – well with warm water before you start.
Is Mould Dangerous?
Yes, it is, and for that reason, you must discard ferments that have become mouldy.
My Ferment Smells Bad
When you’re new to fermentation, the right smell may be unknown to you. So let me tell you what good fermentation smells like:
The contents of a jar of lacto-fermented vegetables should smell sour, tangy and a little bit yeasty.
When, instead, you get smells like rotten meat, putrid, or like sewer or even vomit, that’s a clear warning sign! Always discard ferments that smell bad.
Why it happens
Salt: The most likely cause for a bad-smelling ferment is contamination with harmful bacteria, and that’s almost always due to an improper salt ratio.
Temperature: When temperatures are too high, harmful bacteria may grow faster than the beneficial ones.
Solutions
Always stick to the required amount of salt, which should be at least 2, better 3 – 5 % of the weight of the vegetables.
Keep an eye on the temperature: the ideal fermentation temperature range is between 18 and 22 °C (65 – 72 °F).
Soft or Mushy Vegetables
Usually, fermented vegetables stay crunchy. Yet, sometimes they may go soft and mushy. I’ll tell you why.
Why it happens
Temperature: When temperatures are too high (above 25 °C/77°F), the vegetables can become softer
Time: With time, ferments become softer or mushy, even though they have been stored in a cool place, where fermentation slows down but never really stops completely.
Salt: As with the other problems, the correct amount of salt can prevent this problem, as well.
Naturally softer vegetables: cabbage, carrots, and radishes are crunchy, but vegetables like pumpkin or zucchini are naturally a lot softer and thus can become mushy during fermentation.
How to Prevent It
Always stick to the required amount of salt, which should be at least 2, better 3 – 5 % of the weight of the vegetables.
Keep an eye on the temperature: the ideal fermentation temperature range is between 18 and 22 °C (65 – 72 °F).
Use fresh vegetables, at best directly after harvesting.
The Ferment Is Not Bubbling
A sure sign of a successful fermentation start is the formation of bubbles, but what if there’s no sign of them?
Why it happens
Temperature: While temperatures above 25 °C / 77 °F increase the risk of mould or Kahm yeast, temperatures below 18 °C / 64 °F can slow down the fermentation process or take longer for it to start.
Slow starter culture: if you use a starter culture like brine from an earlier ferment, it may contain only a small amount of active microbes. It’ll take them some time to reproduce and do their work.
Fermentation already completed: bubbles only form at the beginning of the process. When the main work is done, they’ll disappear – a sure sign to put the jars in a cool place.
Small batch size: the larger the container, the more vegetables you use and the more microbes are in the ferment. In reverse, that means the smaller the batch, the fewer microbes you have.
How to Tell if It’s Still Working
Before you give up, look out for
Aroma changes: smell the ferment and look for all the signs I described earlier.
Brine cloudiness: it’s a sure sign of an active fermentation when the brine gets cloudy.
Taste changes: when the ferment tastes sour, tangy and slightly yeasty, it has been fermented.
Brine Overflowing From the Jar
Overflowing brine is actually a clear sign of active fermentation!
Why It Happens
Lactic acid bacteria convert vegetable sugars into lactic acid and carbon dioxide. This gas forms the bubbles and develops a certain pressure within the jar, which can press the brine out of the jar.
What To Do
Always place the jars on a tray where the brine collects and can be removed later.
Leave adequate headspace: leave at least 2 cm (about 1 inch) between brine surface and lid so that there’s room for expansion.
Brine Level Has Dropped
When brine flows out of the jar, it sometimes occurs that there’s too little left in the jar. Another cause for a dropped brine level is evaporation or the shrinkage of vegetables due to water loss.
Solutions
If that happens, you can simply add more brine. Just mix 20g salt per 1 litre of water, mix it thoroughly until the salt has dissolved, and top the jar up.
My Ferment Is Too Salty
While a certain salty taste is normal, too salty is too much.
Why It Happens
Measuring by volume: always weigh the vegetables and calculate the amount of salt necessary. This is way more accurate than measuring by volume.
Salt: the salt concentration should be between 2 and 5 %.
But what to do when the ferment is too salty?
Solutions
Rinse before eating: take out the portion you want to eat and put it into a bowl with clear water. Rinse it and repeat this process until all the salt has been washed out. Let it drain in a sieve (plastic or acid-proof metal) for 15 minutes and taste it.
Mix with fresh vegetables
Use it in cooked dishes, for example with extra sauce to dilute the salt.
My Ferment Isn’t Sour Enough
Imagine opening a jar of homemade sauerkraut, only to discover that it’s just kraut without the sour.
Why it happens
Fermentation time: this is the most common reason for ferments that are not sour enough. Fermentation and the development of lactic acid takes its time.
Cool temperatures slow down the fermentation process, and it takes longer to create that sour taste.
Solution
That’s easy: simply ferment the vegetables longer. Fermentation cannot be rushed, and patience is the key.
When Should You Throw a Ferment Away?
More often than not, a ferment is perfectly safe to eat. There are, however, a few warning signs that indicate a ferment should be discarded.
Discard it if you see
Usually safe
❌ Fuzzy mould
✔ Cloudy brine
❌ Pink mould
✔ Bubbles
❌ Black mould
✔ White sediment
❌ Orange mould
✔ Kahm yeast
❌ Rotten smell
You can download my fermentation starter checklist, a free printable with all the ingredients for a successful fermentation at home.
Frequently Asked Questions About Fermentation Problems
Can I scrape mould off fermented vegetables?
No. If mould is present, discard the entire ferment.
Is Kahm yeast dangerous?
No. Kahm yeast is usually harmless but may affect flavour.
Why is my brine cloudy?
Cloudy brine is typically a sign of active fermentation.
Why isn’t my ferment bubbling?
Temperature, batch size, or fermentation stage may be responsible.
Can fermented vegetables be too salty?
Yes, but they can often be rinsed before eating.
Can I eat vegetables that floated above the brine?
If they were only briefly exposed and show no signs of mould, they are usually safe. Re-submerge them as soon as possible.
Is white sediment mould?
No. White sediment at the bottom of the jar is usually dead lactic acid bacteria and is perfectly normal.
Fermentation problems can happen – know how to deal with them.
Every experienced fermenter has encountered cloudy brine, floating vegetables, overflowing jars, or a layer of Kahm yeast at some point. Fermentation is a learning process, and most problems are easy to prevent once you understand what’s happening inside the jar.
Trust your senses, follow a few key fermentation principles, and you’ll soon discover that fermentation is far less intimidating than it first appears.