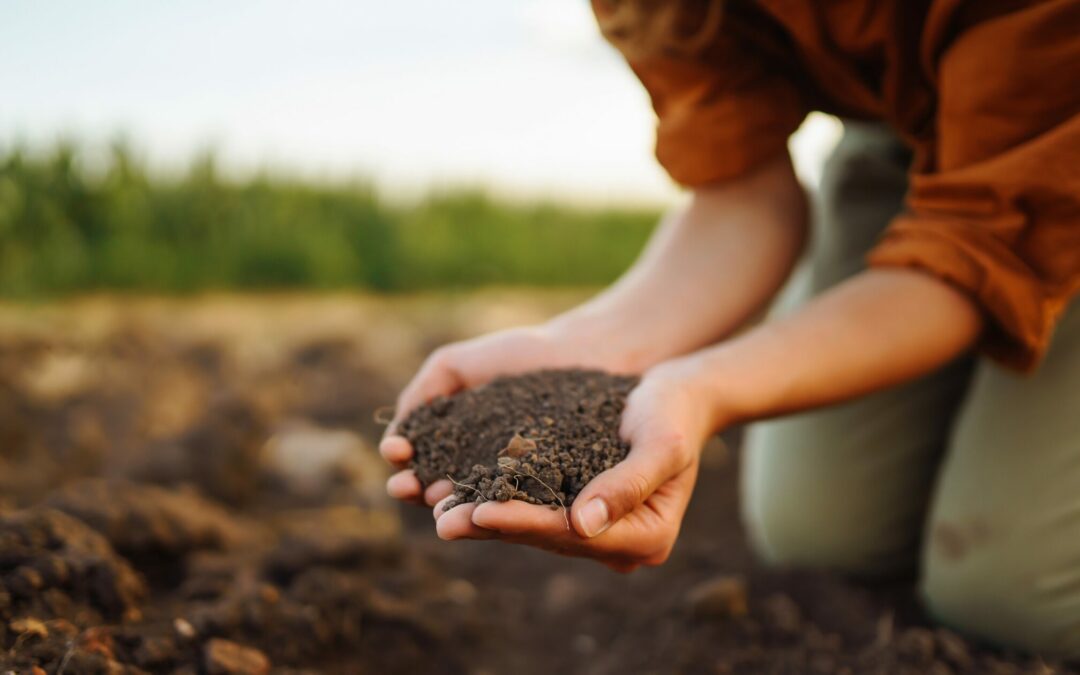
If you want to make your garden a success, it’s essential to know its soil type. Plants have different requirements regarding moisture, permeability and pH value. In short: different plants thrive in different soil types.
Types of soil are classified by grain size, colour, the amount of organic material and the minerals in it. Also, the percentage of sand, clay and silt is important and lastly, you should know the pH-value of your garden soil.
Nutrition
A plant cannot absorb water and fertiliser in one go. It can’t drink a whole can of water in one gulp and eat a whole load of fertiliser all at once. The soil’s important task is to store liquid and nutrients and deliver them to the plants so that they can have little snacks.
Also, plants cannot take in fertiliser in solid form. To make the best use of nutrients, plants need water as a solvent agent. A plant “eats” and “drinks” mainly with its root system but also little stomata in the leaves absorb a bit of water and nutrients.
The soil is a pantry
The soil is the plant’s pantry. In it, there are cavities (pores) where water, released nutrients and oxygen are stored. The cavities between particles are of different sizes, depending on the soil structure. A fine-textured soil has smaller cavities than a coarse-grained soil. The smaller the cavities, the better the soil can bind nutrients and water. If the cavities are large, water runs through the soil.
Soil structure
Different soil characteristics provide the plants with different prerequisites. When you know and understand your soil, you can easily maintain or improve it and thus offer your plants a suitable environment.
Naturally, soil is built “from below” as well as “from above. The lower part of the soil is based on the bordering rock. Basic mountain rock that was rich in minerals, has weathered and crumbled during millions of years. The upper part, which is known as mother soil, was mixed with organic material from animals and plants that had decomposed and turned into humus.
Thus, the solid parts in the soil consist of minerals and organic material. Between the solid particles, there are pores. At best there are as many pores as particles. The pores’ task is to store oxygen, liquid and nutrients and carry them to the plants’ roots.
Different grain sizes
Rock erodes and breaks down into particles of different particles. The size decreases from stone to gravel, sand and silt to clay. Most garden soils are a mixture of mineral soil and organic material.
Soil types
It is practical to categorize the soil with terms like “silty, slightly loamy soil”. By that, we know what we have and what we can do to improve the soil. Different soils have advantages and disadvantages, especially regarding what you want to plant.
The most common definition of soil types is based on pure mineral soil and uses the grain size as a description.
Sandy soil
Sandy soil has large particles; it is light and porous and can be worked easily. It warms up quickly in spring and cools quickly down in autumn. That makes it especially suitable for sensitive plants that must go into hibernation early to survive the cold season.
On the other hand, sandy soil badly stores liquid and nutrients. It dries out quickly and must be watered often.
Silty soil
The size of the silt grain lies between sand and clay, being smaller than sand and larger than clay. By covering the silty soil with organic material like leaves or bark mull encrustation can be prevented.
Loamy or clayey soil
Loamy soil has small particles that encrust easily. If loamy soil has a clay content of more than 40 % it is practically impenetrable. Loamy soil is nutrient-dense and stores moisture well.
Loamy soil takes longer to get warm in spring but also holds the warmth longer in autumn. Loamy soil has few cavities and thus is sensitive to pressure and trampling.
Chalky soil
As the name indicates chalky soils contain a relatively large amount of chalk which makes them alkaline and thus not very good for plants. They have little nutrients and tend to dry out easily but become a rain-slicked, loamy mass after heavy rains.
Every type of soil can be improved. The goal is to make sure that it can hold optimal amounts of moisture, nutrients and oxygen optimally. It’s great for any soil to add organic material.
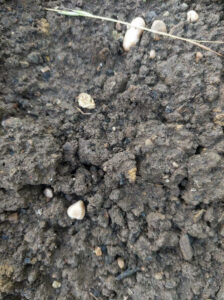
How to find out soil types
Often, it’s enough to have a look at the soil to determine its type but to be sure, you can try out the following:
The rolling test
Take a bit of soil (about 1 tablespoon) and roll it between your hands to a “sausage”. If the soil doesn’t form a roll of any kind, you probably have sandy soil. The thinner the “sausage”, the higher the clay content in the soil. Loamy soil yields a roll of 1 mm diameter, 4 – 5 mm characterise silty soil.
The shaking test
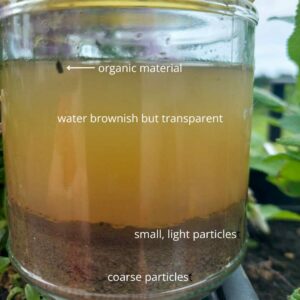
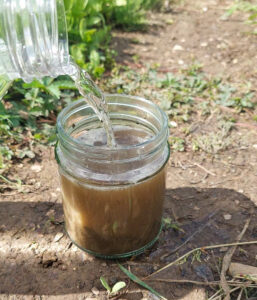
Fill a large glass jar with a handful of soil and add water at a ratio of 1 part soil and 2 parts water. Shake it well to mix the soil and water and let it set for 1 – 2 days without disturbing it. Slowly the soil particles will sink to the bottom and layer up there.
Sandy soil leaves the water almost clear; the particles have layered at the bottom.
Silty soil leaves cloudy water and most of the particles at the bottom.
Chalky soil leaves a layer of grit-like particles at the bottom of the jar; the water is a light grey.
Loamy soil shows relatively clear water and the particles are layered by grain size at the bottom with the smallest particles on top.
This is the result of the shaking test with my garden soil. Can you see the layers?
pH value
Soil can be acid, alkaline or neutral which can be determined with a pH-test. The pH scale goes from 1 = acid to 14 = alkaline. The middle value 7 indicates neutral. Most plants prefer a pH value between 5.5 and 7.5, with the ideal value between 6 and 6.5. The pH value impacts the plants’ nutrient uptake.
Extreme pH values under 3 and above 8 provide no suitable environment for plants as nutrients become encased and can’t be taken up by the plants. And then it doesn’t matter if or what you use to fertilise.
The pH value also influences the soil’s structure and microorganisms. And, finally, a balanced pH prevents the absorption of dangerous heavy metals from the soil.
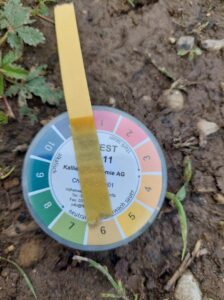
First, however, you must know your garden soil’s pH value. To determine that, you can either ask a lab to make a soil analysis or buy some litmus paper and do the tests yourself.
Measuring the pH value
1. Remove the upper soil layer (approx. 3 centimetres / 1 inch) and dig 20 cm / 8 inches deep. You need about 200 ml / 0.5 lb soil.
2. Put the soil into a large jar with a lid. Mix the soil at a ratio of 2/3 water to 1/3 soil with distilled water. (It’s important to use distilled water to make sure that the water’s pH value does not affect the test)
3. Close the jar and shake it for at least 2 minutes.
4. Let the mixture set for at least 10 minutes.
5. Insert the litmus paper into the water above the sediment.
6. Read the result and note it down. Take several soil samples from different places in your garden.
Compare the colour of the litmus paper with the indicator.
Favourable pH-values
Greens: 6.5 – 7.0
Cabbage: 6.5 – 7.5
Potatoes: 5.5 – 6.5
Raspberries: 5.5 – 6.5
Strawberries: 6.0 – 7.0
Berry bushes: 6.0 – 7.0
Blueberries: 5.0
How to improve your soil type
When you know your garden’s soil type, you can take measures to improve it by adding organic materials like compost and manure. Stay patient! building good soil requires time.
Sandy soil
As said before, sandy soil can’t store water very well because due to the sand’s large grain size, water will run through it. To improve moisture retention capacity, we can dig in plenty of bulky organic material like compost or well-rotted manure.
Always keep the soil surface well covered, either with mulch or with groundcover plants. Sow green manure between vegetables, cut it off when it becomes too large and use it as mulch. Leave the roots in the earth. They will stabilise the soil and help to store moisture.
Nevertheless, sandy soil will always need more fertiliser than other soil types. Fertilise sandy soil several times during the cultivation season and with relatively low amounts. If you give sandy soil more nutrients than it can store, they will be washed out.
Silty soil
Silty soil has a lot of nutrients and holds moisture well. It can be easily cultivated as long as it is well drained.
To improve drainage, dig in organic material like compost.
Chalky soil
Chalky soils have larger particles and are stonier than other soils. It is alkaline and, depending on its clay content, may be light or heavy.
First, we must lower the pH value by digging in lots of organic materials like compost or well-rotten manure but also half-rotten compost of conifers. Mulching with conifers in addition to other organic materials also improves the pH value long-term.
To break up the soil and add nitrogen, sowing leguminous plants is recommended.
Loamy soil
Loamy soil is usually a great mixture of sand, silt and clay. It’s nutritious and holds water easily. It warms up relatively quickly in spring and is easily cultivated.
Although loamy soil is already nutritious, it’s important to keep it that way. This is usually carried out best by adding organic material like compost and manure to the soil, making sure that it’s always covered with plants (green manure if necessary) and well-mulched. To aerate the soil, dig into it with a digging fork and jiggle it slightly. This is best done in autumn and early spring to ensure that enough oxygen gets into the soil without digging it up.
What to do to raise your soil’s pH?
If your soil’s pH is too low, that is if your soil is too acidic, you can add lime to your soil. But be careful, a too-high pH is equally unfavourable as a too-low pH. There are, however, good reasons to add limestone to your garden: it adds micronutrients to your soil which results in the plants not taking up too many heavy metals. especially loamy soil is better aired, more loose and thus easier for the roots to penetrate.
Different forms of lime
Lime is sold in different grain sizes. Powdered limestone has the smallest particles, granulated limestone consists of processed powdered limestone. the latter does not make a lot of dust and dissolves quickly into the soil. You can also buy lime chippings, but they dissolve relatively slowly.
Time and dosage
The best seasons to add lime are autumn and winter when rain and snow transport the lime into the soil.
The amount of lime you need depends on the soil type. Loamy soils usually need more to adjust the pH, sandy soils need less. As the lime products differ in their ingredients, you must follow the instructions valid for your product. If you prepare a new garden, you’ll need more lime than just for maintenance.
Conclusion
The first step for a healthy garden is determining your soil type. Different soil types require different improvement and maintenance methods. Every soil can be improved so that your garden provides the best conditions for your plants.
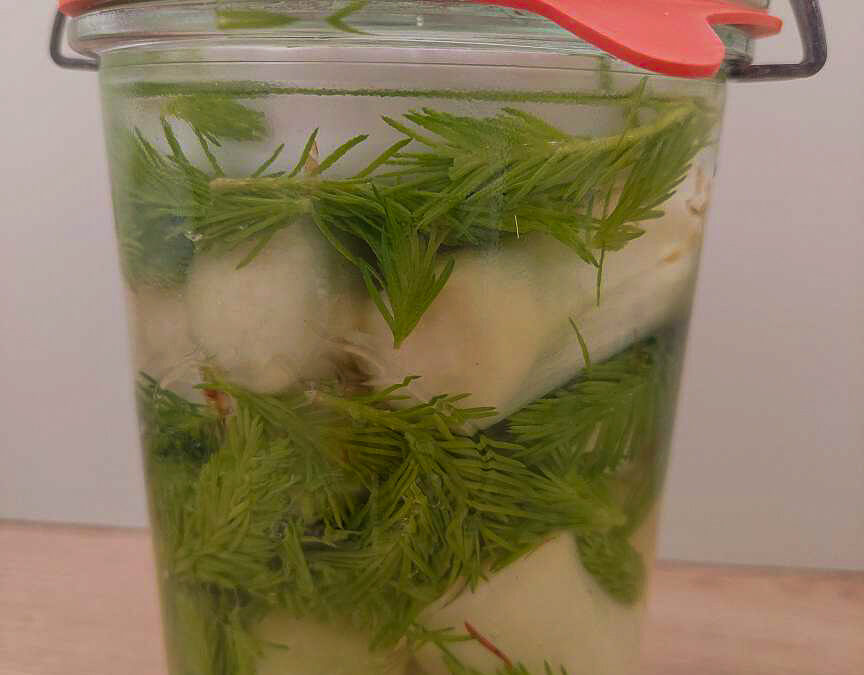
For quite a long time, I only ate asparagus with sauce hollandaise and young potatoes, topped with some bacon if I felt adventurous. Not because I like asparagus best that way but because I didn’t know it in any other way. So, when a short while ago, I tasted raw white asparagus for the first time I was thrilled by its fresh taste of young shoots. These days, whenever I buy asparagus, I have to force my willpower not to eat the whole bunch just like that. Spruce tips have a lemony, slightly dry taste and go well with the crisp asparagus. You can forage the spruce tips in April and May. The younger they are, the more delicate they taste. Alas, nothing is forever, and the season for both, asparagus and spruce tips is very short. What would be more logical than preserving both for when they won’t be available? And what better way than fermenting to keep the asparagus crisp and all the nutrients alive. The best thing is: you won’t need many ingredients for this simple recipe for fermented asparagus with spruce tips.
Fermented asparagus with spruce tips
Ingredients
Shelf life: several months
500 g white asparagus
salt
water
1 handful of spruce tips
Instructions
1. Peel the white asparagus and cut it into pieces of 4 – 5 cm (about 2 inches).
2. Mix the asparagus and the spruce tips with 30 g salt in a bowl and let it rest for 30 minutes.
3. Put the asparagus and spruce tips into glasses and fill them up with a salt solution of 3 % (30 g salt on 1 litre of water). Put a weight on top of the asparagus to keep everything well under the brine.
4. Close the lid and let the vegetables ferment at a dark and warm place for about one week.
5. When the taste is to your liking, store the asparagus in the fridge.
Both, asparagus and spruce tips are such great foods to experiment with. For example, have you tried out this recipe for tarte flambée with asparagus and walnuts? It’s delicious. Or get over here and read how you can make a very easy homemade spruce tip honey and preserve the flavour of a spring forest. I’m not done with trying out new recipes either. Stay tuned!
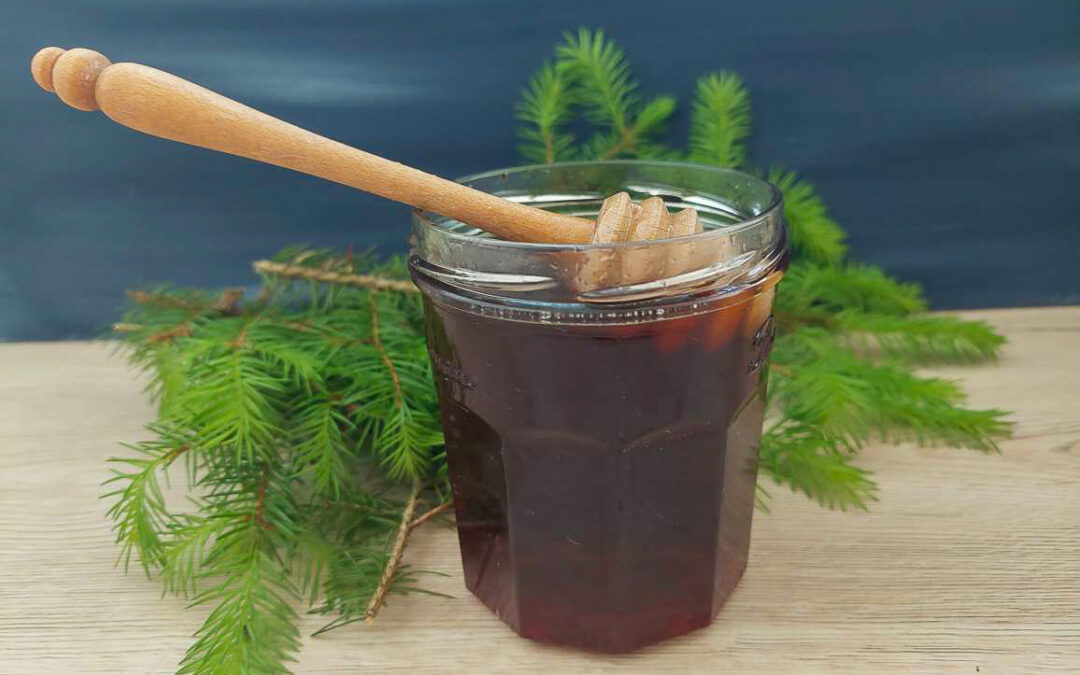
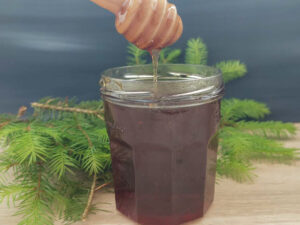
Every spring, the firs and spruces grow new, light green tips filled with the fresh scent of the forest. These tender shoots taste surprisingly citrusy – and with a little patience, you can transform them into a delicious golden-rosy syrup known as spruce tip honey.
I have been harvesting spruce tips every spring for years, and this recipe has become my favourite way to preserve their flavour.
This simple recipe captures the flavour of a spring forest and preserves it for the entire year.
Spruce Tip Honey at a Glance
🌲 Best harvest time: April–May
⏱ Active cooking time: about 2–3 hours
🫙 Yield: approx. 1.2 kg
🌿 Difficulty: Easy, but slow
🍯 Taste: citrusy, resinous, honey-like syrup
📅 Shelf life: at least 1 year
Is Spruce Tip Honey Real Honey?
Homemade spruce tip honey is not real honey; that’s only made by bees. It is, however, a vegan alternative made from foraged spruce tips and sugar.
The advantage is that we can benefit from all the valuable ingredients in the young spruce tips.
Fir and spruce tips contain a high amount of vitamin C and essential oils that are said to be expectorant, antibacterial and soothing.
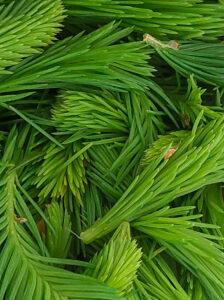
What Are Spruce Tips?
Spruce tips are the young shoots that grow on the ends of spruce tree twigs. They start growing in April through May and can be identified by their light green colour, which distinguishes them from the older, dark green needles.
Spruce tips contain essential oils, but not as much as the older needles and the wood. They taste slightly citrusy and sweet, and you can eat them directly from the tree.
When to Forage Spruce Tips
Note on foraging:
Only take what you can classify without any doubts. Foraging and using foraged plants is at your own risk. Remember that some plants are toxic.
Children, pregnant women, people under medication and those with chronic diseases should additionally consult with their medical practitioner before consuming foraged plants.
Never forage near busy roads.
Depending on the weather, you can forage spruce tips from mid-April until the end of May, just as long as they are still light green. When they get darker and their colour adjusts to that of the older needles, their content of essential oils decreases, and they become harder and more resinous.
To ensure that we don’t weaken the trees, we only pick 2 – 3 spruce tips per twig – we don’t want to steal all the new needles from the tree. Even better, pick the tips from different trees.
By the way, this is a great project for children, especially as the outcome will be something sweet. 😊
How to Identify Spruce Tips Safely
Spruces (Picea) are common needle trees in Mid- and Northern Europe and Northern Asia, as well as in large parts of North America and Canada.
Their needles grow regularly around the twig (in contrast to firs that grow their needles vertically). When you touch a spruce twig, the needles will prick (again in contrast to firs, which are soft to the touch).
Spruce cones hang down from the twig, whereas fir cones grow upwards.
If you’re completely new to the topic of trees, there’s a slight risk of confusing spruce (or fir) with yew trees, which are highly toxic. To avoid that, check the needles (yews’ are very round, soft and dark green to almost black). Also, yews don’t have cones but red berries, and they grow bulbous instead of conical.
Spruce tips have been traditionally used in Northern and Central European herbal traditions for syrups, cough remedies, and spring tonics.
Let’s dive into how to make spruce tip honey at home.
Spruce Tip Honey
Ingredients
Yield: about 1,2 kg spruce tip honey
Shelf life: at least one year
300 g spruce tips
1 litre of water
approx. 750 g sugar
1 organic lemon (optional)
How to Know When the Honey is Ready
If you’ve never made spruce tip honey before, it can be a bit tricky to know when it’s ready to fill into jars. Believe me, I know what I’m talking about…
Too early, and it stays runny and will drip off your toast; too late, and it becomes too thick to spread, and you’ve got to hammer it out of the jar.
However, making spruce tip honey is less about timing and more about learning to read the syrup.
There are a few indicators you can observe to check when the honey is ready for filling:
The syrup’s colour turns to gold or rosy
The simmering mixture develops a fine bubbling foam on the surface
The syrup covers the back of a spoon and slowly drips off
When you pour some drops on a cold (!) plate, it thickens to a honey-like quality
The honey becomes even thicker when it’s cool, so it’s better to fill it sooner rather than later.
Before You Start: Helpful Tips
Once you get the knack of it, spruce tip honey is an easy-to-make staple. Just observe these tips and avoid the following mistakes:
Forage “clean” plants, that means get into the forest and never forage near busy roads.
Harvest only soft, light-green tips. Older ones don’t taste as good and are too thick to release essential oils.
Don’t skip the soaking, cooking and resting time. Each step releases flavour and essential oils.
Stay near the syrup when you boil it and stir it regularly so that it doesn’t scorch.
Check your honey for readiness and fill it immediately.
2. Wash the spruce tips and put them into a pot. Pour the water over them and cover them with a plate so that they stay beneath the surface level. Let them rest there for about 12 hours (best overnight). During soaking, the spruce tips release pollen and thus flavour into the water.
3. Cut the lemon into slices and add them to the water and spruce tips.
4. Bring the mixture to the boil and keep it at a low simmer for about 45 minutes. The water will turn cloudy; that’s perfectly normal, it’ll turn transparent again during cooking.
This simmering process slowly releases the essential oils.
5. Let the brew cool down and let it rest for another few hours. I usually let it rest overnight, which is perfectly fine.
6. Now, strain the mixture through a fine sieve or cheesecloth off the spruce tips and collect the liquid. Press the tips out thoroughly.
7. Measure the amount of liquid you gathered and add the same amount of sugar.
8. Bring the mixture to the boil while constantly stirring. Make sure that the sugar has dissolved completely. Let it simmer over a low flame for about 1-2 hours (mine took 1.5 hours). Make sure you stir the mixture from time to time so that it doesn’t scorch.
9. When the mixture starts to form a bubbly foam and gets slightly thicker, check if it’s ready (see “How to know when the honey is ready”) and fill it into the jars.
10. Securely close the twist-off lids and let the honey cool down.
For a printable version with exact measurements, use the recipe card below.
Spruce Tip Honey
Capture the essence of a spring forest with this delicate spruce tip honey that transforms young evergreen shoots into liquid gold with bright, citrusy notes.
Sterilise the jars and lids you want to use for your homemade spruce tip honey.
Wash the spruce tips and put them into a pot. Pour the water over them and cover them with a plate so that they stay beneath the surface level. Let them rest there for about 12 hours (best overnight).
Cut the lemon into slices and add them to the water and spruce tips.
Bring the mixture to the boil and keep it at a low simmer for about 45 minutes. The water will turn cloudy.
Let the brew cool down and let it rest for another few hours or overnight.
Now, strain the mixture through a fine sieve or cheesecloth off the spruce tips and collect the liquid. Press the tips out thoroughly.
Measure the amount of liquid you gathered and add the same amount of sugar.
Bring the mixture to the boil while constantly stirring. Make sure that the sugar has dissolved completely. Let it simmer over a low flame for about 1-2 hours (mine took 1.5 hours) and stir it regularly.
When the mixture starts to form a fine bubbling foam and gets slightly thicker, check if it's ready (see "How to know when the honey is ready") and fill it into the jars.
Securely close the twist-off lids and let the honey cool down.
Notes
Stored in a cool and dark location, spruce tip honey can be stored for at least one year. Once open, store the jar in the pantry and consume it within several months.
How to Store Homemade Spruce Tip Honey
Once the honey is cool, store the jars in a cool and dark place (like a basement or pantry). There it’ll last for at least one year. I usually store mine in the pantry, where it easily lasts until the next spring harvest.
Boiled sugar syrups can last significantly longer, but, honestly, I can’t tell you from experience how long, as we always eat it up well before the first year’s up.
Once a jar is opened, you can keep it in the pantry (no need for refrigeration). It can crystallise when it stays open for too long, but that’s only a matter of aesthetics and won’t alter the taste.
Uses for Spruce Tip Honey
Spruce tip honey is a wonderful vegan alternative to bees’ honey, and it can be used exactly like that.
Spread it on a warm buttered slice of bread and enjoy it for breakfast.
Sweeten your tea with a teaspoon of spruce tip honey. Its essential oils are said to help fight off colds.
Instead of sugar, add homemade spruce tip honey to salad dressings
Glaze roasted vegetables with spruce tip honey.
Use it in marinades for meat and fish. It adds a more complex array of flavours.
No — spruce tip honey is not made by bees. It is a thick herbal syrup made by extracting flavour from young spruce tips with water and sugar. Because of its colour, texture, and sweetness, it can be used much like traditional honey.
2. When is the best time to harvest spruce tips?
Spruce tips can usually be foraged from April to late May, depending on the weather and altitude. Harvest them when they are still soft, bright green, and easy to pinch off. Once they darken and become firm, they develop a stronger resinous flavour.
3. How do I know if I picked the right tree?
True spruce trees have:
sharp needles growing individually from the branch
needles that roll easily between your fingers
hanging cones (if present)
Always identify trees with certainty before harvesting, as some evergreen species are toxic.
4. How long does spruce tip honey last?
When poured hot into clean jars and sealed properly, spruce tip honey keeps for at least one year in a cool, dark place. After opening, store it in the pantry and use it within several months.
5. Why is my spruce tip honey too runny?
The syrup usually thickens as it cools. If it remains too thin, it likely needs more simmering time to reduce the liquid. You can gently reheat it and simmer a little longer until it coats the back of a spoon.
6. Can I reduce the amount of sugar?
Sugar is essential for preservation and texture. Reducing it significantly may shorten shelf life and result in a thinner syrup. If you prefer a less sweet version, make a smaller batch and store it refrigerated.
7. What can I use spruce tip honey for?
Spruce tip honey is wonderfully versatile. Try it:
in tea or warm water
drizzled over yoghurt or porridge
in salad dressings and marinades
as a glaze for vegetables or cheese
as a soothing syrup during the cold season
Spruce Tip Honey – a Cheap Evergreen Staple for Your Pantry
We gardeners, homesteaders, cooks and bakers always try to make the most of all we can harvest. It’s only natural, then, that we want to preserve the flavour of each season to use it all year round.
Making spruce tip honey is more than a recipe — it is a way of bottling spring itself. Long after the fresh green tips disappear from the trees, their bright forest flavour remains in every spoonful.
And whenever you flavour your morning toast or yoghurt with homemade spruce tip honey, when you glaze an array of roasted vegetables with it or when you stir it into your tea on a cold winter evening, you’ll not only remember the wonderful time in spring but also bite into the concentrated flavour of the forest.
For more information about preserving, you can visit my preserving site, and if you’re also interested in gardening, you might want to look at my gardening hub.
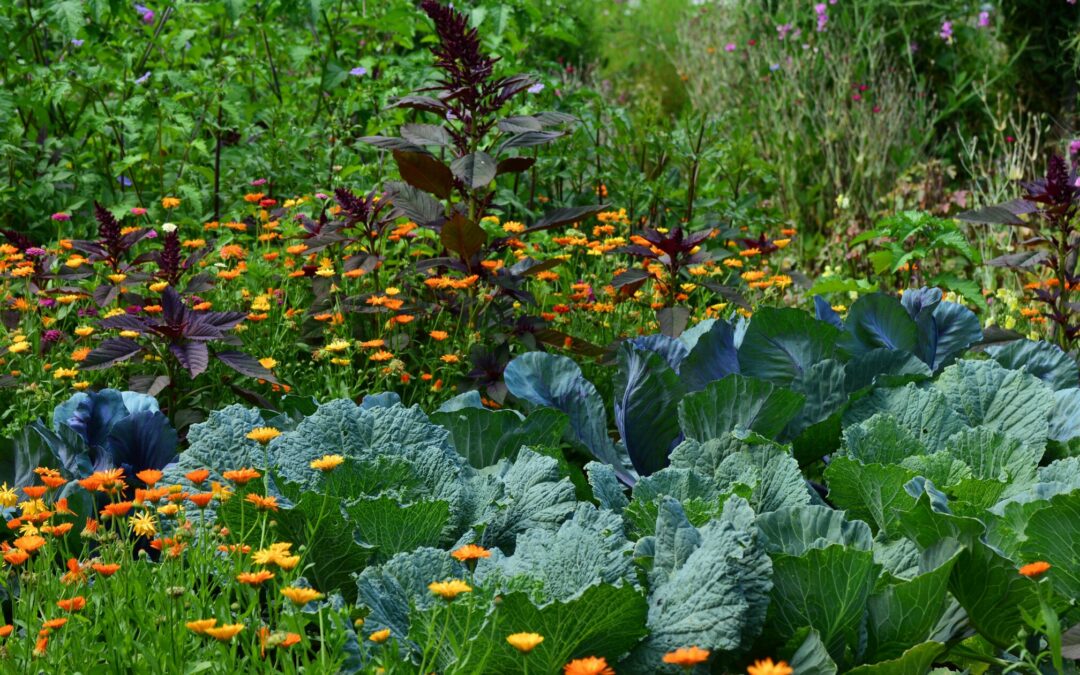
May is certainly one of the most exciting months in gardening! After the last night frosts, all your pre-grown vegetables can be planted out into the patches and all frost-sensitive vegetables can be sowed, as well. Or almost all. In this article I’ll show you what to do in May in the garden, that is what to plant, sow or even pre-grow indoors. But be careful: often there can still be night frosts in May, usually around the 15th. Before they are over you must not plant out your sensitive vegetables.
Beware of the night frosts
Every gardener knows that even if temperatures can be quite warm in April and May, it’s probable that there will be cold spells around mid-May.
These cold spells are due to cold air from the polar region that can cause night frost. Sensitive plants like tomatoes, zucchini, cucumbers or pumpkins must be kept indoors for that reason. If you plant them out too early and a frost hits them, they’ll die from the cold temperatures and your chance to harvest is gone for this year!
In German folklore, we call those days in mid-May when night temperatures can fall below 0°C the “icy saints”. The name comes from the fact that these cold spells often occur during some days in mid-May when we remember certain saints. The weather phenomenon was then linked to the saints and called “icy saints”. According to the calendar they last from May 11 to May 15. But like all things nature this is not always correct. Sometimes the last night frosts occur in April, sometimes we have them at the end of May. Depending on the region you live in, it may be totally different from here.
If temperatures drop, cover your plants with a winter fleece for gardeners. They will protect your plants from frost damage.
What to do after the last night frosts?
After May 15 the weather should become stable and you can finally plant out your sun-loving vegetables. Tomatoes, eggplants, peppers and chillies as well as cucumbers, zucchini and pumpkins can be planted into the garden. The same applies to herbs and summer flowers that are not hardy.
Always bear in mind though that mid-May is just an orientation date and the weather conditions can be quite different, depending on where you live. It’s crucial, therefore, to keep an observant eye on the weather forecast before deciding when to plant your sensitive vegetables.
Now, everything is growing like mad. Alas, that’s also true for weeds. If you have many weeds, it’s best to start ripping them out now before they become too large or even build seeds. Thankfully, I don’t have many weeds in my garden due to the way I made my patches. It saves me a lot of work!
If your plants have reached a height of about 10 cm, you should mulch them. That means that you cover the soil around them with organic material like lawn cuttings, straw, leaves or wood chips. Thus, the water hardly evaporates and you needn’t water often. Mulch also suppresses weeds – another problem solved!
What to do in May in the garden
What to sow indoors
You can sow these plants indoors and thus pre-grow them to plant them out later in the garden:
White cabbage
Brussels sprout
Kale
Broccoli
Kohlrabi
Zucchini
Cucumber
Pumpkin
Sweet corn
Winter leek
Beetroot
Lettuce
What to sow outdoors
Sow these vegetables directly into your patches:
Spinach
Swiss chard
Chicory
Rocket salad
Lettuce
Radishes
Beetroot
(Sugar) Peas
Carrots
Parsnip
Zucchini
Onions
What to sow after mid-May
Bush beans
Runner beans
Pumpkin
Cucumber
Sweet corn
What to plant in the garden
Now you can finally plant these darlings out:
Potatoes
Kohlrabi
White cabbage
Red cabbage
Brussels sprout
Savoy cabbage
Celeriac
Leek
Tomatoes
Cucumbers
Eggplants
Peppers
Pumpkins
Zucchini
Melons
Sweet corn
Lettuce
There’s a lot to do in May in the garden. Let’s get out there and start!
One of the first plants that we can harvest every spring is bear’s garlic (or wild garlic). It grows naturally in forest glades but you can also cultivate it in a shady corner of your garden. I’ve tried it last year but my garden lies in full sun so I think that was the reason it didn’t sprout. Bear’s garlic tastes similar to garlic but lighter and not so extreme. The same goes for your breath afterwards: you’ll smell of garlic but not as strongly as if you had eaten real garlic. Nevertheless, I know a spot in the forests where bear’s garlic grows abundantly and I harvested some of that. Some of it I used to make a wonderful bear’s garlic brioche braid, a savoury bread that’s a wonderful base for a hearty snack.
If you want to harvest bear’s garlic from the forests, too, make absolutely sure that you have the right plant. Bear’s garlic can be confused with lily of the valley which is toxic!
I often have baked bear’s garlic into bread like this bear’s garlic knot to add some savoury flavour to the dough. For this recipe, I have used an enriched dough, which is a yeast dough with additional fat in the form of milk, butter and eggs. Usually, enriched yeast dough is used for sweet bakes like brioches or this braided yeast bun. In this recipe, I’ve used it for a savoury light bread that marvellously captures the essence of spring.
Bear’s Garlic Brioche Braid
Ingredients:
Makes three brioche braids
700 g flour (I prefer spelt but you can use wheat)
1 tsp salt
30 g yeast or 7 g dried yeast
1 tsp sugar
300 ml milk
50 g butter
2 eggs
one handful of bear’s garlic (about 70 – 100 g)
1 red onion
50 g walnuts
olive oil
Salt, pepper
egg yolk
course sea salt
Instructions:
If you use fresh yeast, dissolve it in a bite of lukewarm milk, add some sugar and stir until becomes a uniform mass. Let it rest for 20 minutes until the liquid has visibly risen.
2. Wash the bear’s garlic, dry it, and chop it roughly. Peel the onion and cut it into fine rings. Chop the walnuts. Heat up the olive oil in a pan and add the bear’s garlic, onions and walnuts. Stew it lightly, season it with salt and pepper and let it cool down.
3. For the yeast dough, put the flour and salt into a bowl. If you use dried yeast, add it, too. Add the eggs, butter and milk (and yeast milk in case of fresh yeast) and knead these ingredients into a smooth dough. Put the dough into a bowl and let it rest for about one hour (it should double its volume).
4. Thoroughly knead the dough on a floured surface and divide it into three portions. Divide each portion again into three parts and roll each part to a string. Plait a braid from three strings so that you get three brioche braids.
5. Cover a tray with baking parchment, put the braids onto the tray and let them rest and rise for 15 minutes. Preheat the oven to 200 °C (°F). Scramble the egg yolk and brush the brioche braids with it. Sprinkle some sea salt on top of the braids and let them bake in the oven for 25 – 30 minutes.
As I said before, this bear’s garlic brioche braid is a wonderful spring bread, but you can make the same recipe with different herbs later in summer. Use chive, for example, parsley and chervil or try stinging nettle and rocket for a twist. Be creative and have fun trying out different herbs.