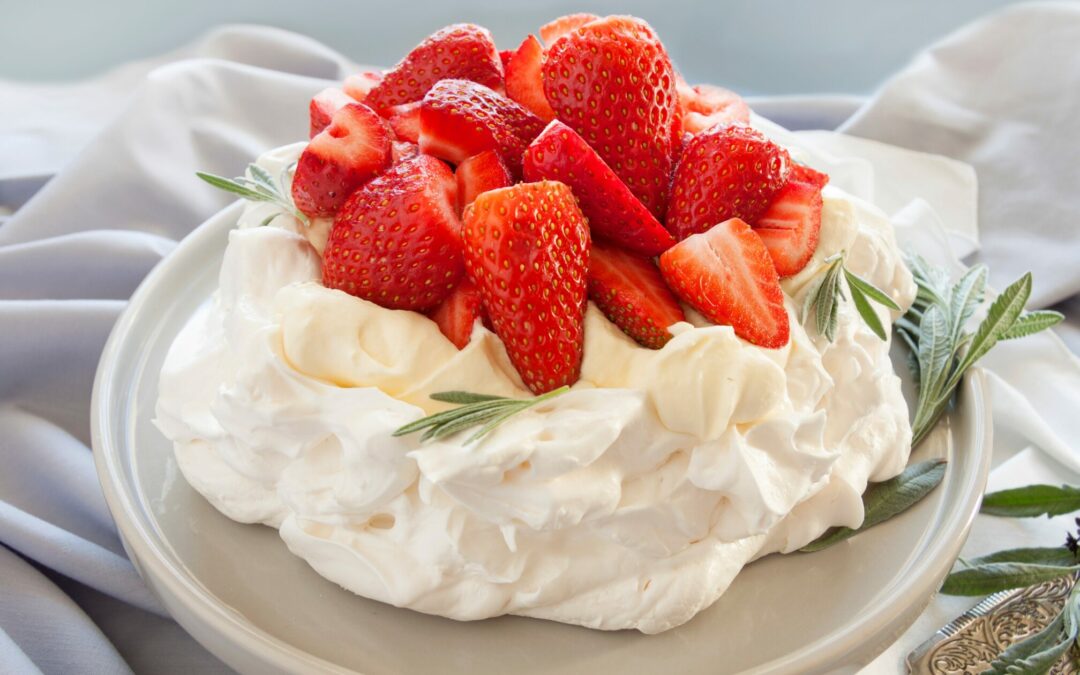
If you have never come across a pavlova, you missed something! It’s basically a baiser base with cream and fruit. That may sound a little dull but don’t underestimate this yummy combination: the sweet, crisp base, the rich, fluffy cream and the fresh fruit will catapult your palate onto cloud nine! With this beginner-friendly recipe, I’ll show you how to make a wonderfully tasty strawberry pavlova.
Strawberry Pavlova
For 5 people
Ingredients:
For the Baiser base
270 g icing sugar 15 g cornstarch 4 egg whites (150 g) 1/2 tsp baking powder a pinch of salt 1/2 tbsp white vinegar
For the topping
250 g cream 250 g strawberries 1 tbsp sugar 1 tbsp balsamic vinegar almond flakes or chopped pistachios (optional)
Instructions:
Mix the icing sugar and cornstarch and sieve twice. Stir the egg whites, the baking powder and the salt in a metal bowl and set it in a hot water bath. Mix the icing sugar-cornstarch mixture in portions and warm up the whole batter until it is hand-warm. Transfer it into a second bowl and stir it until it’s very stiff. Add the white vinegar and mix it in.
Preheat the oven to 150 °C (300 °F). Fill the baiser into a piping bag with a large-holed nozzle. Alternatively, fill it into a common freezer bag and cut off a corner. Put baking paper onto the tray. Now, pipe three even circles onto the baking tray and bake them in the oven for 10 minutes. Reduce the temperature to 100 °C (210 °F) and let the baiser dry for approximately 2 hours. Let it cool.
Roast the almonds in a pan without fat until they are light brown. Put them on a plate and let them cool down. In the meantime, wash the strawberries, remove the leaves and cut them into slices. Whip the cream until it’s stiff. Layer the baiser bases with cream and strawberries (and almonds if you use them). The last layer is strawberries. Alternatively, you can use only one cake base and top it with cream and strawberries. Serve immediately, otherwise the baiser will soak through and become soft.
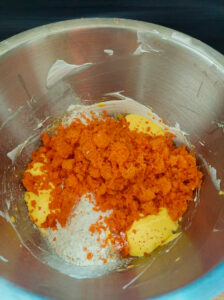
Everybody knows lemon curd but did you know you can make curd from vegetables also? I tried out carrot curd which, in combination with cream cheese, is the topping for these moist carrot muffins. We have carrots in abundance all year round, either fresh from the garden or sand storage, so I can make this treat whenever I like. And with this easy recipe, you can, too!
Carrots and hazelnuts complement each other wonderfully and the fresh and slightly salty taste of the cream cheese is a marvellous addition to the sweet and earthy carrot curd.
Carrot muffins with cream cheese – carrot curd topping
Yield: 14 muffins
Ingredients
For the carrot curd:
125 ml carrot juice, freshly juiced
150 g sugar
1 tbsp cornstarch
45 g butter in cubes
2 egg yolks
1 whole egg
¼ tsp cinnamon
For the carrot muffins:
180 g grated carrots (you can take the leftovers from the juice-maker and grate some fresh carrots additionally if it’s not enough)
4 eggs
130 g brown sugar
60 g flour
200 g ground hazelnuts
1 tbsp baking powder
For the Topping:
150 g carrot curd
150 g cream cheese
Instructions
Carrot curd
1. Mix the carrot juice, sugar and cornstarch in a bowl. Bring the mixture to a boil over medium heat while constantly stirring until it thickens.
2. Take the pot off the heat and stir in the butter until it has melted. Afterwards, add the egg yolks and the whole egg.
3. Put the pot back on the heat and stir for 5 – 6 minutes until the mixture has thickened considerably and falls heavily from the spoon. Put it aside, cover it with cling film so that it won’t form a skin and let it cool down.
Carrot muffins
1. Preheat the oven to 180°C (355°F)
2. Separate the eggs. Whisk the egg whites with half the amount of sugar until it’s solid.
3. Beat and froth the egg yolks with the remaining sugar.
4. Sieve the flour and baking powder and mix both with the ground hazelnuts.
5. Mix the flour and nuts, as well as the grated carrots under the egg yolk mass. Carefully fold in the whipped egg whites.
6. Fill the mixture into a muffin form and let the muffins bake for about 25 minutes. Insert a chopstick into a muffin to see if it’s done. When you pull the stick out there should be no dough sticking to it.
7. Take the muffins out of the oven, remove them from the muffin form and let them cool down.
Assembly
1. Mix the cream cheese with the carrot curd until homogenously combined.
2. Either spread or pipe the topping onto the muffins.
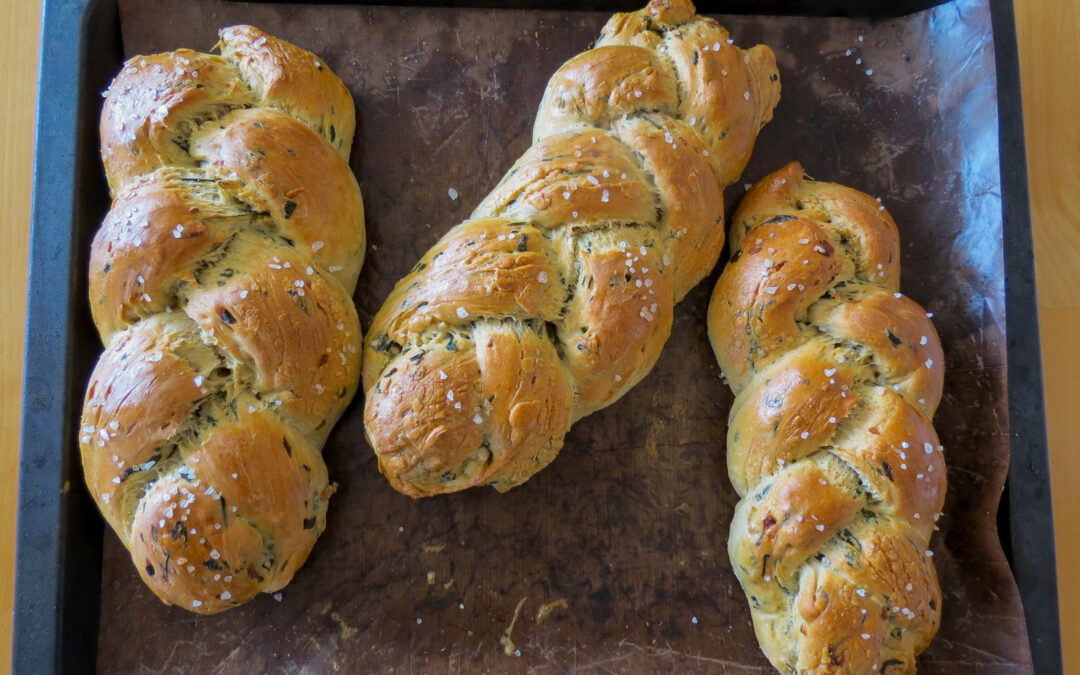
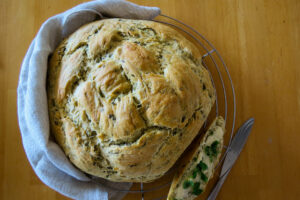
One of the first plants that we can harvest every spring is bear’s garlic (or wild garlic). It grows naturally in forest glades but you can also cultivate it in a shady corner of your garden. I’ve tried it last year but my garden lies in full sun so I think that was the reason it didn’t sprout. Bear’s garlic tastes similar to garlic but lighter and not so extreme. The same goes for your breath afterwards: you’ll smell of garlic but not as strongly as if you had eaten real garlic. Nevertheless, I know a spot in the forests where bear’s garlic grows abundantly and I harvested some of that. Some of it I used to make a wonderful bear’s garlic brioche braid, a savoury bread that’s a wonderful base for a hearty snack.
If you want to harvest bear’s garlic from the forests, too, make absolutely sure that you have the right plant. Bear’s garlic can be confused with lily of the valley which is toxic!
I often have baked bear’s garlic into bread like this bear’s garlic knot to add some savoury flavour to the dough. For this recipe, I have used an enriched dough, which is a yeast dough with additional fat in the form of milk, butter and eggs. Usually, enriched yeast dough is used for sweet bakes like brioches or this braided yeast bun. In this recipe, I’ve used it for a savoury light bread that marvellously captures the essence of spring.
Bear’s Garlic Brioche Braid
Ingredients:
Makes three brioche braids
700 g flour (I prefer spelt but you can use wheat)
1 tsp salt
30 g yeast or 7 g dried yeast
1 tsp sugar
300 ml milk
50 g butter
2 eggs
one handful of bear’s garlic (about 70 – 100 g)
1 red onion
50 g walnuts
olive oil
Salt, pepper
egg yolk
course sea salt
Instructions:
If you use fresh yeast, dissolve it in a bite of lukewarm milk, add some sugar and stir until becomes a uniform mass. Let it rest for 20 minutes until the liquid has visibly risen.
2. Wash the bear’s garlic, dry it, and chop it roughly. Peel the onion and cut it into fine rings. Chop the walnuts. Heat up the olive oil in a pan and add the bear’s garlic, onions and walnuts. Stew it lightly, season it with salt and pepper and let it cool down.
3. For the yeast dough, put the flour and salt into a bowl. If you use dried yeast, add it, too. Add the eggs, butter and milk (and yeast milk in case of fresh yeast) and knead these ingredients into a smooth dough. Put the dough into a bowl and let it rest for about one hour (it should double its volume).
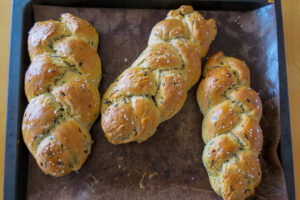
4. Thoroughly knead the dough on a floured surface and divide it into three portions. Divide each portion again into three parts and roll each part to a string. Plait a braid from three strings so that you get three brioche braids.
5. Cover a tray with baking parchment, put the braids onto the tray and let them rest and rise for 15 minutes. Preheat the oven to 200 °C (°F). Scramble the egg yolk and brush the brioche braids with it. Sprinkle some sea salt on top of the braids and let them bake in the oven for 25 – 30 minutes.
As I said before, this bear’s garlic brioche braid is a wonderful spring bread, but you can make the same recipe with different herbs later in summer. Use chive, for example, parsley and chervil or try stinging nettle and rocket for a twist. Be creative and have fun trying out different herbs.
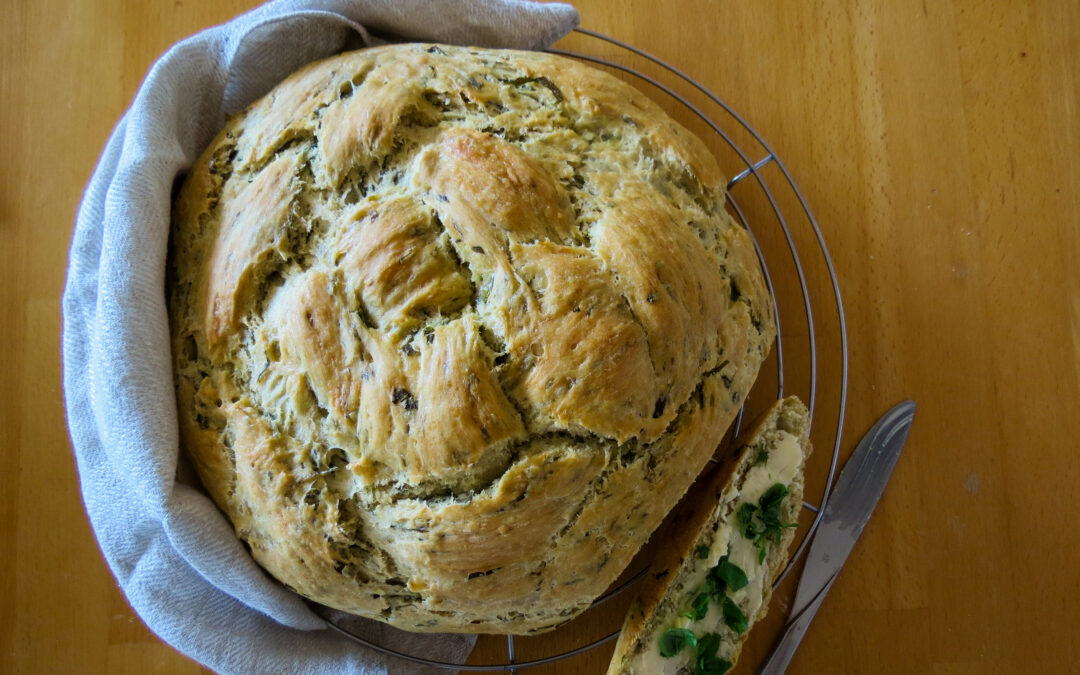
Bear’s garlic, or wild garlic, is one of the first spring herbs we can harvest. It grows in light forest glades but you can also cultivate it in a shady part of your garden. Apart from its benefits for our health, what I like most about bear’s garlic is that IT smells quite like real garlic but YOU won’t after eating it 😊. In this recipe, I’ve used bear’s garlic in a light yeast dough to make a savoury and eye-catching bear’s garlic knot.
You can harvest the bear’s garlic in the woods if you know a place where it grows wildly but please: make absolutely sure you know your plants! Bear’s garlic can be confused with lily of the valley which is toxic! If you’re not sure, buy it or try to grow it in your garden.
Bear’s garlic knot
Ingredients
Makes one large knot or braid
700 g four (I like spelt but you can use wheat)
20 g fresh yeast or 7 g dried yeast
1 tsp sugar
250 ml lukewarm water
5 tbsp olive oil
2 tbsp milk
Instructions:
1. If you use fresh yeast, dissolve it in a bite of lukewarm milk, add some sugar and stir until becomes a uniform mass. Let it rest for 20 minutes until the liquid has visibly risen.
2. Wash the bear’s garlic, dry it and chop it roughly.
3. For the yeast dough, put the flour and salt into a bowl. If you use dried yeast, add it, too. Add the water and 2 tbsp oil (and yeast water in case of fresh yeast) and knead these ingredients into a smooth dough. Put the dough into a bowl and let it rest for about one hour (it should double its volume).
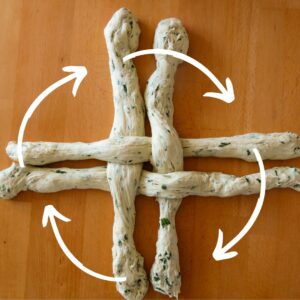
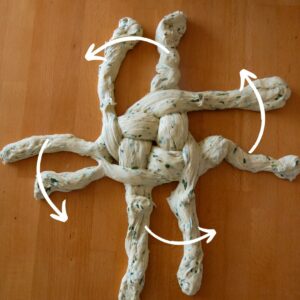
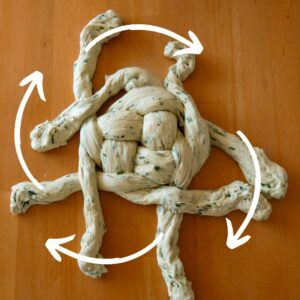
4. Thoroughly knead the dough on a floured surface and divide it into four parts. Roll each part to a string and plait a knot. First, lay the strings crosswise (see drawing) and then put the lower string across the string next to it. In the following pictures, you’ll see how to do it:
In the end, it’ll look like that:
Ready for baking
5. Cover a tray with baking parchment, put the bear’s garlic knot onto the tray and let it rest and rise for 15 minutes. Preheat the oven to 175°C (350°F). Mix the milk and remaining olive oil, brush the knot with it and let it bake in the oven for 45 minutes.
Enjoy your bear’s garlic knot with salted butter and chopped bear’s garlic on top.
If you liked this bread, you may also want to try this recipe for a braided bear’s garlic brioche braid.
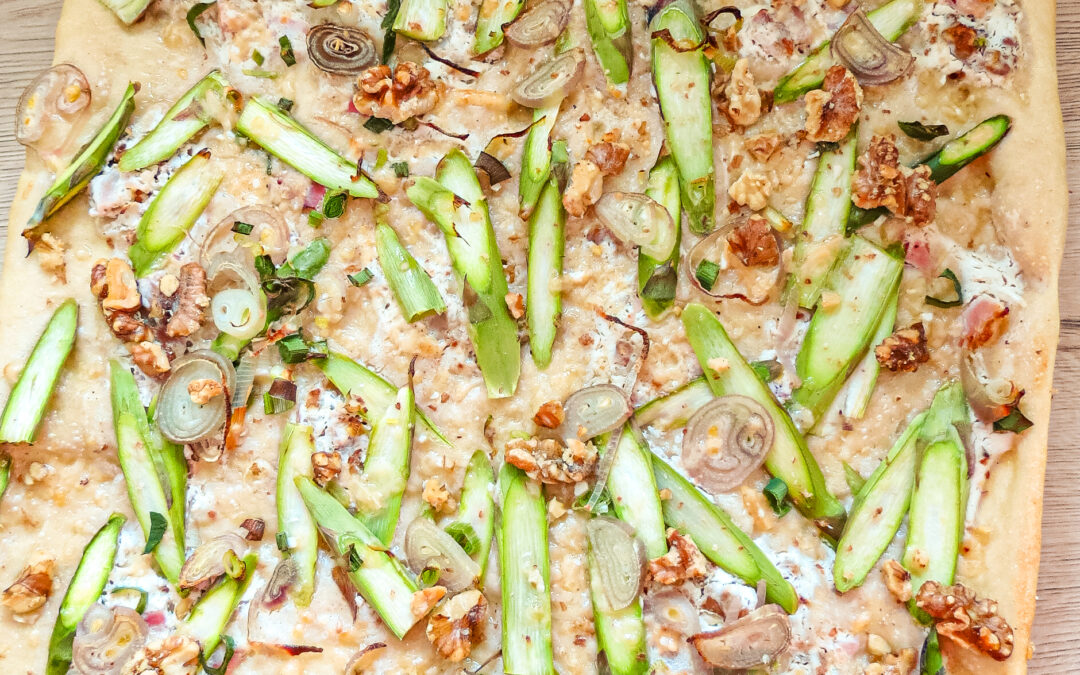
Every year I yearn for the first asparagus ’cause it’s the unmistakable sign that we are heading out of late spring and right into early summer! I love all types of asparagus, white, green and violet but if I had to choose (which thankfully I don’t), I’d say that I love green asparagus a teeny tiny bit more. In my eyes (or should I say: taste buds?), it’s got more of a taste, bringing herbal, nutty and spinach flavours to the table. And it’s so versatile! Sauté green asparagus and mix it with orange slices and Parmigiano to get a delicious salad. Or cook it in white wine sauce and add it to your pasta, sprinkle the whole dish with some freshly grated nutmeg and you’ll stun your friends and family. For this recipe, I’ve chosen to combine a classic tarte flambée with green asparagus. For taste – and colour – I added red onions and walnuts. Apart from the yeast dough which needs to be prepared about an hour before baking, this is a speedy recipe.
Tarte flambée with green asparagus and walnuts
Ingredients for 4 servings
Yeast dough
250 g all-purpose flour
7 g dry yeast or 15 g fresh yeast
Salt
125 ml warm water
Topping
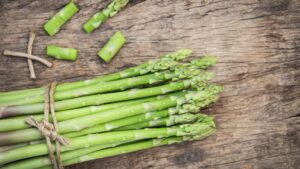
400 g green asparagus
3 red onions
100 g walnuts (shelled)
200 g sour cream
200 g cream cheese
salt, pepper
walnut oil
Instructions:
If you use fresh yeast, crumble it into the warm water and stir it until the yeast has dissolved. Weigh the flour, add a teaspoon of salt and pour the yeast water into it. Knead into a smooth dough. If you use dry yeast, weigh the flour and measure the water, add the yeast and a teaspoon of salt to the flour, pour the water in and knead into a smooth dough. Either way, let the dough rest in a warm place for about 30 minutes.
In the meantime, cut off the ends of the asparagus spears and peel them. As we use green asparagus, only the lower half of the spears must be peeled. Cut the spears into thin slices. Peel the onions and cut into thin slices. Chop the walnuts.
In a bowl, mix the sour cream and cream cheese, add salt and pepper to your taste and stir in 2/3 of the walnuts.
Preheat the oven to 240°C. Divide the dough into four portions and on a floured surface roll them out very thinly. Line a baking tray with parchment and place the rolled-out dough onto it. Evenly spread the cheese-nut mixture onto the dough, add the asparagus and onion slices and sprinkle the rest of the walnuts on top.
Bake the tartes for 12 – 15 minutes. Season with salt and pepper to your taste and drizzle with walnut oil before serving.
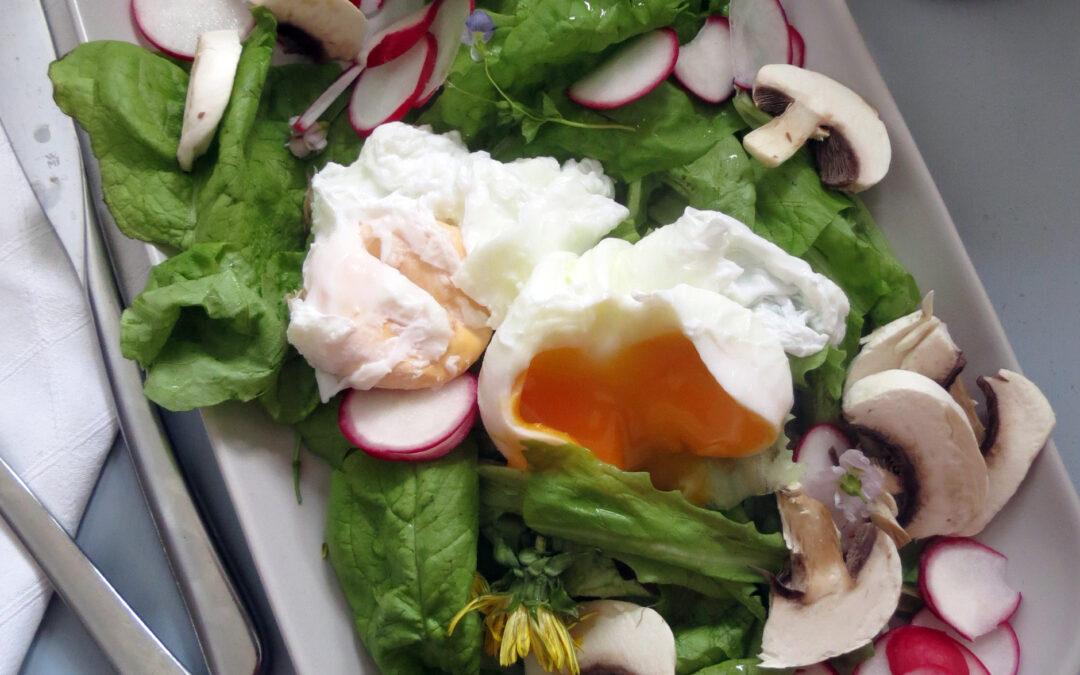
Spring is finally here and we all long for the first freshly harvested lettuce! Also, the first wild herbs can be foraged and why not add the young leaves of nettle, ribwort plantain and dandelion to your salad bowl to boost your energy. Mix in slices of radishes and mushrooms and poach your salad bowl with poached eggs and flower petals: you’ll have a health-boosting vegetarian meal and a beautiful dish to impress your guests with!
wildflowers (dandelion, cuckoo flower, red clover, violet, daisy etc.)
4 eggs
6 tbsp apple vinegar
4 tbsp walnut or hazelnut oil
salt (normal or orange herb salt), pepper
Instructions:
Wash the lettuce and wild herbs thoroughly and shake them to dry
Wash the radishes and cut off the leaves and the roots. Wipe the mushrooms with a moist kitchen cloth.
Mix the apple vinegar and nut oil with salt and pepper.
Bring a large pot with water and two tablespoons of vinegar to the boil. Crack the egg open into a glass. When the water is boiling, stir it until a vortex forms. Carefully insert the egg into the vortex and cook for about 4 minutes.
In the meantime, arrange the lettuce, herbs, radishes and mushrooms on four plates and pour the dressing over the salad.
When the eggs are cooked, take them out with a skimmer and put them onto the salad. Sprinkle with wildflowers and flower petals and serve.