February is not my favourite month. It’s still cold outside, and some days it’s so foggy and gloomy that one could think Spring will never come. On the other hand, however, we can witness how the days become longer in February. Sometimes, temperatures are above zero, and although the melting water leaves the paths and patches muddy, the smell of thawing earth bears the promise of warmer days. That’s when I can feel the itch in my fingers to dig into soil! While we may not be able to plant outdoors yet, there are still plenty of garden tasks we should tackle in February.
Once spring has arrived, it seems that everything must be done right then and there, and we could easily get overwhelmed. Doing some of these tasks now can add 2 – 3 weeks to our growing season!
So, roll up your sleeves and let’s get started!
Overview of garden tasks in February 2026
Here’s a quick overview of all tasks and when to tackle them:
Task
Time
Turn compost heap
Any dry day
Soil preparation
When soil is no longer frozen and dry
Refresh container soil
When soil is no longer frozen
Check seeds
Anytime this month
Organise seeds
Anytime this month
Review and plan improvements
Anytime this month
Build garden elements
Anytime this month
Refresh your garden paths
Any dry day
Fruit tree and berry bush pruning
Before buds swell
Cleaning the greenhouse
Early February
Seed-start
Mid-to-late February
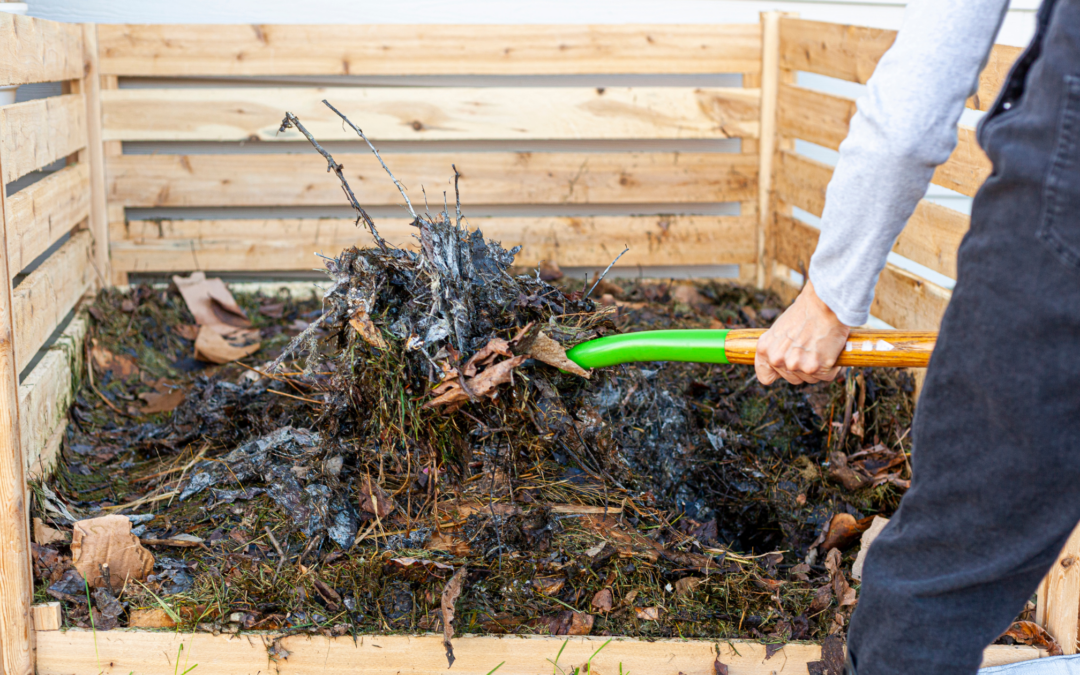
#1 Turn your compost heap
If you’re like me and have forgotten to cover your compost heap in late autumn, it’ll be a bit on the wet side by now. That’s why now, depending on your climate, can be a good time to turn up your compost heap. That way, dry and wet parts are mixed, the heap is aired, and microorganisms, as well as soil organisms, can start working again as soon as it becomes warmer.
When the soil– and thus your compost heap– is no longer frozen, turn everything out with a fork. Either you put it in a new compost heap or box right away, or you make a heap beside your initial compost heap.
If the compost is very wet, mix dry parts into it, for example, hay, leaves or even scraps of cardboard. In the unlikely case that your compost is too dry, water it after you’ve mixed it through and made a new heap.
When you’ve turned over the compost heap, remember to cover it so that nutrients won’t be washed out.
#2 Soil preparation
During winter, the soil in your garden has become dense, and we must loosen it up to prepare it for the first sowings.
As you may know by now, I don’t dig up my garden soil but rather loosen it with the help of a garden fork. When the soil is no longer frozen and has dried somewhat, prick the fork into the soil and jiggle it forward and backwards. That way, the soil will loosen, and air will get into the deeper soil layers. This air will help warm the soil up faster and transport oxygen to the deeper layers of our garden soil.
#3 Refreshing container soil
Garden tasks in February not only include preparing the soil in the patches, but also refreshing used soil for pot planting.
Soil that has been left in balcony trays or pots is pretty much leached out. Dump all this soil into a big container or bucket, add a bit (not too much!) of organic and mineral fertiliser (compost, horn shavings, rock powder, etc.). Now add one part of fresh soil to three parts of used soil. For example, if you have three buckets of spent soil in your mixing container, add one bucket of fresh soil to it.
Mix all the ingredients really well together, and you can use this refreshed soil for your planting pots again. By treating it that way, you not only add the nutrients necessary for healthy plant growth, but by mixing and adding new soil, you also bypass the necessity of crop rotation.
Crop rotation: An agricultural practice to cultivate crops from different plant families in the same place to improve soil health, repel pests and enhance nutrient levels. Click here for a detailed guide to crop rotation.
#4 Check your seeds
By now, you’ll certainly have a planting plan and know what seeds you’ll need. Check the seeds you may have bought or harvested from last year, and buy or trade seeds on local exchange platforms. That way, you’ll not only become a little bit more independent, but you’ll also get seeds that are perfectly adapted to your climate.
#5 Organise your seeds
For years, I bought seeds I already had, just because I had overlooked them in my chaos called the seed box. That only changed when I took the time to organise that box. I took a shoe box and divided it with cardboard into sections. Each section is dedicated to a plant or plant group, for example, tomatoes, lettuce, cabbage, spinach, etc. I put my seed packages in the appropriate section, and that way I can see at a glance what seeds I have and what I need.
#6 Review last year’s garden journal and plan improvements
Before long, we’ll be in the midst of seed-starting, planting, maintaining and harvesting again. Now is the short time frame where we have the opportunity to enhance our knowledge on gardening, review what went well last year and what didn’t.
For example, look what varieties performed poorly and find better alternatives.
Or maybe you realised that one of your patches is shadowed early in the afternoon by a big bush.
February is still a month of reflection and planning, and that’s why now is the perfect time to learn from our experience from the last season and plan improvements based on the lessons we’ve learned.
Here are resources for common issues you might be planning to address:
Have you longed for a cold frame? Now’s the time to build one. The same goes for insect hotels, trellises, raised beds and decorative articles you may want to have for your garden but haven’t found the muse to build.
These are perfect projects for rainy or cold days: Head to your workshop, grab your saw, screwdriver and screws and start building.
#8 Refresh your garden paths
I use wood shavings and chips on my garden paths and at the end of winter (that is: now), I add a fresh coat of them. It not only suppresses weeds but also prevents the earth from the beds from falling onto the path, as long as the layer of wood chips is as high as the soil in your beds.
Alternatively, build frames around your beds, either with planks, round timber, fences made from willow twigs, stone and so on. There are no limits to your imagination. Think it – build it.
#9 Fruit tree and berry bush pruning
Another important garden task in February is pruning. If you haven’t pruned your fruit trees and berry bushes yet, now is more or less your last chance. Here in Germany, we must be done pruning by March 1. After that date, it’s forbidden to cut back any trees or bushes so that the birds won’t be disturbed when they build new nests. Check your local regulations on that matter.
By pruning, we thin the tree crowns and bushes so that they become lighter and airier, and the fruits have more room to grow and ripen.
You can cut the twigs and branches with a wood chopper and use that material for your garden paths or as a mulch for your beds. Leave some sturdy branches and use them as a trellis for peas that you can sow later in spring.
#10 Clean your greenhouse
Over the winter, algae and dirt have collected on the greenhouse sides and windows. Like with every good spring cleaning, this must be removed so that your plants inside will get enough light to grow healthily.
Get a bucket of hot water and some soft soap, and clean the windows and walls from inside by brushing the dirt off with a brush or a sponge. Rinse off with clean water and marvel at how light it has suddenly become in your greenhouse.
Yes, I know, it’s still winter, but spring is already lurking around the corner, and we can do a lot of garden tasks in February to give our garden a head start for the upcoming season.
Don’t wait until March – by then, you’ll have missed the window for several of these tasks. Imagine stepping into your garden in late spring, when others are just starting to prep, and you’re already harvesting.
Remember that itch to get busy in the garden? Now channel that energy into these tasks – your garden is waiting.
Can’t wait to work in your garden?
Browse my complete gardening library for step-by-step guides on every aspect of vegetable growing, from planning to harvest.
These February reflections are part of a monthly practice of noticing what each season asks of us.
What does February ask of us?
In this article, I share how February urges us to slow down, find joy in simple tasks, embrace the garden’s quiet stirrings, and care for body, mind, and soul as we prepare for spring.
In January, I still experience the aftermath of Christmas with its festivity and enjoy the peace and tranquillity of the beginning of the New Year. But February? February makes me restless and sometimes a bit depressed. I yearn to go outside again without several layers of thick clothing – to walk in warm sunshine again. Instead, here in Bavaria, it’s wet, foggy and bleak outside, and it feels as if winter will never end. February is not my favourite month.
I feel a bit like a seed that’s been buried in the soil. The seedling has just broken through the hard outer shell of the seed in search of light and life – only to discover that it’s still surrounded by darkness. That isn’t quite true, of course – there is light up there, and it’s just a little way to reach it.
When I feel my mood drop in February, and the late-winter blues try to kick in, I take a look at the calendar: Candlemas, which we celebrate on February 2nd, marks the midpoint between winter solstice and spring equinox. That means winter is officially half over! Although it’s still some way to go, spring is near.
So, why not embrace that short time before we can go out again and dig in our garden soil without wearing a down jacket by finishing “winter work” and preparing for spring?
The garden is dormant.
But wait – is the garden truly dormant?
The garden in February has many faces. One day, it can be buried under a thick blanket of snow, sleeping deeply and peacefully.
Practically overnight, however, all that ice and snow can melt, leaving a mud bath. And sometimes, the sun comes out, and we hope that spring has finally arrived – only to discover the next morning that it has snowed again.
While it may still be too early to dig in the dirt yet, there are still some things we can do in our gardens, like pruning or building a bird feeder.
Also, it’s time to sow some vegetables indoors for the upcoming season. It’s not the same as actually working outside, but still a wonderful way to give our garden a good head-start. If you want to learn what vegetables you can seed-start now, check out my complete February seed-starting guide.
No matter the weather, we can still take strolls through nature and watch out for those tiny indicators of change. There is one place in the woods near where I live where snowdrops grow. Once a week, I check to see if they’ve emerged yet. And, oh, how gorgeous they are and so strong! Braving the winds, snow and rain and still blooming happily, whispering about the promises of Spring.
If bravery were a flower…
Later in February, we may even discover crocuses, which add colourful dots to the otherwise still colourless garden. It’s a bit like nature wants to contribute to Carnival season.
February Traditions, Celebrations & Seasonal Joy
But February is a month of transition and shows us that it holds both stillness and celebration at once.
It’s high-carnival season in February, with balls, parades and parties of all kinds. As an introvert, these events have always been too loud, crowded and chaotic for me, and I never liked being part of them. What I do like, however, are the yummy treats like Krapfen and Küchle that we eat during that time. It’s one of the few February traditions that I love to keep up!
And then, there’s Valentine’s Day. Even if you’re not into that whole hearts-and-flowers extravaganza, you can still have a nice evening with people you love. Who says Valentine’s Day is only for couples? Invite some friends over and have a good time.
Which you can do at any given time, by the way. You don’t need a special occasion to meet with people. After my retreat in January, where I took my alone-time to recharge my batteries, I can feel myself becoming more social again in February. If you’re feeling the same way, just get out there or invite some friends over; it’s always good to be surrounded by loved ones.
Spring Cleaning, Decluttering & Seasonal Reset in February
The word “February” comes from the Roman “Februum”, which means “purification”. While the Romans had their own purification rituals in mind, the concept appeals to me in a different way. Tidying up, throwing out things that no longer feel part of me and thus creating space for something new is just what I need right now.
By February 2nd, all Christmas decor has to be gone. Although I like our flat to be festively decorated, I now enjoy the minimalist, clean look without dry fir needles, golden baubles and paper stars.
The pantry is an example of what I usually tackle at the beginning of the year. I take everything out, wipe the shelves and sort it back in. That way, I can make sure that all my food is within its best-before date, and I don’t forget anything I ever bought and stashed away hurriedly. Here’s my complete guide to pantry organisation and rotation.
I also finish up craft projects like that shawl I started to knit shortly after Christmas, and which sadly lies in one corner of the couch right now, looking at me with reproachful stitches. I want to finish it before the end of the month, when I know I’ll be busy outdoors.
Self-Care in February: Winter Mindfulness, Movement & Nourishment
Before diving into specific practices, there’s one crucial mindset shift that makes everything else possible: accepting winter.
There comes a time, usually around the beginning of February, when I become restless and frustrated that it’s still cold and unwelcoming outside, and it still gets dark too soon, and everything just feels grey and stagnant.
However, when I reach the point where I can accept that winter will last a little while longer, I start feeling more peaceful again. Like the little seedling that’s still buried in the soil, I also need to go on to eventually break through and see the sun again.
Stillness doesn’t mean stagnation.
Although we can’t see a shoot yet, the roots are growing. Self-care now builds a base for our strength in spring.
So I try using the time in my favour, not against it.
February Self-Care for Body…
Spring cleaning is not only meant for our houses. While in January I enjoyed staying at home in “Gemütlichkeit”, I feel the need to move again in February. The walks I take get longer, and I also start doing light workouts again, which are not too exhausting but let me break a sweat. Sometimes I do Yoga and boy, have I gotten stiff!
After training, I enjoy treating my body with a homemade peeling or scrubbing it with this chestnut peeling soap, for example. A thick slather of shea butter and almond oil keeps my now stronger (ha!) and more flexible (well, a little more flexible at least!) body smooth and moisturised.
Like the seedling needs nutrients, I love nourishing my body by eating warming food in February, like roasted root vegetables, potato soup, or a hearty stew. Also, citrus fruits are in season now, and besides being delicious, they add a lovely brightness to the kitchen.
…for Mind…
Although the days get longer by the, well, day, it still gets dark rather early, and sometimes it seems to be one long, dull night due to fog and mist. On those days, I love to cuddle into my blanket on the couch, get myself a hot chocolate with homemade elderflower syrup and a good book. Right at the moment, I have several books on my nightstand and the coffee table. Depending on my mood, I grab either the cosy crime, the romance novel or some gardening book to beat the winter blues.
To keep my mind entertained, I now love to learn and do something new. Whether it’s trying a new recipe, learning about gardening concepts or reading up on Franz Schubert’s “Winterreise” doesn’t really matter. The main point is to use the little grey cells and create something new, or, to stick to the seedling metaphor, turn towards the light, even on grey days.
… and for Soul
February bears the energy of renewal. So, while it was too early in January to go all New Year’s Resolutions, now is a good time to plan the next few months. I try setting myself mindful intentions and goals without going all busy about them. It’s still time for planning. The transition will take place next month.
While January was all about me-time and wintering, I increasingly enjoy being with people again. I love to have people over, be it for a cup of coffee (and cake of course!), a late Sunday morning breakfast or a home-cooked dinner.
Gathering with loved ones nourishes all three: food for the body, interesting conversation for the mind, and love and appreciation for the soul.
The beauty of February
February, with all its facets – quiet melancholy, flickers of hope, growing frustration – returns every year. But instead of seeing it as an obstacle, let’s accept it for what it is: a deep breath before we dive into the hustle and bustle of spring.
Even though we don’t see growth, the seedling has already broken its shell and is growing roots. Soon enough, we’ll be able to watch it break through the soil, stretching for the light.
Every winter eventually comes to an end, and the sooner we realise that, the more peaceful we can transition into spring.
For me, reading, walking, snuggling up on cold nights, but also tidying, organising and preparing are great ways to integrate both the stillness of winter and the restlessness of the upcoming spring.
What better way to let winter end on its own terms, knowing that spring, with the promise of movement and emergence, lies just ahead?
If you’re interested in more cooking and baking recipes, look here: Recipes – seasonalsimplelife.com Many (but not all) of the recipes there are authentically Bavarian.
Sometimes in winter, when I don’t know what to cook, I go down into my basement to look at all my jars of homemade preserves. And I’ve always found an inspiration there! One of the most versatile staples there is sauerkraut. Have you ever tried it in pastry? Today, I’m going to share one of my favourite recipes: authentic Bavarian sauerkraut strudel.
As Bavarians, we often eat sauerkraut together with fried sausages, of course. But there are so many other ways to use it! This strudel will soon become one of your go-to recipes, too. The crispy dough, the juicy filling and the wonderful combination of flavours will leave your family and guests begging for more.
What is Bavarian Sauerkraut Strudel?
Strudel is a wonderful dish. Honestly, if we hadn’t already got it, somebody would have to invent it. You can put anything on strudel dough — apples, sauerkraut, potatoes, or fish — wrap it up, and bake it in the oven. In this case, we have crispy strudel dough with a savoury sauerkraut filling.
This sauerkraut strudel recipe makes for a perfect weekday winter dish. The rich, hearty filling makes it a down-to-earth, warming comfort food. And using homemade sauerkraut is the cherry on top!
In Bavaria, we eat this strudel as a main dish. You can serve it with a cream sauce and a fresh seasonal salad like lamb’s lettuce, beetroot or carrot salad.
Ingredients You’ll Need
For the dough
Strudel dough is easy to make. You just need
250 g flour: all-purpose flour is best, make sure it’s not self-raising
1 egg, free-range
1/8 l lukewarm water
2 tbsp vinegar and
1 tbsp oil or melted butter
a pinch of salt
Mix everything and let it rest for half an hour before you thinly stretch it out.
Instead of making the dough from scratch, you can buy a ready-made version, but make sure it’s a high-quality product. Honestly, making the dough is a matter of minutes, and while it rests, you can prepare the filling. There’s almost no time-gain in buying one.
For the filling
For the rich, savoury filling you need
750 g sauerkraut (that’s one large jar): use your homemade staple, if you have one or a good store-bought one. Quality matters!
1 large onion
200 g sour cream
200 g bacon ( you can leave the bacon out for a vegetarian dish)
salt, pepper, and
1 tbsp caraway seeds
Bavarian Sauerkraut Strudel Recipe: Step-by-Step
We start by preparing the dough, as it has to rest for about half an hour.
Making the strudel dough
Weigh the flour and put it into a bowl. Now add the egg, the salt, vinegar and oil or melted butter. Warm the water until it’s lukewarm and slowly pour it into the mix. Don’t add all the water in one go, but rather mix the dough and add water as necessary. Depending on the temperature and humidity in your kitchen, you need less or more water.
Mix the ingredients thoroughly and knead the dough
In this post, I describe in detail how to make strudel dough. If you prefer watching a video, look here:
You are currently viewing a placeholder content from Default. To access the actual content, click the button below. Please note that doing so will share data with third-party providers.
Now, the dough has to rest for about half an hour. Just put it back into the bowl and cover it with a second bowl so that it won’t dry out.
As I said before, you can also use store-bought dough, either strudel dough or puff pastry dough. Phyllo/filo dough is an alternative, as well; you just have to “glue” the sheets with oil on top of each other.
Preparing the Filling
Finely chop the onion and cut the bacon into small squares or strips. Heat a skillet and cook the bacon until the fat is released. When the bacon has become bright and glassy, add the chopped onions and stir the mixture until the onions are glassy, as well.
When the bacon becomes glassy like that, add the onions
Let it all cool down and put the bacon-onion mix in a bowl.
If your sauerkraut has a lot of brine, drain it first. Mine is usually fine without draining since I ferment it with less liquid. Now, add the sauerkraut, the sour cream, pepper and caraway seeds to the bacon and onion mix and stir it together. Don’t add salt yet. Due to the sauerkraut and the bacon, it could be salty enough already. Taste the filling and add salt and pepper if necessary.
Assembling the Sauerkraut Strudel
Preheat the oven to 180 °C (355 °F) top/bottom heat or 160 °C (320 °F) fan oven.
Dust a kitchen towel with some flour and roll the dough out on it. Then stretch it out with your hands as shown in the video until it’s very thin.
Start pulling the dough carefully at the edges with your fingers.
Spread the filling evenly onto the dough, leaving about 1 inch from the edges free.
Fold in one inch of the dough on the short edges. Now start rolling the strudel by carefully lifting the kitchen towel and letting the dough roll more or less by itself.
Line a baking tray with baking paper and put the strudel onto it.
Bavarian sauerkraut strudel, ready for the oven. Larger than life – or rather larger than the tray. Had to bend the strudel to put it onto the baking tray.
Mix one egg with a bit of water in a bowl and brush the strudel with it. Alternatively, you can brush it with melted butter or oil.
Baking
Put the strudel into the preheated oven (remember? It’s 180 °C / 355 °F top/bottom heat or 160 °C/320 °F fan oven) and bake it for 40 – 45 minutes.
You know that it’s done when the surface is crisp and has turned into a beautiful golden brown. When the strudel becomes suspiciously dark before the end of the baking time, cover it with baking paper or aluminium foil. It’ll still bake but won’t get too dark.
When the strudel is done, take it out of the oven and let it rest for 2 minutes. This helps the filling settle and allows any juice that’s leaked out to be reabsorbed into the dough.
Sauerkraut strudel fresh from the oven
Serve the sauerkraut strudel while it’s still hot.
Traditional Bavarian Sauerkraut Strudel
Crispy strudel dough filled with tangy sauerkraut, bacon, and caraway seeds. This traditional Bavarian comfort food is perfect for cold winter evenings and makes a satisfying main dish.
Weigh the flour and put it into a bowl. Now add the egg, the salt, vinegar and oil or melted butter. Warm the water until it's lukewarm and slowly pour it into the mix. Don't add all the water in one go, but rather mix the dough and add water as necessary. Depending on the temperature and humidity in your kitchen, you need less or more water.
Now, the dough has to rest for about half an hour. Just put it back into the bowl and cover it with a second bowl so that it won't dry out.
In the meantime, finely chop the onion and cut the bacon into small squares or strips. Heat a skillet and cook the bacon until the fat is released. When the bacon has become bright and glassy, add the chopped onions and stir the mixture until the onions are glassy, as well.
Let it all cool down and put the bacon-onion mix in a bowl.
If your sauerkraut has a lot of brine, drain it first. Mine is usually fine without draining since I ferment it with less liquid. Now, add the sauerkraut, the sour cream, pepper and caraway seeds to the bacon and onion mix and stir it together. Don't add salt yet. Due to the sauerkraut and the bacon, it could be salty enough already. Taste the filling and add salt and pepper if necessary.
Preheat the oven to 180 °C (355 °F) top/bottom heat or 160 °C (320 °F) fan oven.
Dust a kitchen towel with some flour and roll the dough out on it. Then stretch it out with your hands as shown in the video until it's very thin.
Spread the filling evenly onto the dough, leaving about 1 inch from the edges free.
Fold in one inch of the dough on the short edges. Now start rolling the strudel by carefully lifting the kitchen towel and letting the dough roll more or less by itself.
Line a baking tray with baking paper and put the strudel onto it.
Mix one egg with a bit of water in a bowl and brush the strudel with it. Alternatively, you can brush it with melted butter or oil.
Put the strudel into the preheated oven and bake it for 40 - 45 minutes.
You know that it's done when the surface is crisp and has turned into a beautiful golden brown. When the strudel becomes suspiciously dark before the end of the baking time, cover it with baking paper or aluminium foil. It'll still bake but won't get too dark.
When the strudel is done, take it out of the oven and let it rest for 2 minutes. This helps the filling settle and allows any juice that's leaked out to be reabsorbed into the dough.
Serve the sauerkraut strudel while it's still hot.
Notes
Serve this traditional sauerkraut strudel as is or with a cream sauce and seasonal salad.
Variations
This recipe is the basic version of a traditional Bavarian sauerkraut strudel. However, there are several variations you may want to try.
Red cabbage strudel
A festive, slightly sweet variation perfect for holidays
Instead of sauerkraut, use 750 g fermented red cabbage for the filling. Leave out the bacon and add some roughly chopped cooked chestnuts instead. For a touch of fruit, either add some orange zest or add roughly chopped baked apples and a generous pinch of cinnamon.
Heartier version with vegetables
Makes the strudel more filling and hearty
Leave the filling as it is, but add 200 g of pre-cooked, peeled and roughly chopped potatoes or carrots. You can also put the carrots in raw, but finely grated.
Different meat options
Use up leftovers or add more protein.
Instead of bacon, add roughly chopped or whole raw frying sausages, ground pork or meat leftovers.
Mediterranean twist
For a Mediterranean version, leave out the caraway seeds and instead add 100 g dried tomatoes and thyme, oregano and ground paprika to taste.
Oriental version
If you prefer an oriental touch, add sesame, 1 -2 tsp of chilli powder, ground cumin and nutmeg.
Frequently Asked Questions
Can I use store-bought dough?
Absolutely. Look for strudel dough, puff pastry or phyllo leaves.
How do I store leftovers?
You can store leftovers in your kitchen at room temperature for one day or in the fridge for up to 3 days.
Can I freeze sauerkraut strudel?
Yes, you can freeze the strudel raw or baked. To defrost, put the strudel out of the freezer and let it sit at room temperature overnight. Heat it in the oven before eating.
What type of sauerkraut works best?
Homemade sauerkraut is always the best option, of course. If you want to use store-bought sauerkraut, look for a fermented, organic product.
Can I make it ahead?
Good idea! To make the strudel one day ahead, there are two options:
Fill, roll and bake the strudel, then let it cool down completely. Wrap it in cling film or put it in an airtight container and store it in the fridge overnight. Before serving, heat the sauerkraut strudel in the oven.
Fill and roll the strudel and put it on the baking tray. It’s important that the filling is not too moist. Brush the raw strudel with melted butter to prevent soaking through. Loosely cover the strudel with cling film and store it in the fridge overnight. Due to cooling, the dough becomes denser and needs some extra minutes to bake the next day.
Time To Bake Your Own Sauerkraut Strudel
Traditional Bavarian sauerkraut strudel is a wonderful winter dish that warms the belly and the soul. It grounds us with its down-to-earth, hearty flavours and transforms simple preserved cabbage into something truly special.
Whether you make the traditional version with bacon and caraway or experiment with one of the variations, this strudel is sure to become a cold-weather favourite. The crispy golden crust and tangy, savoury filling never fail to impress—and your kitchen will smell absolutely amazing while it bakes!
I’d love to hear how your sauerkraut strudel turns out! Which version did you try? Did you make the dough from scratch or use a store-bought option? Share your experience in the comments below, and don’t forget to check out my other traditional Bavarian recipes for more warming winter inspiration.
Happy baking, and enjoy every crispy, flavorful bite!
Love cooking as much as I do? You’ll like these recipes:
I don’t know about you but once the festive season is over and life starts again in January, my fingers itch to dig into some dirt! Although there are some outdoor garden tasks you should do in January, it’s too cold to get my fingers dirty outside. But I can always do some seed-starting in January and sow vegetables indoors! Of course, it’s way too early to seed-start tomatoes, for example, but there are some plants we can give a head-start by sowing them out in January. Let’s get growing!
Understanding Your Growing Zone and Its Impact on Seed Starting
As you probably know, there are 11 hardiness zones, each divided further into two half-zones. Hardiness zones are set worldwide and classified by the lowest temperatures reached in winter and last frost dates. If you want to know your hardiness zone, hop over to this site, insert your postal code and find out your zone.
The hardiness zone you live in determines to an extent what plants you can cultivate in your region. It also tells you when to plant and seed-start your vegetables which is largely determined by the dates of the last frost.
However, knowing your hardiness zone doesn’t take into consideration regional microclimates that mostly affect temperature and humidity. Also, soil quality contributes a lot to the microclimate. Sandy soils, for example, have a lower minimum and higher maximum temperature than loamy soils.
Apart from temperature, the last frost dates are what’s most important for us vegetable gardeners. When we know how long it takes for a plant to germinate and from sowing to harvest, we can calculate backwards and determine when to seed-start indoors.
Essential Indoor Seed Starting Equipment for January
The basic equipment consists of cultivation trays and/or small pots with transparent covers, alternatively cling film.
Then, you need cultivation soil specially for seed-starting. It contains fewer nutrients and is also good for planting herbs, which also need a few nutrients, in pots.
A small watering can or a plant sprayer helps you to water your seeds carefully without washing them out of the soil.
Plant sticks are great for noting the plants and varieties you sow and sticking them into the tray to mark your plant rows. Don’t think you can determine the plants later. Been there, done it, not successful!
A plant lamp is a true game-changer when it comes to indoor seed-starting as light intensity and light hours are usually not sufficient for healthy plant growth. When there is too little light for our seedlings, they become leggy and might even fall over as they try to reach for the light. A plant lamp can be programmed for how long it has to shine (12 – 14 hours/day) and it usually provides just the right light spectrum for plants.
Additionally, you may want to think about buying a heating mat for warmth-loving plants like peppers, tomatoes and eggplants. With a mat like that underneath the seedling trays you can ensure a consistently high temperature.
How to seed-start indoors
Seed-starting indoors is not rocket science but there are a few things to observe:
Rinse the tray or pots with hot water to eliminate bacteria and fungi.
Put the soil into the tray or pots, press it lightly and make small holes where you want the seeds. Put the seeds into the holes, cover them lightly with soil and press the soil gently. Now, water the seeds carefully with a fine-holed watering can.
Put the transparent covers onto the trays. This enhances the temperature and keeps the moisture in. Put the trays in a sunny place at the temperatures required for each plant. If you want to seed-start plants that need relatively high temperatures, like eggplants, peppers, physalis etc., you should consider using a heating mat that you can put under the trays and heat up to the appropriate temperature.
Once the plants grow, check them daily. Keep the cover off for a few minutes to enable ventilation and prevent fungi. Also, check for fungus gnats, those small black flies that come out of the soil and whose larvae eat your plants’ roots. Sometimes, we bring them into the house with the soil. Put glue traps into your propagation trays and if gnats stick to them, put nematodes, which eat gnat larvae, into water and water your plants with it. Maybe you have to repeat this procedure at a later time.
Vegetables to seed-start in January
#1 Peppers / Chillies
Peppers and chillies need some time to get started. If you sow them too late, they’ll have their fruits late, too, and you risk damaging them by cold temperatures—even if you cultivate them in your greenhouse.
Sow the seeds into a tray with cultivation soil and put it in a sunny and warm spot at 25 °C (77 °F). A bright south-facing window, a winter garden or a heatable greenhouse are good places.
#2 Physalis
Seed-start physalis in January by sowing several seeds into one pot. Put the pot in a warm and bright spot. Temperatures about 25 °C (77°F) are ideal. Physalis grow slowly at the beginning and must be kept moist. Separate the plants when they are about three weeks old and plant them in single pots. Either plant physalis out after the last night frosts or separate them again and put them into large pots that you put outside.
Physalis are perennials and can be kept indoors during winter.
#3 Winter lettuce
Seed-start winter lettuce like ‘Baqieu’ to plant it out later in a cold frame or unheated greenhouse. That way you’ll have an early lettuce harvest.
Sow the seeds into a tray with the appropriate soil and press it lightly. Lettuce only germinates in light so don’t cover the seeds with soil. Temperatures mustn’t be as high as for peppers or physalis. 16 – 18 °C (60 – 65 °F) are ideal. When the plants are large enough, separate them and set them into single pots.
#4 Sweet potatoes
Cut sweet potatoes in halves and let the cutting areas dry for a few hours. Then, put the halves with the cut end facing down into a pot or balcony box with soil. Place the pot or box in a warm and sunny place. After some time, shoots will grow out of the sweet potatoes which we’ll cut off later and put into water for building roots.
#5 Ginger / Turmeric
Ginger and turmeric build rhizomes instead of deep roots and thus are best grown in flat pots. Put a rhizome with “eyes” into a tray or pot and cover it with soil so that two-thirds of the ginger or turmeric is in the soil and one-third is still above.
#6 Eggplants
Like peppers and physalis, eggplants like it warm and thrive best at temperatures of 25 °C (77 °F). Seed-start eggplants at the end of January by sowing seeds into a tray. Later, when they are large enough transplant each plant into a single pot. Always make sure that they are in a warm and sunny place.
#7 Cabbage
Cabbage is usually harvested in autumn, but there are varieties for a summer harvest and those should be seed-started now. As usual, sow the seeds in a tray and separate them later when they’ve grown four seed leaves.
Cabbage doesn’t need high temperatures like peppers and eggplants. On the contrary, it’s perfectly content with temperatures of 16 – 18 °C (60 – 65 °F).
When we plant out these cabbage varieties after the last day frosts, we can harvest the plants already in July.
#8 Savoy cabbage
As with cabbage, there are summer varieties that should be seed-started at the end of January. Savoy cabbage germinates already at temperatures of only 3 °C (38 °F). Once they have four seed leaves, separate the young savoy cabbages and plant them into single pots. Now put them in a bright place at about 16 – 18 °C (60 – 65 °F) and plant them outdoors end of March/beginning of April.
Summer varieties of savoy cabbage can be harvested in July and August.
#9 Early cauliflower
Seed-start early cauliflower varieties in January by sowing them into trays and putting them in a place with 16 – 18 °C (60 – 65 °F). Separate them when they have grown four seed leaves and plant them into single pots. Plant them into an unheated greenhouse or a cold frame mid to end of March. If you have them in the greenhouse, you can plant tomatoes in between later. By the time they need more space, the cauliflower is already harvested.
#10 Kohlrabi
Kohlrabi can also be seed-started now for an early harvest in the cold frame or greenhouse. Indoors they need temperatures about 16 – 18 °C (60 – 65 °F) and should be separated once they’ve developed four seed leaves. Plant them out into the cold frame or greenhouse end of February/beginning of March for an early harvest.
#11 Onions
Sowing onions may be more time-consuming than planting the bulbs but it shows advantages like healthier growth, more varieties and better storage capability. And it’s cheaper. Seed-start onions in January to ensure that you can harvest them before the first frost in autumn. Put the seeds into a tray or small single pots and place them in a bright spot of about 16 – 18 °C (60 – 65 °F) or colder (not under 10 °C / 50 °F). At the end of March/beginning of April, you can plant them outdoors.
#11 Summer leek
Summer leek, that’s harvested in July / August must be seed-started in January. You can either sow the seeds in trays and separate them later or you sow them into small single pots. Plant the leek outdoors when it’s about as thick as a pencil. To protect it from night frosts, however, you should cover it then with a frost fleece.
Summary
Starting seeds in January sets you up for a productive growing season ahead. Remember to choose varieties suited to your zone and provide proper growing conditions for strong, healthy seedlings. When you observe the simple rules for seed-starting vegetables indoors (see above), you’ll give your plants a good head-start and have a great harvest later that season.
Ready to get growing? Grab your seed packets and let’s make this your best gardening year yet!
Here you’ll find further articles on seed-starting:
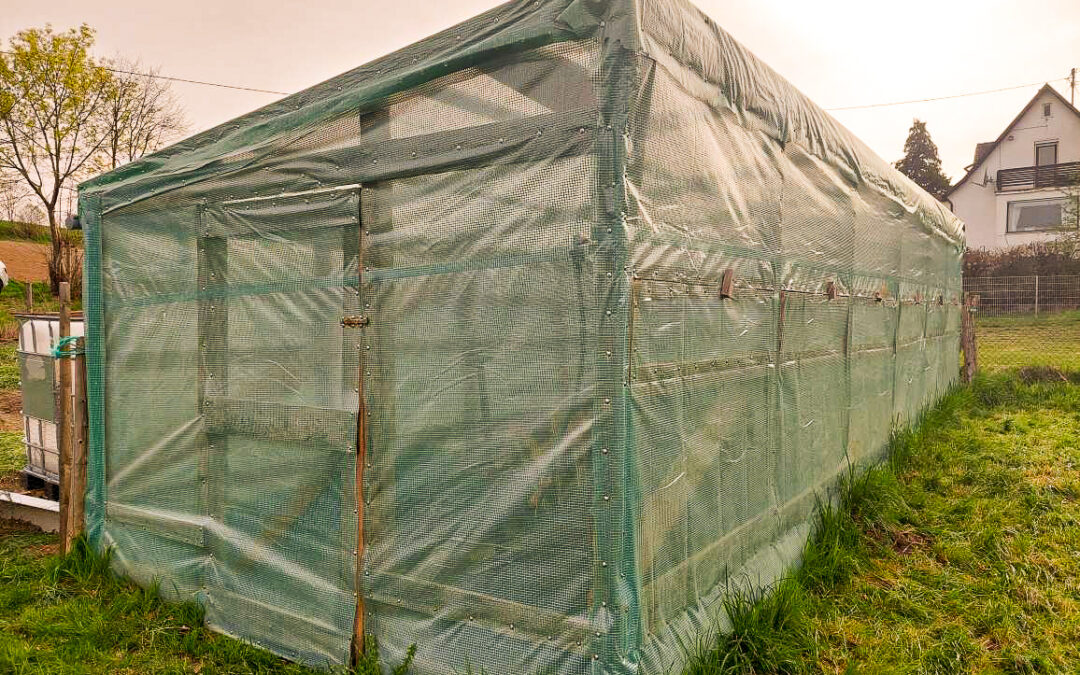
This guide is based on my own greenhouse, which I built and have used for four growing seasons.
Standing in my vegetable garden on a rainy summer day, watching my tomato plants struggle under these humid conditions, I dreamed of a greenhouse—a warm sanctuary where peppers could ripen, tomatoes could climb to the ceiling, and the growing season wouldn’t end with the first frost.
What I didn’t realise was that this dream would lead me on a journey from browsing expensive catalogues to hammering in my own ground sleeves, learning how to build a DIY wooden greenhouse from scratch – something far better than anything I could have bought.
Here’s a quick summary of what building this greenhouse involved.
Quick Overview
Building a Greenhouse from Scratch
Greenhouse type:
DIY wooden greenhouse with plastic covering
Foundation:
Ground sleeves driven into soil (no concrete base)
Total cost:
~€1,300 in materials
Build time:
Several weekends, weather-dependent
Skill level:
Beginner-friendly with basic DIY skills
Best suited:
Gardeners wanting a low-cost, non-permanent greenhouse
Research
As I said, I first looked for ready-made options. There were, of course, several varieties of greenhouse kits, but a greenhouse of the size I wanted (about 10 x 3 metres) was nearly impossible to find, and when I finally found one, it was definitely not within my budget!
Another problem was that all these greenhouse kits had to be fixed onto a solid concrete base. As I do not own my garden but have rented it, I am neither allowed to plant deep-rooted bushes or trees nor set up anything permanent. Like a solid concrete base. But how to make sure that the greenhouse would be safely anchored without a base? So I googled DIY greenhouse construction without a permanent foundation.
There were, of course, greenhouse tunnels that had a frame made of curved PVC tubes that were stuck into the earth. However, as we have severe storms around here, especially during autumn, I was afraid that one of those would lift the greenhouse right out of the ground and send it flying through a neighbour’s window. So, a greenhouse tunnel with a frame of PVC tubes was certainly not an option either.
It was my dad, finally, who suggested building a greenhouse from scratch with wood and using ground sleeves as point foundations. I was sceptical at first–would simple ground sleeves really be enough to keep a greenhouse safely anchored? Four years later, I can tell you: this has worked reliably for me over four seasons!
Planning your greenhouse: What you need to build a greenhouse from scratch
But how to build a greenhouse without concrete foundations? I’m not all thumbs when it comes to handcrafting, but I haven’t had much experience either. Well, the first step is:
Drawing your greenhouse plan
By the way: Planning is an ideal task for winter, when there are only a few things to do in the garden (for more details, read on here about January garden tasks).
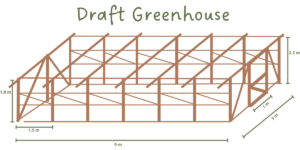
First, I drew a rough plan of the greenhouse and talked it over with my dad and an acquaintance who is an experienced carpenter. I had to adjust some things and refine the details, but in the end, I was good to go. Here is my draft. Feel free to use and adapt it if you’re planning your own greenhouse project.
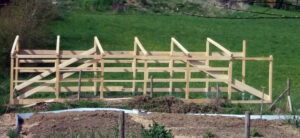
I set the greenhouse behind the vegetable garden, facing south for optimal light yield. The south side is 1,8 metres (3.3 feet) high and 9 metres (30 feet) long, and the north side has a height of 2,2 metres (6.5 feet). Those two long walls are 3 metres (10 feet) apart, so I have gained 27 square metres (300 square feet) of additional gardening space (9 x 3 metres / 30 x 10 feet).
Beginner note: You don’t need a perfectly scaled drawing or technical software. A hand-drawn sketch with measurements is enough—as long as you know where every beam and opening will go.
Advanced note: If you’re comfortable with it, sketching your plan to scale or using simple CAD software can help you pre-calculate angles and material lengths more precisely.
Choosing your location
When you’re planning a greenhouse in your garden, you’ll want to put it in direct sunlight while making sure that it doesn’t cast a shadow on already existing beds.
In my case, it was obvious that I wanted the greenhouse to go behind the vegetable garden, that is, at the north side. That way, it wouldn’t throw a shadow on the existing garden while at the same time protecting it from harsh north winds.
Before you start: What you need to know
Now that you have your design planned out, let’s talk about the practical side: what this will actually cost, how long it takes, and what you’ll need to get started.
How much will this cost? (And is it worth it?)
Before we dive into the details of building a greenhouse from scratch, let’s talk about costs. I’m sure you’re dying to know if the whole procedure is worth the trouble.
Well, the ready-made options I found online, in catalogues, and at hardware stores ranged from € 5,000 to € 23,000. Nothing I could or would remotely ever pay for a greenhouse. For that amount of money, I could buy organic vegetables for the rest of our lives. Of course, prices may vary in your region, but I doubt you’ll find something cheap.
The total cost to build this greenhouse was €1.310.
Here’s a list of everything I needed and what it cost:
Item
Details
Cost
Ground sleeves
16 sleeves, 90cm length, 7x7cm top
100 €
Wood
Beams, boards and battens, cut to size at the sawmill
500 €
Screws
Various sizes for construction
200 €
Hinges and hardware
24 window hinges, 3 door hinges, 1 door bolt
80 €
Heavy-duty tarp
Grid-reinforced greenhouse film
250 €
Gutter system
Brackets, tubes, end pieces
100 €
Water container
1000-liter capacity (secondhand)
80 €
Total
1.310 €
Ready to start planning your own greenhouse? Get my weekly gardening tips delivered to your inbox!
Join the Seasonal Simple Life Community!
Seasonal inspiration for your garden, kitchen, and home—delivered with care every week.
Depending on your region, these costs may vary as well, of course, but I’m pretty sure it’ll still be way less than a ready-made greenhouse.
For €1310 and several weekends of work, I gained 27 square metres of growing space that a comparable ready-made greenhouse would have cost at least € 5.500, plus installation—if I could even find one this size.
Beginner note: If this is your first large DIY project, expect it to take longer than planned—and that’s completely normal. Build in extra time so the process stays enjoyable.
Advanced note: With pre-cut lumber, power tools, and a second person, you could reduce the build time by several weekends.
How long does it take to build a greenhouse from scratch?
Bear in mind that I worked mostly alone and on weekends when the weather permitted. With a helper, you could cut this time significantly. The key is not to rush—take time to ensure everything is level and secure.
Description
Time frame
Planning and design
2 weeks
Gathering materials
1 week
Setting sleeves and frame
2 weekends
Installing windows and tarp
2 weekends
Finishing touches
1 weekend
Total
About 6 - 7 weekends, spread over two months
What tools do you need?
Must-have tools
Spirit level
Hammer or mallet
Electric drill with bits – you can borrow one if your site has electricity
Saw (hand saw works, electric is faster)
Measuring tape (at least 5 meters)
Folding rule
String and stakes for marking
Sharp knife
Nice-to-have tools
Screw clamps
Spade
Planer or drawknife
Beginner note: You don’t need professional-grade tools. I built most of this greenhouse with basic, borrowed equipment and hand tools.
Advanced note: Access to a table saw, impact driver, and laser level would speed things up considerably, but isn’t required.
Helpful skills
Basic measuring and levelling
Sawing in a straight line
Using a drill
Patience and problem-solving!
Don’t let this list intimidate you. I had never built anything this large before, and if I could learn as I went, so can you. The trick is just not give up.
When should you build?
I started building my greenhouse mid-March, but in hindsight, it would have been better to do it in the autumn of the preceding year.
Had I done so, I would have had more time to build the house–I got really stressed at one point, thinking that I’d never finish this project in time to really grow something in it that year.
Also, the soil I’d put into the greenhouse would have had time to settle before I put the plants in.
However, depending on your growth zone, your skills and experience with projects of this kind and if you have any help, late winter/early spring can be just fine to start building a greenhouse.
How to build a greenhouse from scratch
Step 1: Measuring and setting up a string frame
By the end of this step, you’ll have made a string frame for your DIY greenhouse.
First, I measured out the space behind the vegetable garden where I wanted to build my greenhouse and marked it with strings. I’m glad my dad helped me with that. If you (like me) have never done this before: don’t worry. Here’s a step-by-step guide on how to set up a string frame:
Marking your first corner
When you have decided where to put your greenhouse, you hammer a wooden (or metal) stake into the ground to mark a corner of your future greenhouse. Ensure the stake extends at least 20 cm (8 inches) above the ground for string attachment.
Creating the rectangle
Next, you measure out the small side (in my case, 3 metres / 10 feet) and hammer in a second stake. Connect these two stakes with a string. You then measure out the long side from one of the two stakes (here: 9 metres / 30 feet) and hammer in a third stake. Again, connect this stake with the first one.
Ensuring perfect squares with the diagonal method
Beginner note: If this step feels confusing, take your time. Getting the base square makes everything else easier later—and fixing mistakes now is far simpler than correcting them later.
Advanced note: If your site isn’t perfectly flat, you can still square the frame—just focus on accurate horizontal measurements rather than ground level at this stage.
Now comes the coolest part: measure the diagonal length from the second to the third stake and make a note of the length. If, like in my case, you want to build a large greenhouse, you can do that with the help of a string that you attach to the second stake and pull it to the third one. Otherwise, you just use a folding rule. Mark the spot on the string where it touches the stake and measure it. Now you measure from the first stake to a (at that point imaginary) fourth stake until you have the same diagonal length as measured before between stakes two and three. Hammer in the stake and connect the last side with the string.
Step 2: Setting up the frame
By the end of this step, you’ll have
set the ground sleeves
pillar beams securely bolted
a stable base frame including windows and a door
Setting the ground sleeves
Beginner note: Ground sleeves are very forgiving. Small inaccuracies can be compensated for later when you attach the beams—don’t aim for perfection, aim for consistency.
Advanced note: In very loose or sandy soil, you may want to set sleeves slightly deeper or compact the soil around them with gravel for extra stability.
With the string frame in place, I started to hammer in the ground sleeves for greenhouse foundation, one on each corner and then one every 1,5 metres (3.5 feet) at the long sides. I used sleeves with a length of 90 cm (3 feet) and a 7×7 cm (2.75 x 2.75 inch) base on the top.
At the front of my future greenhouse, i.e. the short side facing east, I additionally added two sleeves where the doorframe would be. All in all, I used 16 ground sleeves (7 on each long side and two for the door frame).
All sleeves must be at exactly the same height. To ensure that, I used a plank, put it across two sleeves and measured with a spirit level. Since the area I built my greenhouse on isn’t level, I had to compensate. Some sleeves needed to be hammered deeper into the earth, while others stood higher—all carefully adjusted so the tops were perfectly level with each other.
I had to decide what my reference point for height was. Naturally, I took the deepest point in my greenhouse area where I let the sleeve stand out 20 cm (8 inches) above ground. The other sleeves were adjusted accordingly. That meant that while the reference sleeves stood out 20 cm (8 inches), some had to go 10 cm (4 inches) into the ground. There, I shovelled away the earth and hammered the sleeve into the right height. After every sleeve, check that it is level with the others.
Erecting the wooden beams
Beginner note: If planing beams by eye feels intimidating, remove small amounts of wood at a time and test the fit often—you can always take more off, but you can’t put it back.
Advanced note: A thickness planer or belt sander makes this step faster and ensures consistent beam dimensions.
At my dad’s workshop, I sawed 8×8 cm (3×3 inches) wooden beams to the right length, which I determined with good old Pythagoras. I added an extra 15 cm (6 inches), though, as I wanted the beams to protrude over the south edge.
This was necessary, as I intended to fix a gutter on this side. In the end, I had 7 beams with 1,8 metres / 6 feet (south side) and 7 with 2,2 metres / 7 feet (north side), all with an angle of 13 ° at the upper side. The two beams for the doorframe were adjusted later.
To fit the wooden beams into the sleeves, I had to plane 0.5 cm / 0.2 inches on each side of the lower 10 cm (4 inches) of the beams. Since my 8×8 cm (3×3 inches) beams were slightly larger than the 7×7 cm (2.5 x 2.5 inches) sleeves, I planed them by eye until they fit snugly.
After fitting the beams into the sleeves, I drilled holes into them through the pre-made holes in the sleeves and stuck 8 cm (3 inches) carriage bolts into them. Lastly, I screwed them tightly into the sleeves using the carriage bolts and nuts.
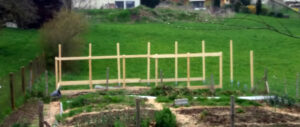
Constructing the wooden greenhouse frame
Once the pillars were set, I started to build the wooden greenhouse framework for which I used boards that were 2,5 cm (1 inch) thick, about 20 cm (8 inches) broad and 4 – 5 metres (12 – 15 feet) long. I fixed the first board with a screw clamp across the bottom of the front corner pillar, starting at the south side.
Then I marked where it hit the last pillar it could reach (in this case, the third), took it off and sawed along the mark. My garden plot has no electricity connection, so everything had to be done by hand—a workout I hadn’t quite anticipated when I started this project!
After fixing it again with two screw clamps, I screwed the board to the pillars. In that way, I did all the bottom boards around the greenhouse and afterwards started screwing boards to the upper side of the pillars. I just had to remember that no bottom board was needed where the door should be built.
Adding windows
Next, I installed the frames for the windows that I wanted to build into the sections on the south and north sides. For this purpose, I took wooden battens (5 cm x 2,5 cm / 2 x 1 inches), measured the distance between two beams, sawed them to the measured length and screwed them in between the beams. For each window, I needed an upper and a bottom batten to complete the frame.
Window frames
Beginner note: Slight variations in window size are perfectly fine. What matters is that each window fits its own opening, not that all windows are identical.
Advanced note: If you want tighter seals, you can add weatherstripping or overlap battens once the tarp is installed.
Now the windows had to be built. This was the same as building the window frames, but with additional sidebars. I measured out every section and sawed the battens according to measurement. I’m no carpenter, so the measurements varied a bit from section to section, so it made more sense to measure each section individually and saw the battens accordingly.
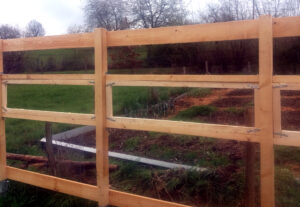
When the windows were ready, I fixed them into the frames with hinges at the lower part, two on each window, making sure that they opened to the outside of the greenhouse. I can’t tell you the delight I felt when I opened my first (empty) window, and it worked! In the end, I had 12 windows, six on the south and six on the north side, and it was time to tackle the ceiling.
My first completed window frame—empty, but perfect!
Tip: Always double-check that the windows open outward fully to allow ventilation.
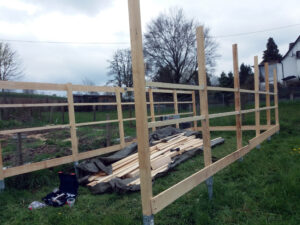
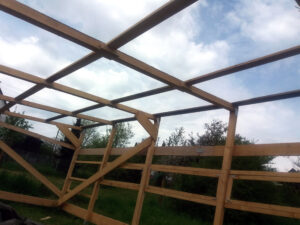
Ceiling beams
Next, I laid beams of 3,15 m (10.3 feet) across the upright beams in a north-south direction so that they ended at the north side at the edge of the pillars and overhung on the south side by approximately 10 cm (4 inches). I screwed the ceiling beams onto the pillars and additionally fastened them with metal angles.
All, except the last one on the front. I only laid this beam onto the pillars, inserted the remaining two beams into the sleeves where the doorframe would be, and marked the height at which I had to saw so they would fit. I didn’t want to take the risk of calculating the height (I was never good at maths), so that seemed the best and easiest way to do it.
As the framework needed stability, I screwed boards diagonally across the backside and the fields left and right of the door frame. I also installed diagonal boards from each pillar beam to the adjacent ceiling beam. That done, stability had improved A LOT!
Beginner note: Diagonal bracing may not look pretty, but it’s one of the most important elements for long-term stability—especially in windy regions.
Advanced note: Metal cross-bracing or tension cables can be used instead of wooden braces for a cleaner look.
Reinforcing the ceiling
The wooden beams on top are adjusted in a north-south direction. To make sure the tarp wouldn’t hang loosely and form sags when it was raining, I inserted boards between the beams’ sections. I started with the highest, i.e. the north side and screwed the boards on with angles so that they levelled with the top of the beams.
I did three boards per section, one on the north side, one in the middle and one on the south side, ending with the beams’ edges.
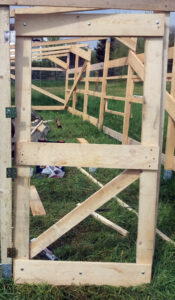
Building the door
Now, I had to build the door: I made a frame out of boards and stabilised it with a horizontal board in the middle and diagonal boards on the upper and lower sections. I then fixed it to the left pillar with hinges that were larger and thus more stable than the window hinges.
When that door swung smoothly on its hinges for the first time, I may have done a little victory dance. (Okay, definitely did a victory dance.)
Step 3: Covering
At the end of this step, you’ll have
covered all sides of the greenhouse with tarp
closed the ceiling
secured the tarp in the soil
cut open all windows and the door
Research on greenhouse covering
The last step now was to cover the whole DIY greenhouse frame with greenhouse film. I had done a lot of research in advance, comparing different possibilities like plastic twin-wall sheets, plexiglass, real glass and different greenhouse films.
The twin-wall sheets and plexiglass I dismissed pretty soon, as they would have been too expensive. The same went for real glass, which had the additional disadvantage of heating the greenhouse too much, so that shading would have been necessary–which would have cost even more.
Film it was then. Here, too, there are multiple possibilities. In the end, I opted for this heavy-duty tarp, which, due to its grid, is very stable and also thick enough to last several years (the manufacturer guarantees 3 – 5 years, but I think it may last a good deal longer. Time will show.) Update (2025): After three years, the ceiling tarp developed holes in it, forcing me to replace it.
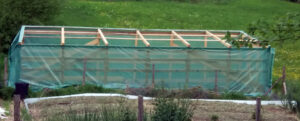
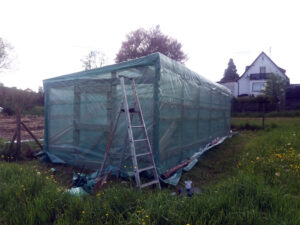
Covering the greenhouse sides
Beginner note: This step is much easier with two people. If you’re working alone, clamps are your best friend—use more than you think you’ll need.
Advanced note: For long-term durability, sandwich the tarp between wooden battens and the frame rather than relying on screws alone.
Adjusting the heavy-duty tarp was the hardest part of this whole project, as it lives up to its name and is very heavy. However, with the help of several clamps (and after a bit of swearing and sweating), the first edge was tightly screwed to the corner beam of the east side using plumbing screws.
How to fix the tarp
Plumbing screws are metal screws with a rubber seal washer. That means that they have a larger contact area than without the washer, making sure that the film doesn’t tear out.
Update (2025): Despite the plumbing screws, the tarp was partly torn out when I replaced it after three years. This time, I fixed the tarp with boards on the framework.
Now, I pulled it to the next pillar and screwed it on, making sure that it was tightly stretched. Additionally, I fixed screws along the upper and lower boards and around the window frames, clinging them firmly to the wood. I started at the back wall and worked my way around the entire house. I made sure that the film levelled up at the upper side of the greenhouse and overlapped at the lower side.
Opening up the door
To enter the greenhouse, I used a sharp knife to cut a slit between the door and the doorframe. Next, I screwed a door latch onto the door and its counterpart onto the frame—and just like that, I could open it! It was a great moment entering “my house” for the first time!
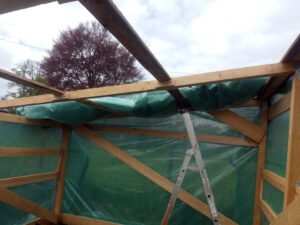
Covering the greenhouse ceiling
Beginner note: Wind stress adds up over time. Even if the tarp looks secure at first, reinforcing it now can save you from repairs later.
Advanced note: UV-resistant greenhouse film with reinforced edges lasts significantly longer than generic tarps, especially on roofs.
To get the ceiling covered, I first unfolded the tarp to its full size and then rolled it lengthwise. I then lifted it onto the ceiling and started to screw it onto the east beam. (Honestly, I don’t remember how I got that heavy foil onto the ceiling all by myself, but I’m pretty sure that some swearing was involved.)
I then unrolled the film inch by inch, using a lot of plumbing screws to screw it onto the beams and boards. I took a screw every 10 – 15 cm, in short: a lot! But I was (and still am a bit) scared that the wind would rip off the film and tear the whole greenhouse apart, and so I decided that in this case, more is more.
Update (2025): It turned out that my fears were justified– the tarp had ripped off the boards when I replaced it after three years. To prevent that, I additionally fixed the tarp with boards on the wooden framework.
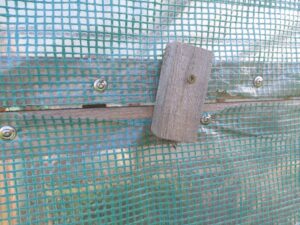
Opening up the windows and digging in the tarp
The whole house was covered now, and I opened the windows by cutting around between their edges and the frame with a knife, just like before when I opened the door. To keep the windows from falling open, I took some wooden scraps, leftover pieces from the battens I’d sawed earlier, and hammered them not too tightly onto the upper frame so that I could turn them and use them as a latch.
The last step on this building journey was to dig the overlapping tarp into the soil. I used a spade to dig slits into the earth, stretched the tarp and burrowed it tightly by firmly pressing the soil with my feet.
Step 4: Final touches
Fixing the gutter
As a last step, I fixed a gutter to the south side of the greenhouse to collect the rainwater from the roof. I had bought several gutter brackets that I screwed onto the upper boards of the greenhouse frame, one bracket per metre.
As you need a slight slope to one side to which the rainwater will be flowing, I fixed the brackets in a descending line from west to east. That means I started with the first bracket on the west side, screwed it almost at the top of the board and gradually lowered the brackets so that the last on the east side was about 10 cm lower.
Then I stuck the gutter tubes together and inserted them into the brackets. I closed both gutter sides with end pieces. About one metre from the east side, I inserted a tube into the gutter that leads the water downward into a 1000-litre water container that I bought from eBay. Finally, with the gutter in place, I could collect rainwater efficiently—an eco-friendly bonus!
Prepare for planting
Beginner note: Letting the soil settle for a few weeks before planting improves water retention and root stability.
Advanced note: Installing drip irrigation or soaker hoses before planting is much easier than retrofitting later.
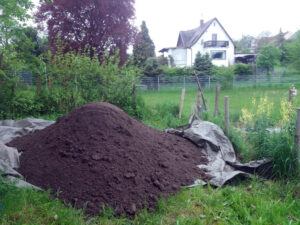
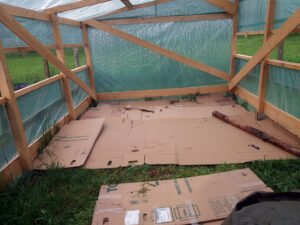
With the greenhouse complete, it was time to prepare the beds. For this, I used the same method as with my garden: I laid out cartons, put some leftover manure I still had from the previous year and ordered some good humus. To determine how much soil you need, measure your planting area (excluding paths) and multiply by 0.15 m (0.5 feet) to raise your beds 15 cm (6 inches) high.
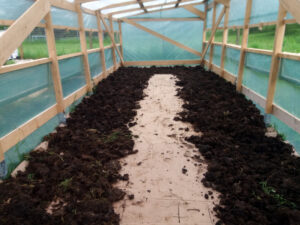
This is the soil for my greenhouse—it took me two hours to distribute it all!
This shows the massive pile I had to move.
Laying out cardboard for bed preparation
Distributing the manure evenly
Ready for planting!
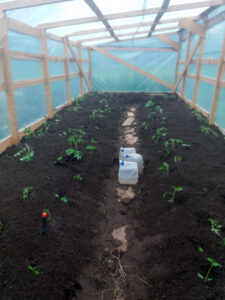
Finally, I was ready to plant my tomato, pepper and cucumber plants in the greenhouse, which had grown very large already!
What I’d do differently next time
Beginner & Advanced takeaway: If you only take one thing from this section, let it be this: start earlier than you think, secure the tarp better than you think necessary, and don’t hesitate to ask for help.
Start earlier
Well, to be honest, I totally underestimated the time it took for me, an inexperienced non-craftswoman, to build a greenhouse of that size. Naturally, I sometimes had to reflect on how to proceed and all in all, I wasn’t very quick.
Additionally, you’re dependent on the weather. Heavy rains will stop your work on a project like that. That said, if I were to build a greenhouse again, I’d start earlier in the season. It was ready for planting by the end of May, and that was a bit too late for all my warmth-loving plants like tomatoes, cucumbers and peppers.
Use boards to secure the tarp.
Next, I’d fix the tarp on top with wood boards. That means, I’d first roll the tarp across the ceiling, place boards on top of it where the beams are and secure it all in place with screws. That way, the tarp couldn’t get torn out when the wind gusted in and lifted it.
Invest in better materials.
Also, four years in now, I’d definitely invest in a more weather-resistant tarp. The one I bought initially guaranteed weather-resistance for 3 – 5 years, and last year (after three years), I had to exchange the ceiling tarp. This may also have to do with the insufficient fixing to the beams just with screws, but it had also become brittle when I took it off. A better tarp is more expensive, of course, but it’ll be worth it in the long run.
Reconsider measurements
For a greenhouse of this width, I learned that three instead of just two beds is better. They’re narrower, giving you better access to all plants.
Plan the door width more carefully—mine could be 20 cm wider for easier wheelbarrow access through the growing season.
Ask for help
Get help. I’m not good at asking for it, and I always want to know if I can do things on my own, but honestly, it wouldn’t have taken that long if I had asked the boys to help. I only admit this to you. Hope none of my family will ever read this section… (Don’t tell them I said so!)
Resume
Four years later, my low-cost greenhouse alternative has weathered autumn storms that would have demolished those flimsy PVC tunnels I first considered. Inside, tomatoes climb past my head, peppers ripen in abundance, and I’ve extended my growing season by months. Every time I step inside—even just to check on seedlings on a February morning—I feel proud. Not because it’s perfect (it’s definitely not!), but because I built it with my own hands.
If you’re dreaming of your own greenhouse, I hope this guide shows you that building a greenhouse from scratch is possible. You don’t need to be a carpenter or engineer. You just need patience (a lot!), basic tools (some), and the willingness to learn as you go (absolutely!).
Start with that string frame, take it one step at a time, and before you know it, you’ll be harvesting tomatoes in your very own DIY greenhouse.
Happy building—and even happier gardening!
Want to know more about gardening? These posts are for you: