.
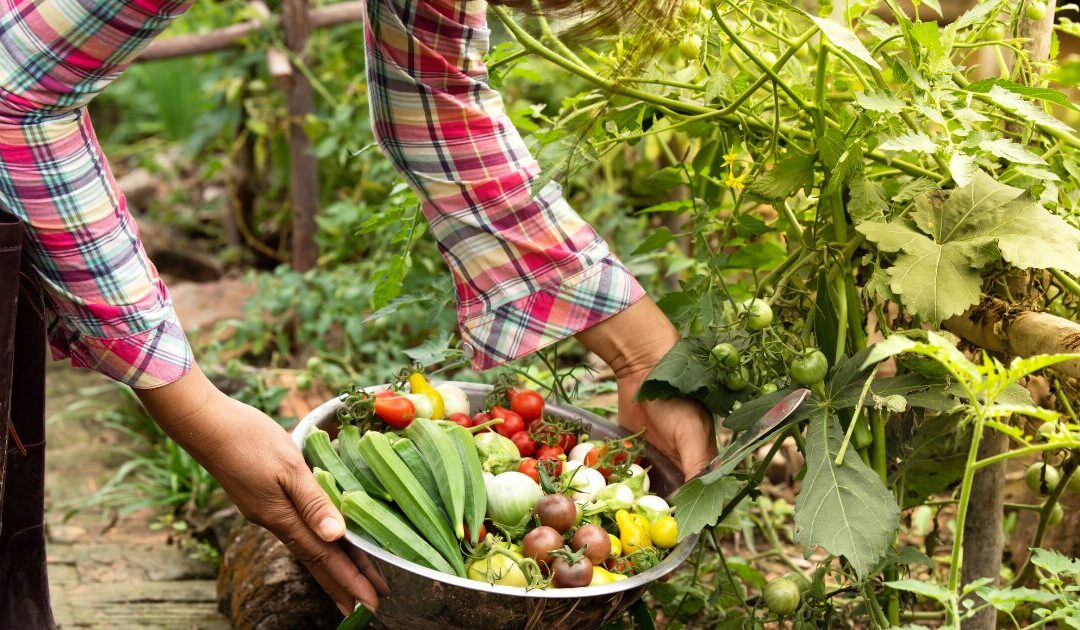
Did you know that over 67% of households started gardening during recent years? As you’ve found this article, I gather you’re a newbie, too, and you’re finally ready to start growing your own food. That’s wonderful! And don’t you let yourself become anxious that you might kill your plants. I’ve got you covered: because there are some vegetables that are practically begging to grow, no matter how brown your thumb might be.
2025 is your year to leave all doubts behind and finally develop that green thumb. Whether you have a spacious backyard or just a few containers on your patio or balcony, these 11 easy vegetables for beginners are practically guaranteed to thrive with minimal gardening experience. From fast-growing radishes to foolproof tomatoes, I’ll show you exactly what to plant for a successful first harvest. Let’s dig in! (Pun absolutely intended 😉)
What are “beginner-friendly” vegetables?
What makes a vegetable easy for beginners?
One criterion, for example is that they are robust against diseases and have a high germination capacity (that means, seeds grow easily) .
Furthermore, they must be easy in their demands on the soil, temperature and watering. Even in conditions that are not ideal, they can grow successfully. For that reason, maintenance requirements are comparatively low.
A furhter indicator is that beginner-friendly vegetables often have a rapid growth cycle. That means that you can harvest them after a relatively short growing time.
Easy vegetables for beginners
The following vegetables are easy to grow and thus great for beginners.
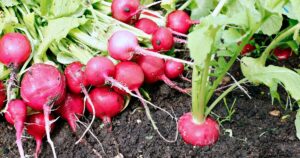
#1: Radishes – the perfect beginner’s vegetable
Sowing: When the soil’s no longer frozen
Harvesting: 4 – 6 weeks after sowing
Pot size: small; a balcony container is sufficient
Radishes were the first vegetables my mum let me grow when I was just a toddler. That said, radishes will work for anyone and everyone who has a patch of soil – be it in a garden, a pot or a container. They have very few requirements on the soil and you can harvest them already after 4 – 6 weeks!
Depending on your growing zone, you can start to sow radishes outside after the last days of frost. In my region (7b) that’s beginning to mid-April. If you have a greenhouse or a cold frame, you can start even earlier.
Prepare the soil and make rows with the stick of your rake or the side of your hand. Sow the seeds 1 cm (1/2 inch) into the row with a distance of 3 – 5 cm (1 – 2 inches). The distance between rows should be about 10 – 15 cm (4 – 6 inches). Cover the seeds with soil, water them and let nature do its magic.
When your radishes are about the size of a large cherry, they’re ready to harvest. If you leave them too long in the ground, they’ll become woody in texture.
You can continually sow radishes until September, which makes them a great gap filler. They grow very well in balcony containers.
Pro tip: When you’ve sowed too tight, plug out all the seedlings that are too close to one another. When they’ve too little room, they won’t build out bulbs.
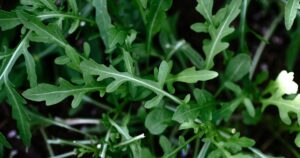
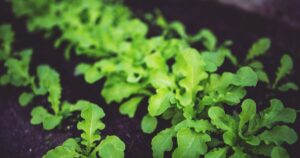
#2: Rocket salad – an easy green
Sowing: early spring to early autumn
Harvesting: 4 – 6 weeks after sowing, multiple times
Pot size: small; a balcony container is sufficient
Rocket salad grows similarly fast and easy as radishes. It’s a great salad and addition to pizza and pasta.
Sow rocket salad at around the same time you sow radishes and also in rows. Sow the seeds 1 cm (1/2 inch) deep and keep a distance between rows of 15 – 20 cm (6 – 8 inches).
If you sow in spring, cover the rows with a garden mesh to keep the seeds warm. After about 6 weeks (depending on the temperature), you can harvest your first rocket salad by breaking off the leaves you want to eat.
You can also sow rocket salad continually until September. It also grows well in balcony containers.
Pro tip: Sooner or later rocket salad will shoot into bloom. At that stage, it won’t taste that good any longer. Cut off all the leaves at about 5 cm above the soil and it’ll soon build out new leaves.
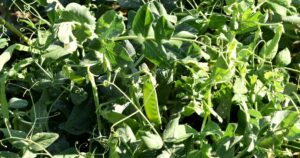
#3: Sweet Peas – a must-have for a beginner’s vegetable garden
Sowing: early spring to early summer
Harvesting: 6 – 8 weeks after sowing
Pot size: You can sow sweet peas in a balcony container (one row per container) but you have to build some kind of stable support for the plants
like twigs. Otherwise, the wind will snap them.
Sweet peas are one of my favourite veggies and usually, I snack them right from the stem! And the best thing is they’re terribly easy to grow.
Sowing time is after the last day frosts.
Prepare the soil and mark two rows with a distance of about 20 (8 inches) in between. Sow a pea seed every 3 – 4 cm (1 – 2 inches) and cover the seeds 4 – 5 cm (1.5 – 2 inches) with soil.
Peas grow to a height of up to 50 – 60 cm. For that reason, it is advisable (but not absolutely necessary) to build a trellis of wire or twigs to support the peas.
Also, protect the peas from birds during the first few weeks of growth with a protective net.
After about three months, the sweet peas are ripe for harvesting. Pluck off the peas when they’re still flat so that they’ll continue to bloom and build new peas.
Pro tip: Peas don’t like beans. If you want to grow beans as well, make sure that you don’t plant them next to peas.
#4: Lettuce – easy to grow and so many varieties!
Sowing/planting: Depending on the variety early spring to early autumn
Harvesting: 6 – 10 weeks after sowing, in case of pluck salad multiple times
Pot size: A balcony container is sufficient for pluck salad; if you want to grow head salad in pots they should at least be as large as the ready-to-
harvest head will be.
Lettuce comes in almost all colours and forms. There are green, red and purple varieties, some even with lovely speckles. Some lettuces build out round or elongated “heads”, others consist of loose leaves or rosettes. When you plan wisely, you can grow salad all year round, because some varieties like for example, radicchio unfold their full flavour not until it’s cold.
Lettuce grows quite fast which makes it a perfect gap filler.
The easiest lettuce to cultivate is pluck salad which you sow directly into your patch or container around the same time as radishes. Cover the seeds only very lightly with soil or just press them into the soil without covering them at all. If you just pluck the leaves without damaging the plant’s heart, it will continue to grow leaves for harvesting.
Head lettuce takes a bit more time and space to grow and you have to make sure that the varieties you sow or plant are appropriate for your climate. Head lettuce itself, for example, doesn’t like temperatures above 22°C (100 °F). In summer, therefore, it’s better to plant iceberg lettuce.
Pro tip: If you use seedlings, don’t plant them too deep. They must “wave in the wind”, otherwise they won’t build out heads.
#5: Swiss chard – an easy vegetable with a long harvesting time

Sowing: early spring to late summer
Harvesting: 10 – 12 weeks after sowing, multiple times
Pot size: The pot should be at least 20 cm high
In my opinion, Swiss chard is the prettiest vegetable ever. It comes in different colours (yellow, orange, red and green) and looks good even in a flower bed. It doesn’t need much regarding nutrients and maintenance and it’s well resistant to pests.
Sow Swiss chard when the temperature is above 15 °C (75 °F) during the day. Sow in rows with a distance of 15 – 20 cm (6 – 8 inches) between plants and about 30 cm (12 inches) between rows. Cover the seeds about 3 cm (1.3 inches) with soil.
After 10 – 12 weeks, you can harvest the stalks and leaves of Swiss chard. Make sure that you leave the plant’s heart intact. That way you can harvest until the first frost.
Pro tip: Swiss chard is closely related to spinach and beetroots which means they need about the same nutrients. To avoid competence, don’t plant these vegetables near each other.
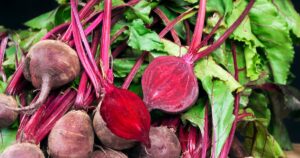
#6: Beetroot – an underrated vegetable for beginners
Sowing: mid to late spring
Harvesting: about 6 – 8 weeks after sowing; leave it longer if you want to get larger plants
Pot size: The pot should be at least 20 cm high
Beetroot is the jack of all trades in the vegetable world. They come in different colours (even striped varieties) and can be eaten raw, roasted or cooked. They can be stored in sand during the winter months and are also easily preserved.
Beetroot grows best at temperatures around 16 °C (60 °F) which means that we either sow it in spring or later at the beginning of autumn.
Sow beetroots in rows with a distance of 15 cm (6 inches) between plants and 25 cm (10 inches) between rows.
Beetroots can be harvested when they’re about the size of a golf ball, but you can also let them grow.
Pro tip: When harvesting, twist off the leaves. That way, the beetroots don’t dry out so fast and can be stored for a longer time.
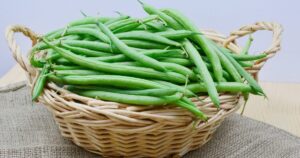
#7: Bush beans – easy to grow and a rewarding harvest
Sowing: Late spring / early summer
Harvesting: 6 – 10 weeks after sowing
Pot size: You can grow bush beans in a balcony container but you must build a stable support for the plants, like twigs. Otherwise, the wind will
snap them.
We differ between bush beans and climbing beans. The latter are more difficult to cultivate but bush beans are a great beginners’ vegetable.
Country lores tell us that beans want to hear the bells ring and that they are best planted barefoot. And it’s true! Beans shouldn’t be planted too deep, not more than 2 – 3 cm (about 1 inch) and when the soil is sufficiently warm to walk barefoot. In my region, that’s about the beginning of May.
Either sow bush beans in rows with a distance of 5 cm (2 inches) between plants and 20 cm (8 inches) between rows or sow them in groups of 6 seeds with a distance of 30 – 40 cm (12 – 16 inches) between groups. Sowing in groups has the advantage that the plants support each other. Nevertheless, as long as the variety doesn’t exceed a height of 25 cm (10 inches), I prefer sowing in rows.
After sowing and watering you needn’t do anything. Bush beans are very modest and don’t need much to grow. On the contrary, they even enrich the soil with nitrogen they catch out of the air and store in their roots.
Pro tip: Harvest regularly. The more often you harvest, the more beans you’ll grow.
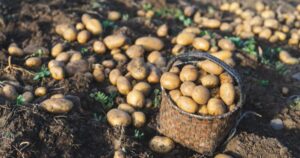
#8: Potatoes – an easy vegetable for beginners with a magic harvest
Planting: late spring
Harvesting: depending on the variety 10 – 24 weeks after planting
Pot size: Take a large pot of at least 50 cm (20 inches) in diameter or a sturdy sack.
To cultivate potatoes, you only need some space and time.
Give potatoes a headstart by presprouting them: about 4 weeks before planting, put the planting potatoes on a window sill (this is best done in an egg carton) and let them sprout. You can plant the potatoes about 3 – 4 weeks before the last night frosts.
Dig a hole 10 cm deep into the soil, place a potato with the sprout facing upwards in and carefully cover it with soil. When the leaves are about 15 cm high, earth them up by raking soil from around the plant and accumulating it around the leaves (don’t bury them; the green must still be visible).
Potatoes are also suitable for growing in pots. Put a drainage into a large pot, add about 20 cm (8 inches) of good, rich soil into it, put about 4 – 6 potatoes onto it (depending on the pot size) and cover it with 10 cm (4 inches) of soil. As the leaves grow, earth them up as described above.
Potatoes are ready to harvest when the leaves have died.
Pro tip: Earthing up not only supports the growth of more potatoes but it also protects them from the sun. If exposed to light, the potatoes will turn green and as a consequence won’t be edible.
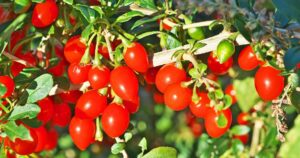
#9: Bush tomatoes – the easiest of their kind
Sowing (indoors): 6 – 8 weeks before planting out
Planting (outdoors): after the last night frosts
Harvesting: 8 – 10 weeks after planting, continually until the first frost
Pot size: Depending on the variety from a balcony container to a large pot of at least 50 cm (20 inches) in diameter.
Admittedly, tomatoes are usually not considered a beginner-friendly vegetable. They have very special requirements regarding nutrients, temperature and watering and can be a bit tricky to cultivate. However, bush tomatoes are more forgiving than the larger varieties! They don’t need to be pruned or tied up and even grow in large pots.
As a beginner, I recommend buying plants from a good nursery. Prepare the soil by working in compost and/or manure to provide enough nutrients. After the last night frosts (in my zone that’s mid-May), you can plant the tomatoes outdoors, either into your garden patch or even into a large pot. Make sure they have enough water, especially when they grow in pots. (If you don’t know your hardiness zone, check out the “plantmaps” website.)
Bush tomatoes produce abundantly all summer long, providing you with loads of little fruit for a salad or just as a snack.
Pro tip: Tomatoes are very hungry: add some liquid fertilizer every 4 weeks to give them everything they need.
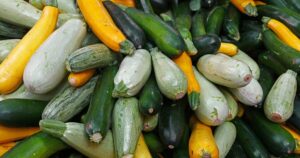
#10: Zucchini / Summer squash – more than you can eat
Sowing (indoors): 4 – 6 weeks before planting out
Planting (outdoors): after the last night frosts
Harvesting: 8 – 10 weeks after planting
Pot size: The pot should be at least 50 cm (20 inches) in diameter
There’s hardly any vegetable that produces reliably so many fruits as a zucchini. 2 – 3 plants can easily feed a family of four, with plenty to spare for preservation. Zucchini can be eaten raw or cooked, even the blossoms are edible.
Summer squash is very easily grown from seeds. However, as the plant likes it warm, you’d best start them indoors. Zucchini grow very fast which is why I recommend sowing them around 4 – 6 weeks before the last night frosts. In my region, night frosts are usually over by mid-May, which means I sow the seeds indoors at the beginning of April.
When the plant has four leaves and night frosts are definitely over, you can plant it out into the garden patch or a large enough pot.
Zucchini need nutritious soil and some fertilising every four weeks or so. As a beginner, it’s best to use a ready-made liquid fertiliser for fruit-bearing vegetables which is normally made of organic manures. If you want to know more about fertilisation you can read about it here, here and here.
Pro tip: Harvest zucchini when they are between 15 – 20 cm (6 – 8 inches). They taste best at that size and continual harvest will produce an abundance of new fruit.
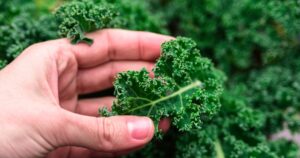
#11: Kale – the easy-to-grow superfood
Sowing: March (indoors), after the last night frosts (outdoors)
Harvesting: August to October. If you harvest only the outer leaves you stimulate growth and harvest yield. That way you can harvest throughout winter.
Pot size: Take a large pot of at least 50 cm (20 inches) in diameter.
Kale is not only a superfood due to its high vitamin content but also very easy to grow, even in containers.
Further, it’s frost-hardy which makes it great for early and late cultivation. You can even harvest it in winter when nothing else grows outside.
Kale is a hungry plant, however, which means that you must enrich the soil with nutrients, for example by digging in compost or well-rotted manure. Additionally, it needs further nutrients during the summer which can be done by watering it with diluted nettle manure.
Sow kale in rows at a distance of 50 cm (20 inches) between plants and rows.
Pro tip: Although frost is not necessary, light frost and sunshine stimulate the storing of sugar in the leaves which makes them even better.
Essential Growing Tips for Beginner Vegetable Gardeners
Whether you turn (part of) your backyard into a vegetable garden or grow your plants in pots, there are some basic things you have to consider.
Soil preparation basics
First of all, it’s important to know your soil’s pH level and nutrient composition. In this article you can learn more about the different types of soil, how you can find out your main soil type and what to do to improve it if necessary. A local agricultural extension office can help you with affordable and comprehensive soil testing.
The next step on your way to cultivating vegetables is to remove all weeds, grass patches, rocks and debris from your patch. That way your vegetables won’t have to compete for nutrients, light and water
I know there are recommendations out there to dig your patch up with a spade, tiller or gardening fork but that’s not necessary. Just loosen the soil with a hoe and afterwards rake it even. If you want to make a (new) patch, this article will show you the easiest method to do so.
It’s good to incorporate compost, well-rotted manure or other organic matter into your soil. This not only adds nutrients and enhances water retention but it also improves the soil structure. Add 5 – 8 cm (2 – 3 inches) of organic matter and mix it thoroughly into the soil.
If you plant in a pot, make sure you have high-quality planting soil with all the nutrients vegetables need. Ask your local nursery what soil is best for your plans.
After planting, add a layer of mulch – yes, in pots as well. This will suppress weeds and retain moisture while at the same time regulating the soil temperature. Over time, the mulch will decompose and that way add more organic matter to the soil.
Watering techniques
After sowing or planting always water the seeds or plants thoroughly. That way, the soil is pressed close to the seed or roots without any space in between. The plants can grow easily into the soil and get water and nutrients from it without effort.
As we mulch, our plants needn’t be watered very often. Unfortunately, most beginner gardeners water way too much, sometimes even drowning their plants! Watch your vegetables and only water them when they show clear signs of a lack of water.
Watering is best done either in the mornings or in the evenings, never when the sun is blazing down. Imagine you take a sunbath and suddenly someone drowns you in cold water. That’s how your plants will feel if you water them during a hot day.
When you water, water deeply. Instead of regularly watering shallowly, water once but deeply. The water should go down all the way to the roots which in some cases can be pretty long.
If you want to invest a little, you can buy drip irrigation and water hose systems. These are the most efficient watering methods. They deliver water directly to the plant’s root zone, minimize water waste, and keep foliage dry. Drip systems can be set on timers for consistent, precise watering and are especially useful for larger gardens.
Sunlight requirements
Vegetables need light to grow, some more than others, but they all need it. Take therefore the sunniest part of your garden to create your vegetable garden, build a raised bed or put your pots. Make sure there are no large trees, buildings etc. that would throw a shadow onto your plants.
Pest management strategies
Better to hear the hard truth right now: there is no garden without pests! BUT: although we don’t want to share our veggies with them we should focus on using the least intervening methods first. The goal is to create a healthy, self-regulating environment in your garden and prevent pests rather than eliminating them with hard chemicals.
An easy but often overlooked approach is to build physical barriers. Install snail barriers and use garden mesh to protect your plants. Additionally, gather snails and harmful caterpillars and dispose of them far away from your garden.
A good step towards regulation is companion planting, which means planting together vegetables that help keep pests away from each other. A good example of that concept is planting onions and carrots together. Onions secrete an odour that keeps the carrot fly (a common pest for carrots) away while the carrots prevent onion flies from attacking the onions.
Fertilization fundamentals
As you know, plants need “food” which they take up with their roots from the soil. However, the nutrients in the soil are not always enough which is why we need to “feed” (= fertilise) them. Every kind of vegetable needs a mix of key nutrients for root growth, healthy leaves and overall plant strength. The key to success lies in the ground – literally. A simple soil test will tell you what your garden needs.
It’s always a good idea to work in compost or well-rotted manure before planting in spring. These methods will slowly release nutrients and improve soil structure. Depending on the plants’ requirements, however, you’ll have to add nutrients at different stages of growth. Be careful though to not overdo it. Much does not help much here.
Container-Friendly Vegetables for Small Spaces
If you don’t have a garden but maybe only a patio, balcony or concrete backyard, you can grow all of the above vegetables in containers. Container gardening is slightly different from regular gardening but with a bit of preparation, both are equally easy.
Soil and pot selection
If in doubt always take the larger pot. There’s nothing more frustrating than watching plants grow and then stagnate or even die before you can harvest anything, just because their roots don’t have enough space in their container.
The second important factor is the soil. Although it’s more expensive, use high-quality, nutrient-rich soil for your containers. You can use ready-mixed vegetable soil or compost. Especially fruit-bearing vegetables like zucchini or tomatoes need plenty of nutrients to keep them going during their long growth period.
Sunlight and watering requirements
All vegetables need sun but some more than others. Fruit-bearing vegetables like tomatoes, zucchini and potatoes prefer a place with many sun hours while others like salad and radishes can grow well in a place with fewer sun hours.
If you grow plants in containers, you must always have a sharp eye on the water. Containers dry out a lot quicker than soil in the garden and therefore must be watered more often. Especially tomatoes, zucchini and potatoes need plenty of water. Too much, on the other hand, isn’t good either. Watch your plants carefully and only water them when they need it.
Common Mistakes to Avoid for New Vegetable Gardeners
Here are a few common mistakes I’ve often seen new gardeners make:
- Overwatering plants
Water thoroughly when sowing or planting and then only if it’s really necessary.
- Incorrect spacing
Resist the urge to sow or plant veggies too close together and give them the space they need although it may seem too big at the beginning. But trust me, it’s a bit like children and oversized garments: they’ll grow into it.
- Poor soil preparation
Prepare your patch into a bed your plants will want to lie in. That means, put out weeds and rocks and add compost and well-rotted manure
- Ignoring local climate conditions
Learn your growth zone and cultivate your garden accordingly. It’s frustrating to plant too early only to watch our seedlings die from frost.
- Unrealistic expectations
Remember the first letter you learned to write? Did you think you could write a whole book with it? No? Then why do you think you can feed a whole family from your first garden’s harvest? Like your garden, your experience will grow.
Conclusion
It can be a bit daunting to start cultivating vegetables but don’t let yourself be intimidated by that! By observing a few simple steps and using beginner-friendly vegetables, your success is guaranteed. Remember, every single gardener out there started exactly where you are now: with curiosity, a bit of uncertainty and the passion to grow something new. Don’t get discouraged by initial setbacks or small harvests. Gardening is a skill that will develop with time and the willingness to learn from every experience. Start small, stay curious and celebrate everything you grow.
Whether you’re nurturing a few balcony pots or transforming a backyard into a garden, you’re not just growing vegetables: You cultivate a deep connection with nature, understand where your food comes from and create something truly magical with your own hands!
Welcome to the wonderful world of gardening. Your adventure starts now!