")
.
Are you dreaming of starting a vegetable garden and harvesting fresh produce:? A small vegetable patch is the first step to a whole new quality of life: the best food, fresh air and a contribution to a “greener” world. Let’s take this fantastic step together so that you can make your dream come true!
How to make a vegetable patch
You want to make a vegetable patch, maybe even a whole vegetable garden? You want to dig into the soil with your hands, and inhale this wonderful earthy scent? And you want to harvest vegetables that are fresher and tastier than anything you can buy in a shop?
That’s wonderful!
In this article, I show you step by step how you can create low-maintenance and fertile vegetable patches without tilling, and superfast, too. With a few tricks, it’ll not only be fertile from the beginning but it’ll also stay weed-free.
Let’s dive in.
Why no digging when creating a vegetable patch?
Admit it: when you think about creating a vegetable patch, you first think about digging up the earth, right? I know it was common in most gardens for a long time. Today, however, science tells us that it’s probably better for our soil to not dig at all. Which is great for both, the microorganisms and our backs.
Did you know that there are more microorganisms in a handful of garden soil than human beings on the earth? These tiny invisible helpers are immensely important for fertile soil.
Imagine an earthworm, for example, who usually looks for food at the surface of the earth but has to go hungry if you dig up the soil. He suddenly finds himself out there while his food is three floors below. That’s a catastrophe – not only for the earthworm without any sunscreen but also for soil fertility.
The trick is now to NOT disturb the microorganisms but to work with them from the very beginning. That’s why we create our vegetable patches without digging.
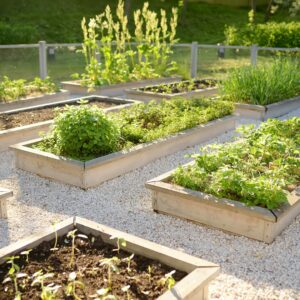
Start a vegetable patch in 5 steps
Let’s create a low-maintenance and high-yield vegetable patch!
Step 1: Prepare the ground
The first step is easy! The only thing you have to do is wait until the grass is long. When the grass is too short it cannot be bent. Then the pointy tips can easily penetrate the cardboard that we put onto the lawn. The cardboard suffocates long bent grass and it dies.
So, the first step in creating a vegetable patch: let the grass grow under your feet 😊!

Step 2: Dig in a lawn edging border
When making a vegetable patch, dig in a lawn edging border along the outer edge of your patch. Weeds and grass must stay outside. With a lawn edging border you make sure that no uninvited guests grow into the patches and reconquer them. To kill to birds with one stone, you can use a metal snail barrier which not only keeps the weeds but also the snails out. I have chosen to use that, as my garden is on a meadow.
Dig a v-shaped hole into the ground and put in the border so that about five centimeters are showing. I prefer this lawn edging border that also works as a slug barrier. It’s made of metal which is more durable than plastic edges that release microplastic into the garden when decomposing.
My patches are all 1,2 m broad because I can work them without contorting. I can reach the middle of the patch from every side without balancing or doing acrobatics.
Step 3: create bed borders (optional)
The lawn edging border is not very appealing and you sometimes may even stumble over them. For that reason, you may conceal it a bit. How about a bed border made from wooden trunks? Stabilize them with small stakes so that they are firmly in place and cannot roll away.
Other possibilities may be stones, boards, tiles, or deadwood. Many things are possible. Just make sure that the bed borders are not too high and throw a shade onto your vegetables.
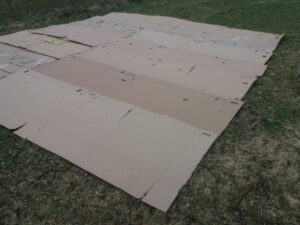
Step 4: Cardboard, gimme cardboard!
Now you get blank cardboard. It’s important to remove all tapes and staples so they do not get into the soil. Put the cardboard within the bed borders, overlapping at least 10 centimetres.
If you don’t have enough cardboard: ask your local bike shop. They have large cardboard transport boxes from the bikes which are great for a vegetable patch. They are huge and usually without print.
If you don’t want to use cardboard, anti-weed fabrics made of natural fibers that break down without any remnants are a good alternative.
Another possibility is to replace the cardboard with a layer of mulch. Apply 10 cm lawn cuttings or leaves and let it dry thoroughly. Then, distribute compost evenly on it.
Step 5: Spreading compost
Attention, ladies and gentlemen: here comes our star guest: his Royal Highness the Compost honors us with his entry into the garden!
That means you spread a 10 – 15 cm thick layer of mature compost on your beds
If you don’t have enough mature compost (which is likely when you want to start a vegetable garden), ask your local composting plant if you can buy some. It’s usually cheaper than a garden centre. In any case, make sure that the compost is made of organic material. Otherwise, it may contain lots of plastic – and we don’t want that in your vegetable garden!
I recommend using compost from green cuttings.
Bonus: Garden paths
Congrats: you now know everything about how to make vegetable patches. But also keep in mind that you may need garden paths, especially when you are creating several patches. You may separate them with woodchip paths. Plan the paths about 40 cm wide so that you can pass through with a wheelbarrow. Just spread the woodchips onto the cardboard. That way you can create easy-care garden paths in no time.
The patch is ready – what now?
The patch is ready, now it’s time for planting and/or sowing. You can plant or sow directly into the compost beds. The cardboard will decompose very soon so that the plant roots can grow through it without difficulty.
And earthworms, by the way, love soggy cardboard. Don’t worry: they’ll find their way to the surface.
You see: creating a vegetable patch is totally easy. The only thing you have to do is go outside and start! With these tips and tricks, you’ll create a vegetable garden in no time 😊
0 Comments