I harvested the first carrots and they smell and taste so good that usually I eat the first bunch of them raw. I love their sweet and earthy flavour, it’s delicious! However, it would be a pity to just eat them all up like that and not use them in some more elaborate recipes. One of my favourites with carrots is this easy recipe for carrot pizza.
How to make carrot pizza
Make a yeast pizza dough, put sour cream on it and coat it lavishly with carrots, herbs, onions and garlic. Top the pizza with cheese and bake it in the oven until it’s crisp and the cheese has melted. And voilà: a hearty and comforting dinner is ready to be served!
Even if you consider carrots bland, give this delicious meal a chance. The carrots taste even sweeter when cooked and the combination with sour cream, herbs, and salt makes this pizza a great dish for summer. It’s so tasty, I’m sure it’ll become your new favourite food.
Although I like it as a vegetarian dish, you could also put some bacon on it to add a smokey flavour. Either way, you’ll sure love this carrot pizza!
Recipe for Carrot Pizza
Ingredients (4 servings):
For the yeast dough
300 g flour 25 g fresh yeast or 3 g dried yeast 1 tsp salt 150 ml lukewarm water 2 tbsp olive oil
For the topping
450 g carrots 2 onions 1 clove of garlic 2 tbsp fresh thyme or 2 tsp dried thyme 200 g sour cream 4 tbsp olive oil salt pepper grated cheese (parmesan, mozzarella or emmentaler)
Instructions
1) Dissolve the yeast in the water and mix it with the flour, salt, and oil until it forms a smooth dough. Cover it and allow it to rise for 30 minutes.
2) In the meantime, clean the carrots, peel them, and cut them into thin slices. Peel the onions and cut them into slices, as well. Peel the garlic and dice it. Put some thyme aside for a garnish and chop the rest.
3) Mix garlic, carrots, onions, and chopped thyme with 2 tbsp oil and season it with salt and pepper.
4) Heat the oven to 250 degrees (fan: 230 degrees).
5) Roll out the dough and coat it with sour cream. Distribute the carrot mix evenly on the pizza and sprinkle the grated cheese on top. Bake it in the preheated oven for approx. 20 minutes. Garnish with the thyme and freshly ground pepper.
Carrot pizza
This carrot pizza makes for a hearty and comforting dinner.Even if you consider carrots bland, give this delicious meal a chance. The carrots taste even sweeter when cooked and the combination with sour cream, herbs, and salt makes this pizza a great dish for summer. It's so tasty, I'm sure it'll become your new favourite food.Although I like it as a vegetarian dish, you could also put some bacon on it to add a smokey flavour. Either way, you'll sure love this carrot pizza!
Dissolve the yeast in the water and mix it with the flour, salt, and oil until it forms a smooth dough. Cover it and allow it to rise for 30 minutes.
In the meantime, clean the carrots, peel them, and cut them into thin slices. Peel the onions and cut them into slices, as well. Peel the garlic and dice it. Put some thyme aside for a garnish and chop the rest.
Mix garlic, carrots, onions, and chopped thyme with 2 tbsp oil and season it with salt and pepper.
Heat the oven to 250°C / 480°F (fan: 230°C / 445°F).
Roll out the dough and coat it with sour cream. Distribute the carrot mix evenly on the pizza and sprinkle the grated cheese on top. Bake it in the preheated oven for approx. 20 minutes. Garnish with the thyme and freshly ground pepper.
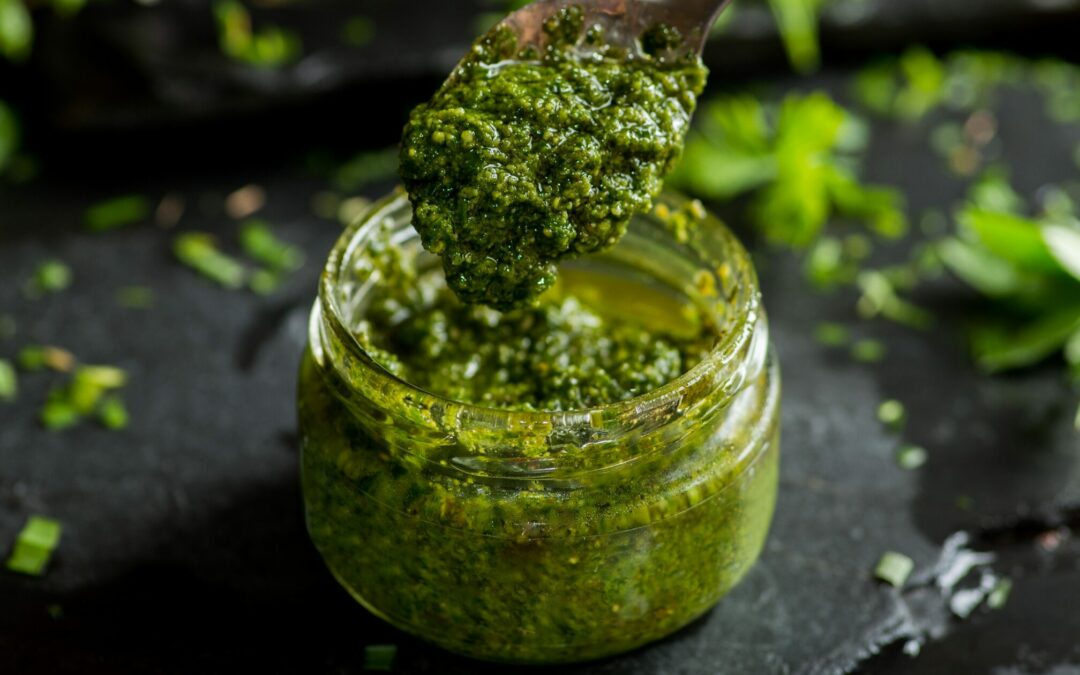
Aficionados of pasta and fresh vegetables appreciate the fresh and aromatic flavour of pesto. If you have fresh herbs at hand you can make some delicious herb pesto with simple means and relatively few ingredients. The big advantage compared to the store-bought version is that you can decide what herbs to put in and adjust the flavour to your liking. Below I’ll show you three great recipes for different herbal pesto that you can make in almost no time.
Tips for making pesto
Making herbal pesto is a fast and easy way to process fresh herbs.
Necessary devices
Pesto recipes always recommend using pestle and mortar. The reason behind this is not to make your arms go lame during the process of shredding and mixing the ingredients but to keep the herbs’ essential oils from evaporating. Electric devices like kitchen blenders or mixers can destroy valuable aroma substances of the herbs. Some essential oils evaporate at 40 °C already and the mentioned devices can reach those temperatures in a relatively short time. Thus, using a pestle and mortar is the first choice for making pesto.
However! If you chop the ingredients into very small pieces, use the pulsing function of your hand blender and pause the device whenever it gets warm, you’ll also get a formidable pesto. The choice of device is up to you.
What you should do in any case is wash the herbs and dry them thoroughly, then chop them finely with a knife before putting them either into the mortar or bowl for further processing.
Basic pesto ingredients
For an aromatic pesto, you always need two main ingredients: oil- or fat-containing nuts or seeds and an appropriate plant oil. One of the most famous recipes for a classic pesto, the Pesto alla Genovese, uses pine nuts and high-quality cold-pressed olive oil.
You can experiment like a crazy scientist with the nuts and seeds. Try out walnuts, for instance, or pistachios, hazelnuts, almonds, sunflower or pumpkin seeds, cashew nuts or – as in the original – pine nuts. Apart from olive oil, you can use sunflower oil, pumpkin seed oil or walnut oil. There is (almost) no limit to the imagination!
A further important ingredient is well-matured aromatic hard cheese – at least for all non-vegans. You can either use pecorino cheese which is mostly made of sheep milk or a good parmesan. Or both.
The last basic ingredient for our herb pesto is – tadaa! – herbs. You can use almost all herbs. If you use a mix of herbs, make sure that they harmonize well. When in doubt, stick to the classic Mediterraneans like rosemary, sage, thyme, savoury, basil and oregano. Either use the single herbs or a combination.
Further possibilities are kitchen herbs like lovage, bear’s garlic, parsley and tarragon or wild herbs like dandelion, sorrel or goutweed.
Recipes for homemade herb pesto
It’s quite easy to make herb pesto by yourself. In a few easy steps, you can make some tasty variations that are great in Italian dishes, on fresh bread or as salad dressing. I show you some simple recipes that you can adapt to your liking.
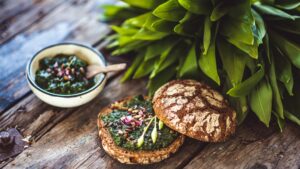
Bear’s garlic pesto
Bear’s garlic or wild garlic is a very popular spring herb. You may have tried already these recipes for bear’s garlic bread and bear’s garlic brioche braids. Wild garlic pesto is another great recipe for this flavoury herb. Its delicious taste is wonderful with pasta and fried potatoes. You can use it in a risotto or spread it on freshly baked rustic bread.
Ingredients for 250 ml pesto
50 g bear’s garlic 125 ml olive oil 5 walnuts 50 g pecorino ½ tsp salt
Instructions
Wash the wild garlic leaves and chop them finely. Grind the walnuts with a pestle in the mortar until they’re creamy, then add the chopped wild garlic. Add the pecorino. Alternatively, put all the ingredients into a bowl and mix them with a blender. Remember to only pulse the blender. Add the oil and salt to your taste.
Mediterranean herb pesto (vegan)
Combine Mediterranean herbs like thyme, lavender, basil, oregano, savory, rosemary and sage and use it for an extraordinary vegan herb pesto. A bit of garlic enhances the flavour of the herb mix.
Ingredients for 250 g pesto
10 g thyme 10 g lavender 15 g basil 15 g oregano 1 – 2 garlic cloves 20 g pine nuts 125 ml olive oil 1 tsp of salt and pepper each
Instructions
Chop the herbs and the garlic. Roast the pine nuts without oil in a pan until they turn light brown. Put the nuts and the chopped herbs in a mortar and mash them together with a pestle. Add the oil and salt and mix all thoroughly. If you want – and don’t insist on this pesto variant being vegan – you can also add hard cheese, for example, parmesan.
Wild herb pesto with dandelion, sorrel and goutweed
Wild herb lovers will adore this pesto that’s perfect for noodles, gnocchi or wild herb salads.
Ingredients for 250 ml wild herb pesto
50 g wild herbs (dandelion, sorrel and goutweed) 25 g sunflower seeds 10 g walnuts 125 ml olive oil (alternative: grape seed oil) 2 tsp lime juice (alternative: lemon juice) 2 tbsp parmesan 1/2 – 1 tsp salt 1/2 – 1 tsp pepper
Instructions
Wash the fresh herbs thoroughly, then dry and chop them. Put the sunflower seeds, walnuts and chopped herbs into a mortar and mash all together with a pestle. After that, add the oil, lime juice and cheese and mix it all thoroughly. Add salt and pepper to your taste.
Storage time of homemade pesto
Making herb pesto is a fast process and you may be tempted to make a lot of it when your herb harvest is abundant. However, pesto can’t be stored for a long time. The oil and salt in pesto are usually preserving foods that help to prolong the storage time of the pesto. The nuts, however, become rancid after some time and thus make the pesto inedible. The same goes for the hard cheese.
Therefore, homemade pesto can be stored unopened for three to four weeks in the fridge, depending on the quality and amount of oil and cheese in it. Storage time can be enhanced when you fill up the jar with oil so that the pesto has no contact with the air. Another possibility to prolong storage time is to add the hard cheese not until you eat the pesto.
So, making pesto is a great idea but making large amounts of it may not be the best way to preserve your abundant herb harvest. If you need other ideas to have herbs all year round, take a look at this post.
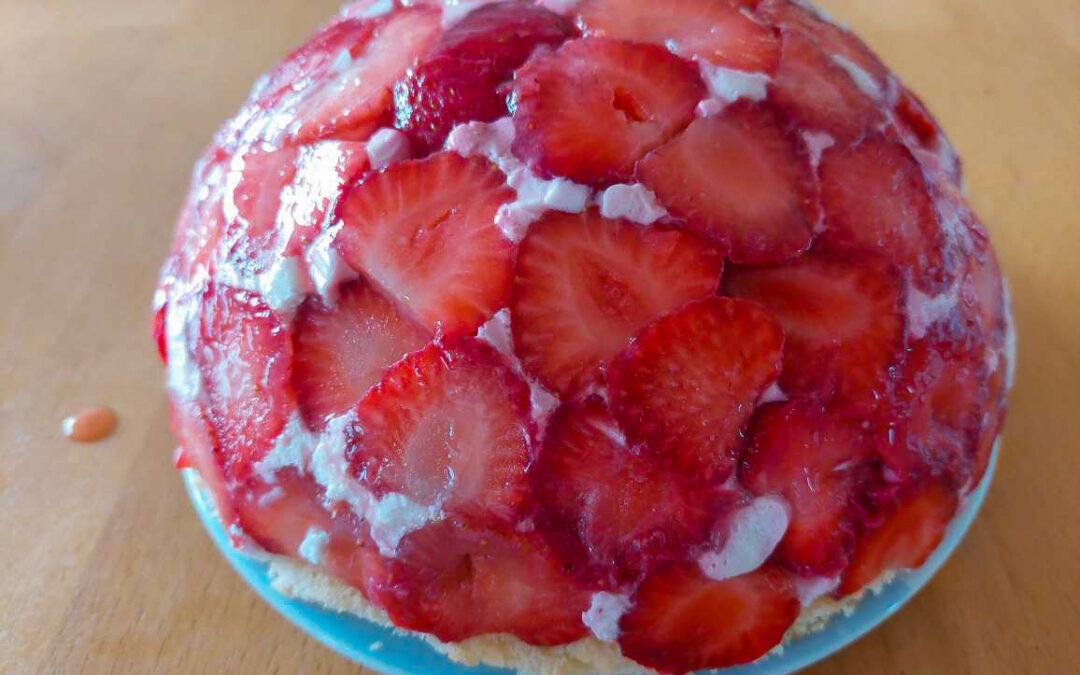
Strawberries! Every year we can’t wait for the first ripe strawberry and the knowledge that their harvesting time is limited to only a few weeks, makes them all the more precious. I think this relatively short availability and the fact that they don’t freeze well make them so popular. However, you can’t keep them for long in the fridge either and thus have to process them quickly. There are many fast and easy strawberry recipes like this strawberry pavlova or the strawberry tiramisu. But sometimes, we want to do something more impressive. That’s what this recipe is for. This strawberry dome cake will be a showstopper on every coffee table and it’s said to have even left some mother-in-laws speechless 😉 Admittedly, it takes more time to prepare this wonderful cake but it’s worth every minute of your effort!
Strawberry Dome Cake
10 – 12 servings
Ingredients:
3 eggs (size M) 1 pinch of salt 220 g sugar 100 g flour 1 tsp baking powder approx. 1 tsp butter 12 gelatin leaves (red or white) 1 kg strawberries 300 g curd cheese 200 g cream 1 package of red cake glaze
Instructions:
Preheat the oven to 180 °C (350 °F). Separate the eggs and beat the egg whites and salt until stiff. Gradually add sugar and beat again until the sugar has dissolved. Stir in the egg yolks. Mix the flour and baking powder and sieve it onto the stiff egg whites. Carefully fold in the flour mixture.
Line a baking tray with baking paper and put the dough on it. Smooth it out until it’s even and bake it in the oven for about 10 minutes. In the meantime, put a dishcloth on a flat surface and sprinkle it with sugar. When the cake is ready, remove it from the oven and immediately put it on the cloth, facing downwards. Remove the baking paper and let it cool down.
Take a half-round bowl and line it with cling film. Soak the gelatin leaves according to the packet instructions. Wash the strawberries and remove the green leaves. Cut about 300 g of the strawberries into slices and layer the bowl with them.
Mash the remaining strawberries together with 100 g of sugar. Stir the puree into the curd cheese. Remove the gelatine from the water and squeeze it. Afterwards, dissolve it in a small pot on medium heat and stir in 2 tbsp of the curd. Then stir this mixture into the remaining curd and let it cool down. In the meantime, whip the cream until it’s stiff and fold it into the curd mixture.
Cut the sponge cake into three layers for your half-round bowl. This can best be done with glasses or bowls of different sizes. The first layer should be the smallest, followed by a larger one. The last layer should be large enough to cover the bowl opening.
Carefully fill some of the cream into the bowl and put the smallest cake layer onto it. Alternately layer the mousse and the sponge, ending with the largest cake layer. Put it in the fridge for at least 3 hours.
Put a cake plate onto the bowl and turn it over so the cake sits on the plate. Remove the bowl and cling film. Prepare the cake glaze according to the package instructions and pour it over the cake. Let it cool for at least another 30 minutes.
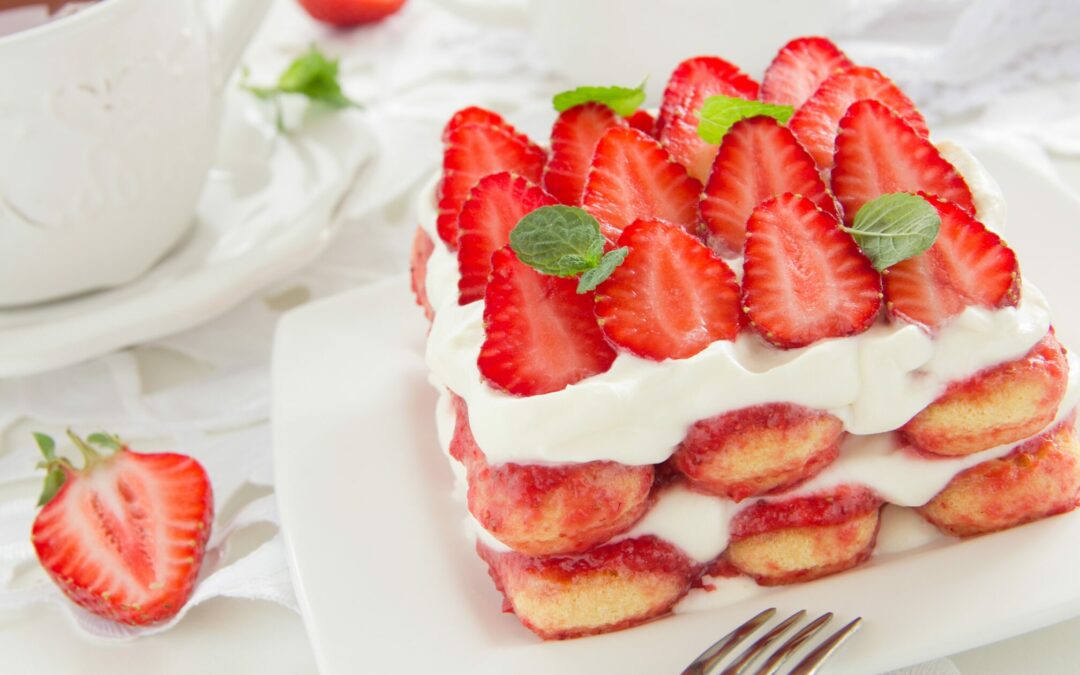
The classic tiramisu consists of ladyfingers, coffee, mascarpone and cocoa. But did you know that you can also make strawberry tiramisu? It’s lighter than the original and thus the perfect dessert for summer! Whenever I make it, I have to quickly secure a portion for me before the boys gobble it up in no time! I can’t blame them. And when you taste it you’ll certainly agree: One bite of this delicious dessert and you’ll become addicted, as well.
The good thing is that it’s swift to make. But look for yourselves:
Strawberry Tiramisu
For 4 people (or 2 greedy boys)
Ingredients:
15 – 20 ladyfingers 300 g strawberries 300 g curd cheese 150 g cream 3 tsp sugar 1 tbsp lemon juice
Instructions:
Wash the strawberries, remove the green leaves and cut them into slices. Put them into a bowl and mix them with 1 tsp of sugar and the lemon juice. Let the strawberries marinate for about 20 – 30 minutes, until a juice forms.
Whip the cream until it’s stiff. Mix the curd with 2 tsp of sugar and gently fold in the cream.
Put the ladyfingers side by side into a tray. Drizzle some of the strawberry juice over them so that they soak it up. Evenly spread the cream-curd mix onto the ladyfingers and put strawberry slices on top. Repeat these steps until all ingredients are used up. The last layer should be strawberries. Serve well chilled.
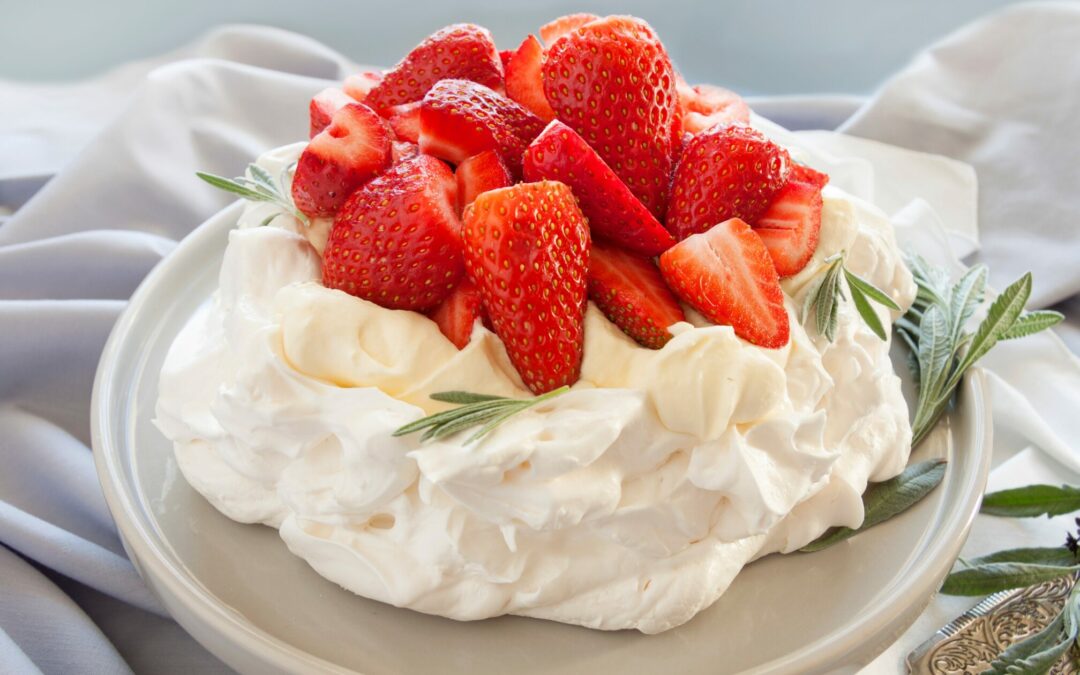
If you have never come across a pavlova, you missed something! It’s basically a baiser base with cream and fruit. That may sound a little dull but don’t underestimate this yummy combination: the sweet, crisp base, the rich, fluffy cream and the fresh fruit will catapult your palate onto cloud nine! With this beginner-friendly recipe, I’ll show you how to make a wonderfully tasty strawberry pavlova.
Strawberry Pavlova
For 5 people
Ingredients:
For the Baiser base
270 g icing sugar 15 g cornstarch 4 egg whites (150 g) 1/2 tsp baking powder a pinch of salt 1/2 tbsp white vinegar
For the topping
250 g cream 250 g strawberries 1 tbsp sugar 1 tbsp balsamic vinegar almond flakes or chopped pistachios (optional)
Instructions:
Mix the icing sugar and cornstarch and sieve twice. Stir the egg whites, the baking powder and the salt in a metal bowl and set it in a hot water bath. Mix the icing sugar-cornstarch mixture in portions and warm up the whole batter until it is hand-warm. Transfer it into a second bowl and stir it until it’s very stiff. Add the white vinegar and mix it in.
Preheat the oven to 150 °C (300 °F). Fill the baiser into a piping bag with a large-holed nozzle. Alternatively, fill it into a common freezer bag and cut off a corner. Put baking paper onto the tray. Now, pipe three even circles onto the baking tray and bake them in the oven for 10 minutes. Reduce the temperature to 100 °C (210 °F) and let the baiser dry for approximately 2 hours. Let it cool.
Roast the almonds in a pan without fat until they are light brown. Put them on a plate and let them cool down. In the meantime, wash the strawberries, remove the leaves and cut them into slices. Whip the cream until it’s stiff. Layer the baiser bases with cream and strawberries (and almonds if you use them). The last layer is strawberries. Alternatively, you can use only one cake base and top it with cream and strawberries. Serve immediately, otherwise the baiser will soak through and become soft.
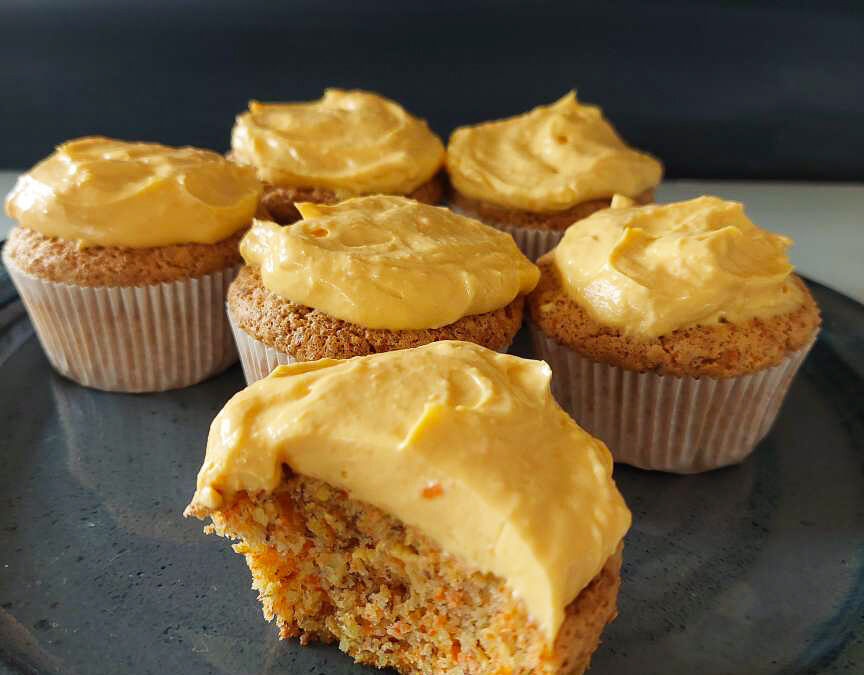
Everybody knows lemon curd but did you know you can make curd from vegetables also? I tried out carrot curd which, in combination with cream cheese, is the topping for these moist carrot muffins. We have carrots in abundance all year round, either fresh from the garden or sand storage, so I can make this treat whenever I like. And with this easy recipe, you can, too!
Carrots and hazelnuts complement each other wonderfully and the fresh and slightly salty taste of the cream cheese is a marvellous addition to the sweet and earthy carrot curd.
Carrot muffins with cream cheese – carrot curd topping
Yield: 14 muffins
Ingredients
For the carrot curd:
125 ml carrot juice, freshly juiced
150 g sugar
1 tbsp cornstarch
45 g butter in cubes
2 egg yolks
1 whole egg
¼ tsp cinnamon
For the carrot muffins:
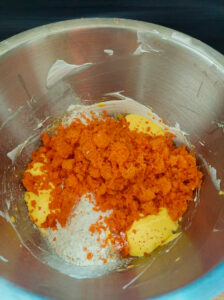
180 g grated carrots (you can take the leftovers from the juice-maker and grate some fresh carrots additionally if it’s not enough)
4 eggs
130 g brown sugar
60 g flour
200 g ground hazelnuts
1 tbsp baking powder
For the Topping:
150 g carrot curd
150 g cream cheese
Instructions
Carrot curd
1. Mix the carrot juice, sugar and cornstarch in a bowl. Bring the mixture to a boil over medium heat while constantly stirring until it thickens.
2. Take the pot off the heat and stir in the butter until it has melted. Afterwards, add the egg yolks and the whole egg.
3. Put the pot back on the heat and stir for 5 – 6 minutes until the mixture has thickened considerably and falls heavily from the spoon. Put it aside, cover it with cling film so that it won’t form a skin and let it cool down.
Carrot muffins
1. Preheat the oven to 180°C (355°F)
2. Separate the eggs. Whisk the egg whites with half the amount of sugar until it’s solid.
3. Beat and froth the egg yolks with the remaining sugar.
4. Sieve the flour and baking powder and mix both with the ground hazelnuts.
5. Mix the flour and nuts, as well as the grated carrots under the egg yolk mass. Carefully fold in the whipped egg whites.
6. Fill the mixture into a muffin form and let the muffins bake for about 25 minutes. Insert a chopstick into a muffin to see if it’s done. When you pull the stick out there should be no dough sticking to it.
7. Take the muffins out of the oven, remove them from the muffin form and let them cool down.
Assembly
1. Mix the cream cheese with the carrot curd until homogenously combined.
2. Either spread or pipe the topping onto the muffins.