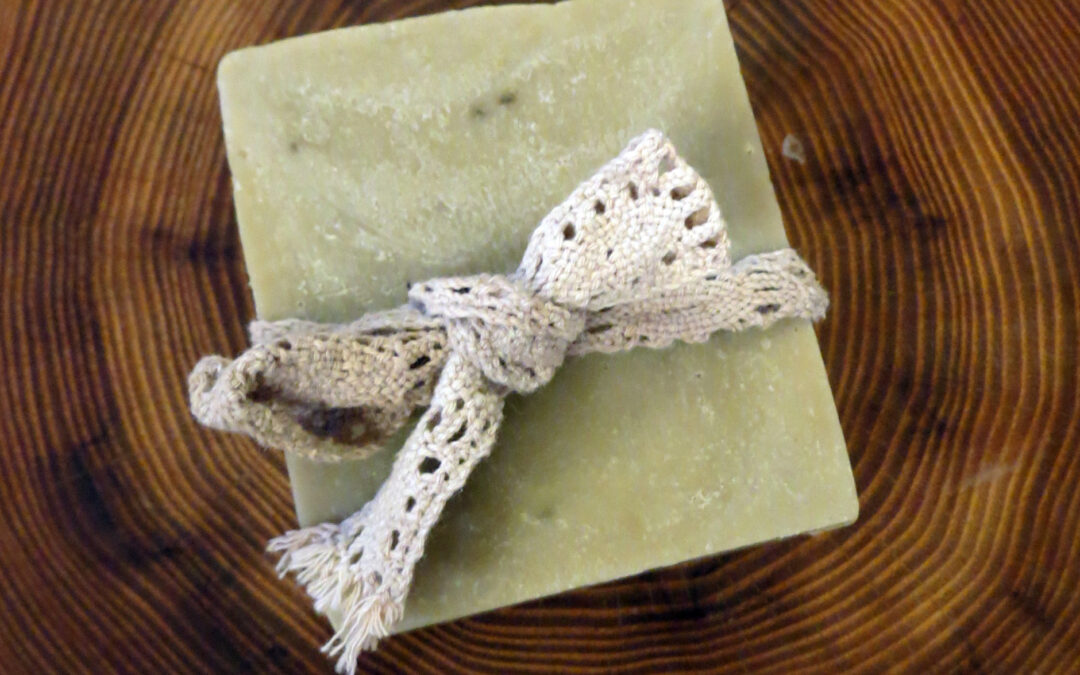
This mint soap beginner recipe was the first soap recipe I made and it’s still one of my favourites! It’s suitable for beginners which means that it doesn’t require many ingredients.
This is a soap specially for sensitive skin due to the green clay. Consistent with this topic, we add hemp oil and mint fragrance. The soap can be used for body and face, even as a shampoo for normal hair or sensitive scalp. In short, it’s the perfect travelling soap!
250 g Coconut Oil 150 g Hemp Oil 600 g Olive Oil 137 g sodium hydroxide (NaOH) 320 g Water 30 g Green Clay (powder) 4 g essential mint oil
Instructions
Prepare your soap mould and put on an apron, gloves, breathing mask and safety goggles.
Weigh the oils. Slowly melt the coconut oil, then add the hemp and olive oil. Put a thermometer into the oil mixture and measure the temperature.
Weigh the water in a large enough, heat-proof container.
Weigh the essential oil and the green clay and put them aside for later use.
Weigh the sodium hydroxide. Put the water container into a sink and slowly pour the sodium hydroxide into the water (never the reverse!). Stir carefully and slowly with a spoon until the NaOH crystals have dissolved. Put a thermometer into the lye-water and measure the temperature.
When the temperature of the lye-water and the oils has reached fallen to 40 – 45 °C, carefully pour the lye into the oils (never the reverse!). Fully immerse the blender and start mixing both liquids until they are well combined. Make sure that the blender stays in the batter to prevent air bubbles. Mix the batter until a trace forms.
Add the green clay and the essential oil to the soap batter.
Pour the soap batter into the mould and either cover it with cling film or spray it with isopropyl alcohol. Cover the mould with towels to keep it warm. Leave the soap in the mould for 48 hours.
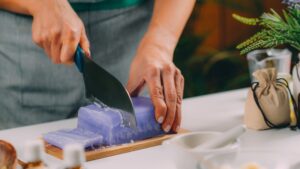
After 48 hours, carefully remove the soap from the mould and cut it into bars.
Let the soap bars cure at a cool and well-ventilated place for 4 – 6 weeks before use.
This makes for a great all-purpose soap for your face and body. It smells wonderfully fresh and has a slightly cooling effect due to the mint oil which makes it a fabulous soap for summer.
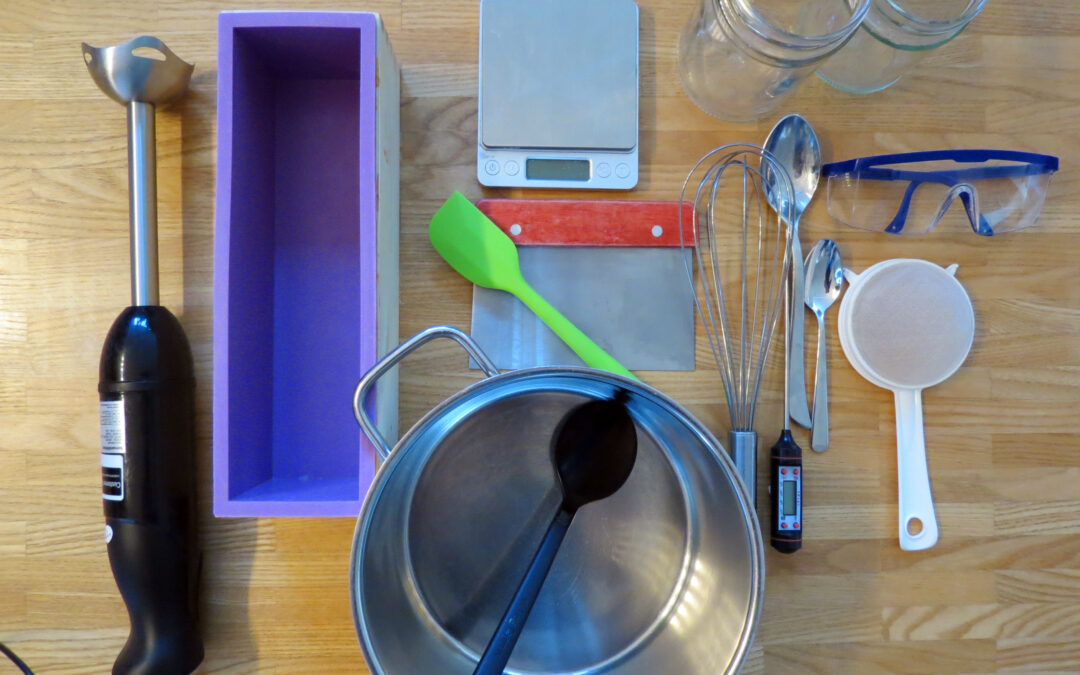
To start with soapmaking, you only need some basic soapmaking equipment. Later, when you are infected with the soapmaking virus, you can always buy additional tools that’ll make the process easier and allow you to make more elaborate designs.
When looking for equipment, take its durability and safety into consideration. Wooden tools are not a good choice, for example, as they are damaged by the lye. The same applies for all things aluminium. Never use anything made from aluminium when making soap as it reacts with lye! It’ll not only ruin your soap but will also form hydrogen, a toxic and explosive gas.
Checklist for your soapmaking equipment
Safety equipment
Chemical-resistant gloves, like medical disposable gloves or rubber dishwashing gloves.
Safety goggles that cover the whole eye (and glasses if you wear them); alternatively, you can wear a face shield.
Breathing mask to avoid breathing in any lye dust or toxic gasses that form when the lye is added to the water.
All ingredients in soapmaking are measured by weight, not by volume as weight is more precise and precision is essential in soapmaking. Digital scales work best, but manual models are also ok. Choose a scale that can hold enough amounts for soapmaking.
Cups and spoons
Cups are great for colouring small portions of soap batter and as a design tool, especially when they have spouts.
Measuring spoons are useful for precision when it comes to dry additives like colourants, clays or exfoliants.
Also, you need one long-handled spoon for creating designs.
Lye-water container
Use a heat-resistant bowl with a handle and preferably a spout. Choose a large enough container as it is important to have plenty of headspace when mixing lye-water.
Bowls
Use heat- and chemical-resistant plastic, glass or stainless steel bowls for mixing the soap batter. Two or three bowls that are large enough for different soap batches (including extra room) are ideal. Additionally, containers with a handle and a spout make it a good deal easier to pour the batter into the mould or create certain techniques.
Thermometer
You need two thermometers (100 °C) to measure the temperatures of oils and lye-water. Lab thermometers are as suitable as candy or digital thermometers.
Whisks, spatula and blender
Whisks in different sizes are great for mixing fragrance oils and other additives into the soap batter. They are also useful for maintaining the appropriate trace as you work. Stainless steel is ideal.
Spatulas are used to scrape the last batter of soap out of the bowl and create certain designs. They should be made from silicone or heavy-duty rubber.
A stick blender is a useful tool that’s almost essential for modern soapmaking. It reduces the tracing process from a 30- to 90-minute process to just a few minutes- When buying a stick blender, look for a model that will not whip much air into the soap batter and has a stainless steel shaft. If you can detach the shaft from the electrical unit, it’s easier to clean.
Other useful equipment
These items aren’t critical for soapmaking but they make the process easier and more convenient.
Rubbing (isopropyl) alcohol to spray on the surface of the soap to prevent the formation of soda ash.
Plastic squirt bottles are used for certain designs, like swirling or multi-layers.
Mini mixer (mini milk frother) for mixing colourants and clays with oil.
Pipette for precisely measuring fragrance and essential oils
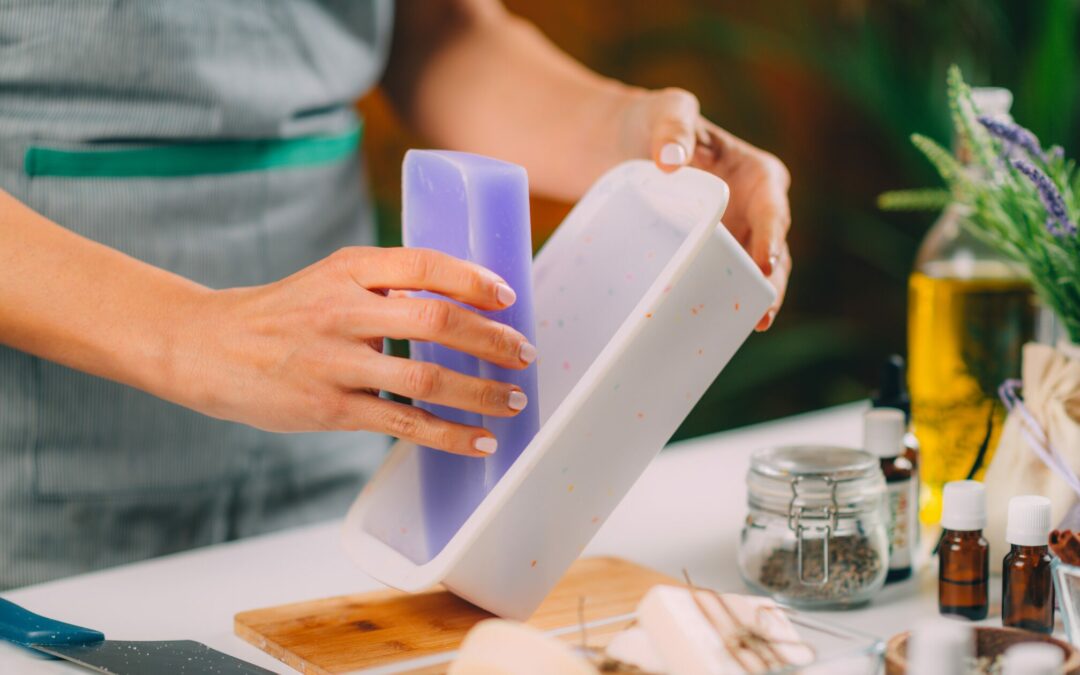
Soapmaking Equipment: Moulds
There are so many options when it comes to moulds for soapmaking: you can make your own out of milk containers, boxes lined with freezer paper and beverage cartons. You can use common kitchen containers (Tupperware) or mini cake moulds (like muffin moulds in different shapes and sizes). Or you can buy moulds made of wood, silicone or plastic that are made specially for soapmaking.
DIY moulds
When you are new to soapmaking, you needn’t buy a soap mould but you can always “misuse” items you already have. Just keep in mind that once used for soapmaking, these items mustn’t be used for food ever again. The second thing is to make sure that the soap batter doesn’t come into contact with aluminium.
Glass and metal are not optimal as it will be nearly impossible to remove the soap from the mould
The following things can be used as soap moulds:
Waxed cardboard milk and juice cartons
Empty potato chip tubes
PVC tubes, washed out and dried; fix one end either with a plastic lid or multiple layers of duct tape
Cake moulds: best are those made of silicone. If you have cake moulds made of metal, layer them with cling film so that the soap batter doesn’t come into contact with the metal
Plastic containers like yoghurt cups, Tupperware etc. You may want to grease them before filling in the soap batter
Wooden moulds; you always have to line wooden moulds with freezer paper
I’m sure there are many more options. Be creative!
Standard moulds
There are great soap moulds in many different sizes, shapes and materials on the market. The most common materials for moulds are silicone, plastic and wood.
Depending on the techniques you want to carry out in your soapmaking process, you can either use log moulds, slab moulds or silicone moulds.
Needless to say, you can also buy special moulds with which you can make very special forms. Often, they’re made of heavy-duty plastic and the removal of the soap can be challenging. It’s therefore best to use a recipe for a comparatively hard soap for this kind of mould.
Conclusion
You see, despite needing some basic equipment, there’s no need to go overboard when starting with soapmaking. Most things you’ll already have and nothing prevents you from using for example a stick blender you already have – as long as from now on you’ll use it for soapmaking only! You should invest in good safety goggles that protect your eyes from lye splashes but other than that, soapmaking equipment needn’t be expensive. After all, you can always add fancy equipment and moulds to your birthday wishlist.
Soapmaking is a wonderful and rewarding occupation! We can be creative and invent our own recipes, add fragrances and colours to our liking and try out different techniques. However, it bears a certain risk and therefore it’s absolutely necessary to be familiar with the following soapmaking safety guidelines.
Soapmaking Safety Guidelines: Safety equipment
Long sleeves
When making soap we are working with lye. LYE IS CAUSTIC! It’ll burn skin, stain clothing, and damage many surfaces. It can cause blindness and may be fatal if swallowed.
When working with lye, we must always wear long-sleeved shirts. A splash of lye-water will eventually eat through clothing and into your skin but if that happens and you remove the contaminated clothing immediately, the damage to your skin may be minimized.
If you do spill lye-water on your skin, wash it under cold water for at least 15 minutes. Some people always keep some vinegar at hand and recommend washing the lye burn with that. Adding vinegar (which is an acid) to lye (which is a base), however, causes a chemical reaction that releases more heat, so just use water to wash a lye burn.
You can use vinegar, however, to clean up the surfaces of your kitchen from any lye dust that may have gotten onto it.
Safety goggles
As I said before, lye in your eyes may cause blindness, so always wear safety goggles that completely cover your eyes. Glasses are no adequate protection – goggles are a necessity!
Gloves
To cover the skin on your hands when working with lye, always wear chemical-resistant gloves. The best type are disposable medical gloves (of latex or nitrile) but you can also use rubber dishwashing gloves. Make sure their fit is tight enough so that you don’t accidentally get caught.
Apron
You can wear a cloth apron (I always do) to form an additional cover between the lye, your clothing and eventually your skin. It protects your clothes from lye or soap splashes.
Breathing mask
When working with lye, we must avoid breathing in lye dust and the toxic vapours that form when we add the lye crystals to the liquid. In addition to making sure that the room is well-ventilated, we must use a mask to guarantee our safety.
Soapmaking Safety Guidelines: Safety precautions
When we have all our tools and materials at hand, we should cover the work surface, either with a plastic film (of a dustbin bag that’s been cut open or a plastic tablecloth), cardboard or several layers of newspaper. Many work surfaces react to splashes of lye or soap batter and leave unremovable stains. Whenever possible, you should mix the lye-water over a sink to prevent accidents and contain spills.
You should plan about 2 – 3 hours for soapmaking, depending on the techniques you want to use. Never soap with pets or small children in the room and make sure that they are adequately supervised so that you can focus on your soapmaking process.
Never let your soapmaking ingredients come into contact with aluminium! This includes containers, mixing tools and moulds. Aluminium will not only ruin your soap but worse, produce highly flammable hydrogen gas as a by-product.
Soap utensils are for soapmaking only! Do not use utensils that you use for cooking.
Mix your lye solution in a heat-safe container that’s a bit larger than the amount of liquid it is holding. When lye is mixed with water, it produces an exothermic reaction, which means that its temperature rises up to 100 °C. Other liquids that contain sugar (e.g. milk) can cause an even warmer reaction.
Always add the lye to the water, never the other way around! Adding water to lye can cause a “volcano” that could bubble out of the container.
Soapmaking Safety Guidelines: Emergency response
Skin
If you splash lye, lye-water or fresh soap batter on your skin, rinse the area immediately with cold water for at least 15 minutes. Use fully cured soap to wash off the chemical residue. If your skin is red and/or painful, go to the emergency room.
Eyes
Immediately wash out your eye(s) with cold, running water for at least 20 minutes and seek immediate medical attention.
Throat
If you swallow lye in any form, rinse your mouth thoroughly and then drink about two large glasses of water. Do not induce vomiting! Seek immediate medical attention.
All that may sound frightening but as long as you observe all these safety precautions, soapmaking is hardly dangerous.
And don’t worry: after curing, your homemade soap does not contain any caustic lye. That’s only necessary to initiate the chemical process.
Before you start making your very first batch of soap, you should be familiar with the process. Please read this soapmaking step-by-step instruction thoroughly to make sure that your first soap – and the many soaps to follow – will be a smashing success!
It’s most likely that you’ll make your soap in the kitchen. Before you start, remove everything from the surface that’s got nothing to do with soapmaking and protect the surface with a plastic layer (a dustbin liner that’s been cut open or a plastic tablecloth cloth for example). Lye splashes may damage your work surface in the long run. Keep some vinegar at hand as it neutralizes soap batter or lye splashes. Make sure that you have enough time and solitude for soapmaking, no pets or children should be allowed. The most important thing, however, is to observe the safety guidelines.
Step 1: Lye preparation
Weigh the water (or cool tea or coffee) into a heat-proof container (plastic or glass). Keep your rubber spatula close at hand.
Get on your household gloves, safety goggles, breathing mask and apron. Wear all that safety gear until the soap batter is in the mould and all tools have been cleaned. Make sure that the room you’re working in is well-ventilated.
Weigh the sodium hydroxide into a plastic container, carefully so that there is as little dust as possible. Do not inhale the fine dust. If you’ve spilt some NaOH onto the surface, remove it immediately. Close the NaOH container as sodium hydroxide is hygroscopic which means it attracts water.
Now, slowly but steadily pour the sodium hydroxide into the measured water (never the reverse!) and dissolve under constant, gentle stirring. During this process, the liquid will generate heat, up to 80 – 100 °C and it’ll turn opaque. Toxic vapours will form now that must not be inhaled under any circumstances!
After 2 – 3 minutes the liquid becomes clear again and there should be no undissolved crystals on the bottom of the container. Let the lye cool down to the required temperature. To speed up this process, you can put the container into a cold water bath.
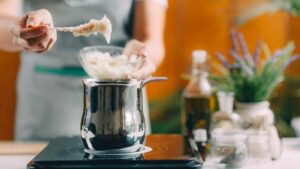
Step 2: Fats/Oils preparation
While the lye cools down, weigh the solid fats you want to use for your recipe and melt them at a low temperature. Take the pot off the heat and mix in the weighed liquid oils.
Check the temperature of the lye water and the oils. Both temperatures should be below 60°C unless it’s noted otherwise. Every soapmaker has their own temperature range they feel most comfortable with and works for most recipes. I prefer to work with temperatures between 43 and 45 °C, but that’s my personal preference and others may have different opinions.
Step 3: Additives
If you want to add fragrances, colourants and fillers, weigh them while the lye water and oils cool down. Your additives should be ready for use as soon as the soap batter builds a trace.
Step 4: Mixing the soap
When the fat/oils and the lye-water have reached the temperature you want to work with, pour the lye carefully (avoid splashes) into the oil mixture (never the reverse!) and mix with a whisk. Keep stirring until both liquids have combined well. Now, use your stick blender and immerse it fully into the batter. Never turn on the stick blender until it’s fully submerged! As most blender motors aren’t strong enough to mix for an elevated time, put the blender off from time to time and stir by hand. The soap batter becomes slightly lighter and changes its consistency. It’s right when there forms a trace at the surface. When you pull out the blender and the mass that’s dropping down is clearly visible on the surface, it’s time to add the essential oils colourants and fillers. Work fast as the soap batter will thicken quickly after it has built a trace.
Step 5: Pouring the soap
Pour the soap batter into the mould and cover it with a cling film or a greaseproof paper to avoid the building of soda ash. As an alternative, you can spray the surface with 99% rubbing alcohol which also creates a barrier between the soap surface and the air. Soda ash is just sodium carbonate that forms as a white layer on the soap surface. It’s totally harmless and just a matter of aesthetics. You can even brush it off the surface so spraying with alcohol or covering is purely optional.
Step 6: Cover the mould
If you have covered the soap batter with cling film or greaseproof paper, you can put a towel over it, as well as around the mould, to insulate the soap. If you don’t use any physical cover, you can place a folded piece of cardboard or a similar item over the top of the mould so that it isn’t touching the soap and put a towel as insulation on it.
This technique helps the soap to initiate a gel phase which is encouraged for soaps with non-sugary liquids as a basis for the lye. Soaps that have undergone a gel phase harden more quickly and have bolder colours. If instead of water, tea or hydrolate you have used milk for example or fruit purees, the sugar that it’s in those additives reacts with the lye and naturally heats the batter. These soaps are not insulated to avoid overheating.
Step 7: Cleaning your work material
Before you clean your work material, rub off the soap batter thoroughly with paper towels to avoid too strong a contamination of your kitchen sink. Discard the paper towels in the dustbin. Remember that for cleaning, as well, you must wear your gloves as the soap batter can be skin irritating.
Step 8: Unmold and cut
Leave the soap in the mould for at least 2 days before you attempt to unmould it. Depending on the oils you used, it may take up to five days even, until the soap is hard enough to be unmoulded. The softer the oils (like olive or almond oil), the longer it takes the soap to harden. As a rule of thumb, if there is no visible mark when you press onto the soap surface, the soap is ready to unmould.
To unmould, pull the edges of the mould gently away from the soap, then lay it face down onto your work surface and slowly and gently press it out while gently rolling up the mould edges. If the soap doesn’t release smoothly or starts to crack or tear, leave it in the mould for another 48 hours and have another go.
Once the soap is out of the mould, you can cut it into bars. The bar size depends on the container you used and should be such that it comfortably fits into your hand. You can cut the soap with a sharp knife, serrated or non-serrated. Cut straight through the soap and slide the soap off the blade, otherwise it may break or tear.
Step 9: Curing
The soap bars must be cured in a well-ventilated area for four to six weeks before you can use them. I usually put the bars on greaseproof paper with a distance of about one centimetre. Turn the bars around several times during curing to make sure that they cure evenly. During that time, excess moisture evaporates, the soap becomes milder and the lather will improve. After curing time, you can measure the pH value with an indicator strip. It should be between 7.5 – 9.
Step 10: Storing
Store your cured soap bars in containers that are protected from light and at room temperature (or cooler). I usually use old shoe boxes. Light protection and a cool temperature are especially important for soaps with natural dyes and essential oils. Under the influence of light, the dyes will fade and heat makes the essential oils evaporate.
Soap is the oldest and most used washing detergent in the history of mankind. The oldest soap recipe that has been found is thousands of years old! And the best thing is: we still know how to make soap. The process differs a bit from that of our ancestors; after all, who would want to make lye from wood ash and boil it for hours with animal fats until it becomes a (stinky) bar of soap? The chemical principle or rather, the science behind soapmaking, however, stays the same and understanding the science behind it helps you to avoid mistakes, create your own recipes and stay safe during the process.
I was never good at chemistry, however. On the contrary, all things chemistry have always been a bit like magic for me. I mean, you take one thing and bring it together with another and you get something completely different! Weird, huh? In this post, therefore, I will explain all this science stuff very simply – because that’s how I get it best. And I hope you, too.
The science behind soapmaking: What is soap?
Let’s start with the most mundane question: What is soap?
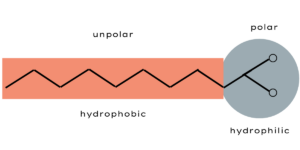
Soaps are surfactants and are used in combination with water as a cleaning agent. Surfactants are wash-active substances that reduce the surface tension of liquids. By that, they cause two normally immiscible substances, for example fat and water to unite. Why is that so? A fat molecule consists mostly of long chains of carbon and hydrogen atoms. The electricity is evenly distributed in these chains and therefore fat molecules are electrically non-polar.
Water, on the other side, consists of a negatively charged oxygen atom and two positively charged hydrogen atoms. Due to their structure, one side of the water molecule is negatively and the other is positively charged. This uneven distribution of charge is called “polar”. The negatively charged oxygen side attracts the positively charged hydrogen side of another water molecule like a magnet which is why water molecules are usually formed into clusters. They can’t, however, connect with the non-polar fat molecules.
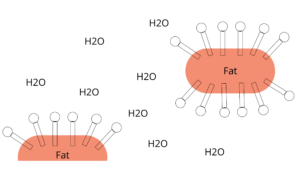
Soap, now, works as an “agent” between fat and water on their molecular basis. The soap molecules have a water-attracting (hydrophilic) and a water-repellent (hydrophobic) side.
The hydrophobic side attracts fat and encloses the fat droplets in small circles. The hydrophilic end connects to water. The result is an oil-in-water mixture, a so-called dispersion.
By washing (that is rubbing your hands), the fats contained in the dirt come off and the fat-dirt-dispersion is rinsed off with water.
I told you: it’s magic!
What is soapmaking?
I’d love to have a time machine and go back to that one day when someone discovered by accident that by cooking fats with alkaline pot ash you’d get a washing-active substance that dissolves dirt and fat.
The principle of breaking down fats with alkaline substances (that is: lyes) has not changed since that first day of soapmaking. Today, we know the chemical reaction of soapmaking, in chem-talk also known as saponification. As lyes, we use sodium hydroxide or potassium hydroxide. When saponification is carried out with sodium hydroxide we get hard soaps, with potassium hydroxide we get soft to semi-soft soaps. The lye breaks down the fat into soap (or water-soluble alkaline salts) and glycerin, or, in chem-talk:
Fat + Lye = alkaline salt (soap) + glycerin
Plainly said: Fats react with lye to create a soap with a small amount of glycerin through saponification.
In soapmaking for skin and hair, we use a sodium hydroxide solution as a lye. Sodium hydroxide can be bought as crystals or flakes and it needs to be dissolved in a liquid (mostly water) so that we can mix it with the oil.
Saponification value
When lye is added to a liquid, an exothermic (=heat-producing) reaction occurs. It’s fascinating to watch the red bar on the thermometer climbing up! When we use water, temperatures reach about 90 – 100 °C, when other liquids are used the temperature is often hotter.
The amount of lye needed to make soap depends on the oils used and is called the saponification (SAP) value. Oils are made of short- and long-chain fatty acids which dictate the amount of lye. For example, coconut oil contains about 85 percent saturated fatty acid which is responsible for the fact that palm oil is solid at room temperature. Olive oil, on the other hand, contains mostly unsaturated fatty acid which makes it liquid at room temperature. Coconut oil reacts radically differently than olive oil when mixed with sodium hydroxide and thus, both oils require different amounts of lye to turn them into soap.
Superfatting
As described above, soap works by clinging its lather to dirt, both of which are rinsed away by water. This process, however, can also take away the skin’s natural oils. To prevent the skin from drying out after washing, we add extra oil to the soap, a process called “superfatting” or “lye discounting”.
If we make soap with a recipe that uses the exact amount of lye that is necessary to turn all the oil into soap has a zero percent lye discount or is zero percent superfat. That means it has no excess oil after saponification which makes it a hard bar of soap but is not very gentle to the skin.
A soap with excess oil, on the other hand, makes a softer bar of soap that has a decreased shelf life.
Most soapmakers keep their superfat to under 10 percent, I mostly use superfats between three (hair soap) and nine percent.
Different methods of soapmaking
There are different methods of soapmaking.
Hot-Process
To accelerate the breaking down of the fats, we heat the soap batter to 100 °C, accelerating the reaction as well as water vaporization. When the soap has cooled down, the process of saponification is finished. I haven’t tried out this process yet but it’s only a question of time.
Cold-Process
Here, no external heat is added but the chemical reaction releases heat (= exothermic reaction). Saponification takes a longer time (24 – 48 hours) and we have to leave the soap for that time in a mould. Afterwards, the soap must be cured for several weeks before it is ready to use. This is the classic method for making body and face soaps and I have loved it since the first soap I made!
Melt and pour
With that method, you melt a premade soap base, customize it with fragrances and colourants and pour it into a mould. This is a method I don’t use.
The science behind soapmaking: Ingredients
As described above, soap consists of fats and lye and – if you like – additives. Let’s have a closer look:
Fats
Our basic raw materials are oils or fats of plant or animal origin. The most commonly used fats/oils for soapmaking have a high content of saturated and monounsaturated fatty acids like olive oil, coconut oil, palm fat, babassu oil and high-oleic oils like sunflower oil, rapeseed, peanut and safflower oil.
These fatty acids make solid soaps with a good storage time.
By a skilful combination of different fats and oils, the soaps’ characteristics can be optimized. That’s why we use mostly mixtures of fat/oils.
Lye
To produce solid hand and body soaps we saponify fats/oils a lye made of water and sodium hydroxide (NaOH). This lye has a pH value of 14 and therefore is strongly alkaline. NaOH is a white hygroscopic (i.e. water-attracting) solid and can be bought as crystals or flakes.
Any lye is a hazardous substance! You must know the risks and dangers and be very careful when working with it!
Additives
Depending on the purpose of our soap, we can add additives to optimize its properties or enhance its sensory effects. However, additives should be used sparsely and only in the best possible quality.
Fragrances
Although fragrances make only a small part of the overall soap amount, they determine (together with colourants) the first impression and influence our perception.
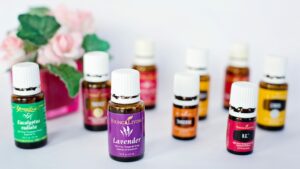
Essential oils
Essential oils are mostly gained by water vapour distillation of aromatic plants. Their shelf life varies with oils from citrus fruit having the shortest. We differentiate:
untreated essential oils (gained from the plant)
natural essential oils (consisting of several untreated components which haven’t all been gained from the plant it’s named after; no synthetic additives)
nature identical essential oils (synthetic oils, composed acc. to a natural model)
natural / nature-identical essential oils (mixtures of untreated and synthetic oils)
artificial essential oils (artificial fragrances; often classified as health critical
Essential oils are irritating to skin and mucous membranes (work safety!) and may cause allergies.
Synthetic fragrances
Nowadays, synthetic fragrances are commonplace. Production is cheap, they have a long shelf-life and replace essential oils in many products. However, synthetic fragrances are chemicals and may contain components that are harmful to the organism. they may lead to contact allergies and allergies through inhalation. They degrade slowly and accumulate in the air.
Fragrancing of soaps
Fragrances, even in a low percentage, influence the physical properties of soaps, for example their solubility, emulsification, hardness and brittleness. It is therefore recommended, to use 2 – 3 percent (related to the whole fat amount) at the most. In soaps or sensitive skin or children, fragrances should not be used at all.
All fragrances used in soapmaking must be alkali-resistant, that is they must not be affected by the lye. Additionally, they must withstand the temperature at soapmaking. Fragrances based on alcohol are unsuitable as alcohol disrupts saponification.
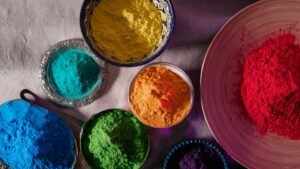
Colour additives
Chemically speaking, we differentiate between inorganic and organic colour additives. Further differentiation is made according to the colourant’s capability to dissolve in the application medium (soap, water or oil).
Colour additives are classified as chemicals and may cause contact allergies. Some are even toxic or are classified as environmentally dangerous. When using colour additives, you must observe the safety instructions.
Colourants
Colourants are chemical compounds that dissolve in the application medium and dye other materials. There are natural and synthetic colourants. Natural colourants can be of animal or plant origin, with animal colourants deriving from bodily fluids like gall or blood and plant colourants deriving from woods, barks, roots, fruits, leaves and seeds. Their quality depends on climate, area, soil properties, etc.
Synthetic colorants on the other hand show a consistent quality as they are made under standardized production conditions. They are light- and heat-resistant and have an almost unlimited shelf-life.
Pigments
Pigments are colouring substances in the form of very fine particles that don’t dissolve in the application medium. The smaller the particles the more intense the colouring. Pigments can either be inorganic or organic, natural or synthetic.
Anorganic natural pigments are obtained from soils and minerals.
Inorganic synthetic pigments are produced with different chemical procedures and in high quantities, for example iron oxide pigments, metal effect pigments, white pigments (e.g. titanium oxide)
Organic natural pigments are made of animal and plant parts
Organic synthetic pigments are unsoluble
Water
For soapmaking, normal, still water is good. Tap water is ok as long as it doesn’t contain too much lime. Alternatively, you can use hydrolates, and alcoholic beverages like wine beer or milk (of animal or plant origin). With alcohol and milk, however, the soapmaking process is slightly different as these two heat too much and thus must be treated differently.
Resume
You see now, as simple as soapmaking may be at its core, it’s also very flexible and adaptable. By mixing different oils, using alternative liquid possibilities, and adding fragrances and colours you have almost infinite possibilities to create your own recipes.
I’m sure you can’t wait to learn how to make your first soap, right?! Get acquainted with the safety instructions, look how it works and then: make your first soap with this easy beginner-friendly recipe!