May is certainly one of the most exciting months in gardening! After the last night frosts, all your pre-grown vegetables can be planted out into the patches and all frost-sensitive vegetables can be sowed, as well. Or almost all. In this article I’ll show you what to do in May in the garden, that is what to plant, sow or even pre-grow indoors. But be careful: often there can still be night frosts in May, usually around the 15th. Before they are over you must not plant out your sensitive vegetables.
Beware of the night frosts
Every gardener knows that even if temperatures can be quite warm in April and May, it’s probable that there will be cold spells around mid-May.
These cold spells are due to cold air from the polar region that can cause night frost. Sensitive plants like tomatoes, zucchini, cucumbers or pumpkins must be kept indoors for that reason. If you plant them out too early and a frost hits them, they’ll die from the cold temperatures and your chance to harvest is gone for this year!
In German folklore, we call those days in mid-May when night temperatures can fall below 0°C the “icy saints”. The name comes from the fact that these cold spells often occur during some days in mid-May when we remember certain saints. The weather phenomenon was then linked to the saints and called “icy saints”. According to the calendar they last from May 11 to May 15. But like all things nature this is not always correct. Sometimes the last night frosts occur in April, sometimes we have them at the end of May. Depending on the region you live in, it may be totally different from here.
If temperatures drop, cover your plants with a winter fleece for gardeners. They will protect your plants from frost damage.
What to do after the last night frosts?
After May 15 the weather should become stable and you can finally plant out your sun-loving vegetables. Tomatoes, eggplants, peppers and chillies as well as cucumbers, zucchini and pumpkins can be planted into the garden. The same applies to herbs and summer flowers that are not hardy.
Always bear in mind though that mid-May is just an orientation date and the weather conditions can be quite different, depending on where you live. It’s crucial, therefore, to keep an observant eye on the weather forecast before deciding when to plant your sensitive vegetables.
Now, everything is growing like mad. Alas, that’s also true for weeds. If you have many weeds, it’s best to start ripping them out now before they become too large or even build seeds. Thankfully, I don’t have many weeds in my garden due to the way I made my patches. It saves me a lot of work!
If your plants have reached a height of about 10 cm, you should mulch them. That means that you cover the soil around them with organic material like lawn cuttings, straw, leaves or wood chips. Thus, the water hardly evaporates and you needn’t water often. Mulch also suppresses weeds – another problem solved!
What to do in May in the garden
What to sow indoors
You can sow these plants indoors and thus pre-grow them to plant them out later in the garden:
White cabbage
Brussels sprout
Kale
Broccoli
Kohlrabi
Zucchini
Cucumber
Pumpkin
Sweet corn
Winter leek
Beetroot
Lettuce
What to sow outdoors
Sow these vegetables directly into your patches:
Spinach
Swiss chard
Chicory
Rocket salad
Lettuce
Radishes
Beetroot
(Sugar) Peas
Carrots
Parsnip
Zucchini
Onions
What to sow after mid-May
Bush beans
Runner beans
Pumpkin
Cucumber
Sweet corn
What to plant in the garden
Now you can finally plant these darlings out:
Potatoes
Kohlrabi
White cabbage
Red cabbage
Brussels sprout
Savoy cabbage
Celeriac
Leek
Tomatoes
Cucumbers
Eggplants
Peppers
Pumpkins
Zucchini
Melons
Sweet corn
Lettuce
There’s a lot to do in May in the garden. Let’s get out there and start!
One of the first plants that we can harvest every spring is bear’s garlic (or wild garlic). It grows naturally in forest glades but you can also cultivate it in a shady corner of your garden. I’ve tried it last year but my garden lies in full sun so I think that was the reason it didn’t sprout. Bear’s garlic tastes similar to garlic but lighter and not so extreme. The same goes for your breath afterwards: you’ll smell of garlic but not as strongly as if you had eaten real garlic. Nevertheless, I know a spot in the forests where bear’s garlic grows abundantly and I harvested some of that. Some of it I used to make a wonderful bear’s garlic brioche braid, a savoury bread that’s a wonderful base for a hearty snack.
If you want to harvest bear’s garlic from the forests, too, make absolutely sure that you have the right plant. Bear’s garlic can be confused with lily of the valley which is toxic!
I often have baked bear’s garlic into bread like this bear’s garlic knot to add some savoury flavour to the dough. For this recipe, I have used an enriched dough, which is a yeast dough with additional fat in the form of milk, butter and eggs. Usually, enriched yeast dough is used for sweet bakes like brioches or this braided yeast bun. In this recipe, I’ve used it for a savoury light bread that marvellously captures the essence of spring.
Bear’s Garlic Brioche Braid
Ingredients:
Makes three brioche braids
700 g flour (I prefer spelt but you can use wheat)
1 tsp salt
30 g yeast or 7 g dried yeast
1 tsp sugar
300 ml milk
50 g butter
2 eggs
one handful of bear’s garlic (about 70 – 100 g)
1 red onion
50 g walnuts
olive oil
Salt, pepper
egg yolk
course sea salt
Instructions:
If you use fresh yeast, dissolve it in a bite of lukewarm milk, add some sugar and stir until becomes a uniform mass. Let it rest for 20 minutes until the liquid has visibly risen.
2. Wash the bear’s garlic, dry it, and chop it roughly. Peel the onion and cut it into fine rings. Chop the walnuts. Heat up the olive oil in a pan and add the bear’s garlic, onions and walnuts. Stew it lightly, season it with salt and pepper and let it cool down.
3. For the yeast dough, put the flour and salt into a bowl. If you use dried yeast, add it, too. Add the eggs, butter and milk (and yeast milk in case of fresh yeast) and knead these ingredients into a smooth dough. Put the dough into a bowl and let it rest for about one hour (it should double its volume).
4. Thoroughly knead the dough on a floured surface and divide it into three portions. Divide each portion again into three parts and roll each part to a string. Plait a braid from three strings so that you get three brioche braids.
5. Cover a tray with baking parchment, put the braids onto the tray and let them rest and rise for 15 minutes. Preheat the oven to 200 °C (°F). Scramble the egg yolk and brush the brioche braids with it. Sprinkle some sea salt on top of the braids and let them bake in the oven for 25 – 30 minutes.
As I said before, this bear’s garlic brioche braid is a wonderful spring bread, but you can make the same recipe with different herbs later in summer. Use chive, for example, parsley and chervil or try stinging nettle and rocket for a twist. Be creative and have fun trying out different herbs.
Bear’s garlic, or wild garlic, is one of the first spring herbs we can harvest. It grows in light forest glades but you can also cultivate it in a shady part of your garden. Apart from its benefits for our health, what I like most about bear’s garlic is that IT smells quite like real garlic but YOU won’t after eating it 😊. In this recipe, I’ve used bear’s garlic in a light yeast dough to make a savoury and eye-catching bear’s garlic knot.
You can harvest the bear’s garlic in the woods if you know a place where it grows wildly but please: make absolutely sure you know your plants! Bear’s garlic can be confused with lily of the valley which is toxic! If you’re not sure, buy it or try to grow it in your garden.
Bear’s garlic knot
Ingredients
Makes one large knot or braid
700 g four (I like spelt but you can use wheat)
20 g fresh yeast or 7 g dried yeast
1 tsp sugar
250 ml lukewarm water
5 tbsp olive oil
2 tbsp milk
Instructions:
1. If you use fresh yeast, dissolve it in a bite of lukewarm milk, add some sugar and stir until becomes a uniform mass. Let it rest for 20 minutes until the liquid has visibly risen.
2. Wash the bear’s garlic, dry it and chop it roughly.
3. For the yeast dough, put the flour and salt into a bowl. If you use dried yeast, add it, too. Add the water and 2 tbsp oil (and yeast water in case of fresh yeast) and knead these ingredients into a smooth dough. Put the dough into a bowl and let it rest for about one hour (it should double its volume).
4. Thoroughly knead the dough on a floured surface and divide it into four parts. Roll each part to a string and plait a knot. First, lay the strings crosswise (see drawing) and then put the lower string across the string next to it. In the following pictures, you’ll see how to do it:
In the end, it’ll look like that:
Ready for baking
5. Cover a tray with baking parchment, put the bear’s garlic knot onto the tray and let it rest and rise for 15 minutes. Preheat the oven to 175°C (350°F). Mix the milk and remaining olive oil, brush the knot with it and let it bake in the oven for 45 minutes.
Enjoy your bear’s garlic knot with salted butter and chopped bear’s garlic on top.
If you liked this bread, you may also want to try this recipe for a braided bear’s garlic brioche braid.
A meadow full of blooming dandelions looks like the sun is shining from the ground upwards. It’s such a pretty sight! Thinking about the lifeforce and vitality of dandelions, however, I have seen gardeners go crazy: no matter how often you cut them off, they’ll always get back. Even if you try to pull out their roots and not get every last bit out, they’ll be right here again. And once they start to develop those pretty little seeds, you know you’re doomed.
Instead of fighting against those little bursts of sunshine, however, we can use them for our health and palates! A wonderful way to preserve not only the taste but also the health benefits of dandelions is by making a “honey” out of the dandelion flowers.
In my garden, there are rarely any dandelions. I’ve eaten them all. It’s still lovely to watch the look of horror passing over people’s faces when they watch me eating a dandelion flower. Ah, the little pleasures in life… Anyway, on the adjoining meadow there are numerous dandelion flowers every spring and believe it or not, I’m grateful for that. Where would I else get the flowers for a sweet and tasty dandelion honey?
Dandelion honey – Recipe
Yield: 5 to 6 glasses (ca. 120 ml)
Ingredients:
about 500 g dandelion flowers (about 4 hands full)
1,5 l water
1 kg sugar
juice of one lemon
Instructions:
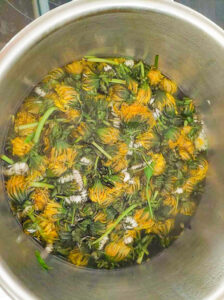
1. After you’ve gathered the dandelion flowers, put them into a bowl or flatly onto a tray and put them outside for about an hour. All the insects, especially those little black beetles will go away. Wash the flowers carefully and put them into a large pot.
Freshly picked dandelion flowers. As you see, I’ve also added some daisies.
2. Fill the water into the pot and press the flowers down into the water so that they are covered by it. Let them sit for two hours.
3. Bring the water with the flowers to the boil. Boil rapidly for 20 seconds, remove the pot from the heat and let it sit overnight (12 – 24 hours).
4. The next day, remove the flowers with a slotted spoon and ladle them into a cheesecloth. Press them out thoroughly, every drop counts.
5. Add the sugar and lemon juice to the dandelion brew and bring it to a boil under constant stirring. Make sure the sugar dissolves completely, otherwise it may set at the base of the pot and burn.
6. Let the syrup simmer without a lid for about two hours. Remove the pot from the heat and let it cool down for about half an hour (or completely if you have more urgent things to do.
7. Bring the syrup back to a boil and let it simmer again while stirring it from time to time. Do not leave the pot for long. When bubbles start to form that will not dissolve when you stir, the time to pour the thickened “honey” into jars has come. Even if it seems to be too liquid, don’t worry. It’ll thicken up when it has cooled down.
When the dandelion honey starts to look like that, it’s ready to be filled into jars.
Determining the right time to fill the jars can be tricky but when you’ve made some “honeys”, you’ll get the experience. If you’ve filled the honey too soon, it’ll stay a bit too liquid to spread onto your bread. In that case, just put the stuff back into a pot and let it simmer a bit longer. If you’ve waited too long, however, the honey may get a slightly burned taste and become too thick, sometimes even solid. In that case, the only thing you can do is throw off the whole batch (good luck with removing it from the jars). There is no chance of making a too-thick honey liquid again.
Dandelion honey: Tasting
Let the jars sit overnight until they’ve fully cooled down. Your sirup will now have a wonderful brown colour and a honey-like texture. Try it on some buttered bread or a braided yeast bun. It’s sweet, tastes a bit like a spring flower meadow and very similar to real honey.
This is a great way to not only get rid of unwanted weeds but also preserve them at next to no cost. Adding to that, it’s totally easy! You only have to watch out for the right time to fill the honey in jars (remember: better too soon than too late).
And when you open one of these jars next winter and thickly spread the honey onto your buttered bread, it will certainly bring back the sunshine to you.
Earlier this year, I got my hands on some organic orange peel… well, ok: a lot of organic orange peel and apart from all the other things I made out of it, I tried my hand at making my first ever hydrolate. It turned out pretty well and I immediately thought about using it in a soap recipe. To enhance the “orange factor”, I added some of the dried and shredded orange peel and essential orange oil and I got a soap that smells and looks as good as it feels. This orange peeling soap appeals to (almost) all senses!
Even better, it’s an easy recipe, suitable for beginners. If you’re not familiar with the process of soapmaking yet, hop over and read this article first. Also, make sure you wear your protective gear throughout the whole soapmaking process. Better safe than sorry.
Orange peeling soap
Superfat: 7 %
Ingredients
350 g olive oil 75 g coconut oil 50 g sunflower seed oil 25 g castor oil 165 g orange hydrolate 64,5 g NaOH 5 g essential oil sweet orange 5 g essential oil bergamot 10 g dried and shredded organic orange peel
Instructions
1. Prepare your soap mould and put on an apron, gloves, breathing mask and safety goggles.
2. Weigh the oils. Slowly melt the coconut oil, then add the olive, sunflower and castor oil. Put a thermometer into the oil mixture and measure the temperature.
3. Weigh the hydrolate in a large enough, heat-proof container.
4. Weigh the essential oils and the shredded orange peel and put them aside for later use.
5. Weigh the sodium hydroxide. Put the water container into a sink and slowly pour the sodium hydroxide into the water (never the reverse!). Stir carefully and slowly with a spoon or rubber spatula until the NaOH crystals have dissolved. Put a thermometer into the lye-water and measure the temperature.
6. When the temperatures of the lye-water and the oils have fallen to 40 – 45 °C, carefully pour the lye into the oils (never the reverse!). Fully immerse a blender and mix both liquids until they are well combined. Make sure that the blender stays in the batter to prevent air bubbles. Mix the batter until a trace forms.
7. Add the dried and shredded orange peel and the essential oils to the soap batter.
8. Pour the soap batter into the mould and either cover it with cling film or spray it with isopropyl alcohol. Cover the mould with towels to keep it warm. Leave the soap in the mould for 48 hours.
9. After 48 hours, carefully remove the soap from the mould and cut it into bars.
10. Let the soap bars cure at a cool and well-ventilated place for 4 – 6 weeks before use.
Characteristics of orange peeling soap
This recipe makes for a great soap with a light peeling effect. It’s got a smooth lather (thanks to the castor oil) and is suitable even for sensitive skin. The orange and bergamot fragrance has a refreshing and awakening effect and the orange peeling particles shine out like little rays of sunlight.
All in all, it’s a perfect soap to use for your morning shower to awaken your body and mind and start the day fresh and energized.