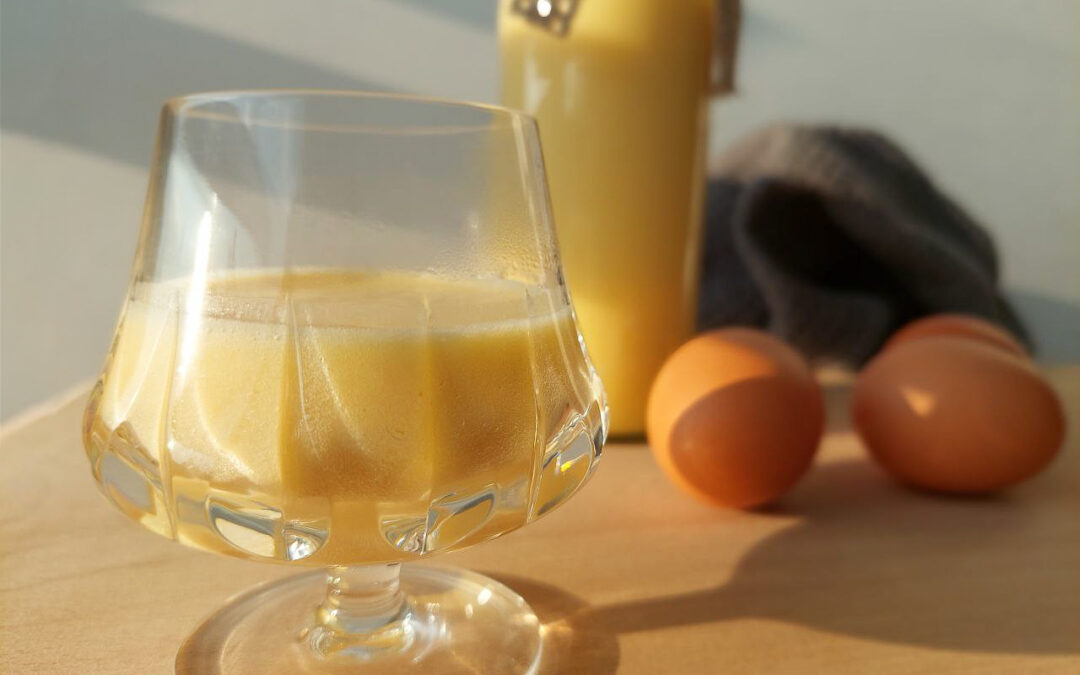
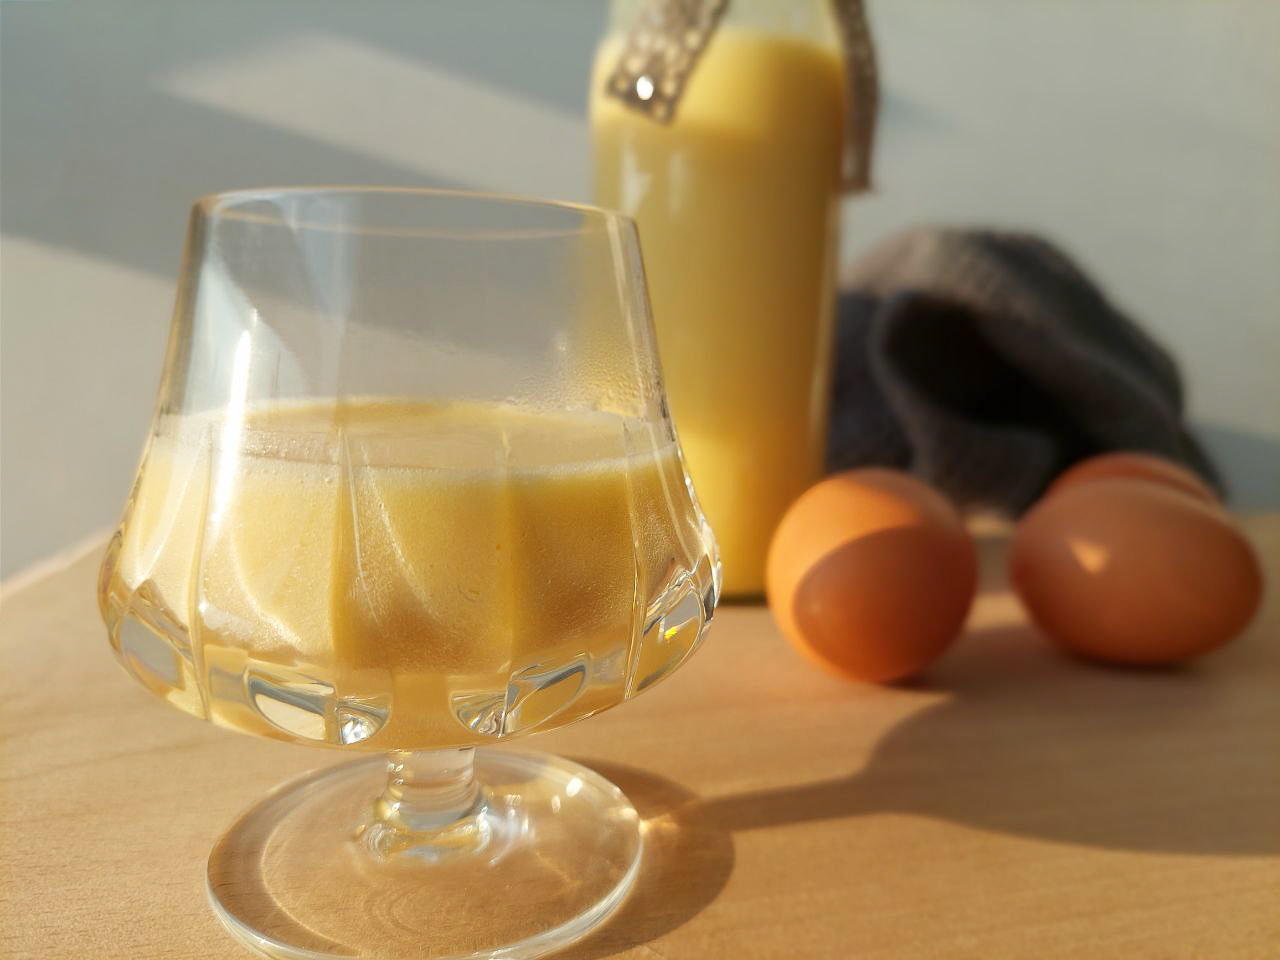
German Eierlikör (or Eierlikoer as it is sometimes spelled) is a wonderfully tasty cream liqueur and makes for a great last-minute gift, especially (but not only) for Easter.
Oma (my granny) had five sisters, who regularly visited her on her birthday. Each year on January 22, all those lovely great-aunts — or “aunties” as we called them — came to celebrate, talk and laugh with her. When none of them could possibly eat any more cake, Oma got up, went to the large sideboard and fetched a large bottle of Eierlikör, which was greeted with great enthusiasm. At least by the adults.
After our aunties had left several hours later in a spirited mood and giggling happily, Oma let us dip our fingers in the empty glasses and taste what Eierlikör was left in them. It was wonderfully creamy and rich and bore a hint of vanilla. And to be honest, just those few drops made us feel like grown-ups.
Nowadays, I make my own homemade Eierlikör, and I’m here to show you how it’s done. With a few simple ingredients, some basic equipment and my traditional recipe, you can whip up this delicious German Eierlikör in under 10 minutes.
This homemade Eierlikör recipe shows you how to make traditional German egg liqueur with egg yolks, cream and vodka in just 10 minutes.
What is Eierlikör?
Eierlikör is a creamy German liqueur made from egg yolks, sugar and alcohol. It has an alcohol content between 14 and 20 %. A thicker variety containing at least 140 g of egg yolks per litre is called Advocaat (also spelled Avocat or Advocat).
So Advocaat and Eierlikör are essentially the same drink, just known under different names.
No matter the name, the liqueur is usually drunk pure or together with coffee (like Oma used to).
The origin of Eierlikör
In the 17th century, European conquistadores in Brazil were introduced to a beverage called Abacate, made with avocados. They mixed the drink with rum and sugar and thus created the first version of an “Advocaat”. In Europe, however, avocados were unknown at that time and could neither be cultivated nor imported.
The Dutch entrepreneur Eugen Verpoorten, who later founded the enterprise Verpoorten, substituted the avocados with egg yolks, and so the Eierlikör was born.
I don’t know if this story is true, but I think it’s quite cute, so let’s pretend it is 😉.
How to Make Eierlikör
Making Eierlikör at home is neither difficult nor complex. Let me show you:
Equipment For Making Eierlikör
To make this classic German Eierlikör recipe at home, you’ll need
A pot
A metal bowl that fits into the pot
A whisk or electric mixer
A thermometer (analogue or digital, range from 0 – 100 °C (32 – 212 °F)
A rubber spatula
A funnel and sieve (optional)
Glass bottles; I use 2 – 3 bottles of ¼ l (the last will not be full). It’s better to use bottles with a wide rim instead of a small one because the liqueur will thicken during cooling and may be difficult to pour.
Ingredients and variations
There are a few standard ingredients you need for making the classic Eierlikör – eggs, for example 😉. All other ingredients can be easily varied.
Egg yolks are the basis for this recipe, and it’s best to use organic, free-range eggs that are not older than one week. Before making the liqueur, take them out of the fridge at least 3 hours ahead so that they can reach room temperature.
Sugar not only sweetens the liqueur but also works as a conservation agent and enhances volume. You can either use granulated sugar, in which case you have to whisk the egg yolks longer until the sugar has dissolved or icing sugar.
Cream makes the Eierlikör very, well, creamy and rich. Alternatively, you can use condensed milk (10 % fat) or part cream, part milk. In the latter case, the liqueur is more liquid and has a more alcoholic taste.
Alcohol preserves the egg liqueur. The most recommended alcohol for Eierlikör is neutral vodka, but you can also use other varieties like corn schnapps, Doppelkorn or white rum. They work equally well but bring their own flavour.
Speaking of which: you can flavour your liqueur, for example, with vanilla, cinnamon or grated tonka bean.
Fill half the pot with water and bring it to a boil.
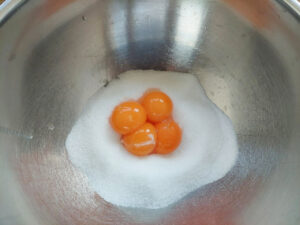
Separate the eggs and put the yolks, sugar and vanilla pulp in the bowl.
Hang the bowl in the pot with the hot water. This is called a bain-marie or double boiler.
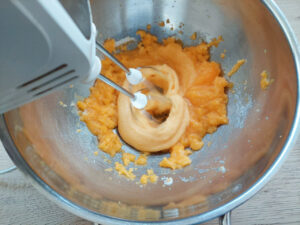
Whisk the ingredients together until they become a fluffy, light yellow mass.
6. Constantly check the temperature with a thermometer. It should not exceed 60 °C (140 °F), or else the eggs will start to clot.
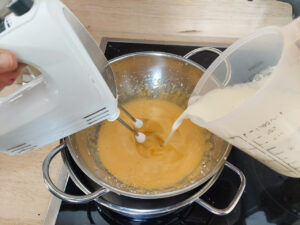
7. Now add the alcohol and the cream and whisk until the mixture noticeably thickens — this usually takes 5–10 minutes. Again, make sure the temperature does not exceed 60 °C (140 °F).
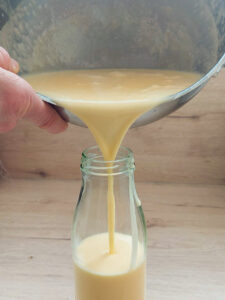
8. Use a funnel and sieve to fill the Eierlikör into bottles.
How to store Eierlikör
The sugar and alcohol in the Eierlikör work as preservatives so that it won’t spoil easily. However, store your homemade Eierlikör in the fridge to be on the safe side. There, it will last for 4–6 weeks.
125 mlvodka, corn schnapps, doppelkorn or white rum
1/2vanilla pod (pulp)
Equipment
1 pot
1 metal bowl that fits into the pot
1 Whisk or electric mixer
1 thermometer (analogue or digital, range from 0 – 100 °C (32 – 212 °F)
1 rubber spatula
1 funnel optional
1 sieve optional
2 - 3 glass bottles 250 ml, at best with a wide rim
Method
Eierlikör: Step-by-Step
Sterilise the bottles by rinsing them and the lids with boiling water and letting them cool down and dry.
Fill half the pot with water and bring it to a boil.
Separate the eggs and put the yolks, sugar and vanilla pulp in the bowl.
Hang the bowl in the pot with the hot water. This is called a bain-marie or double boiler.
Whisk the ingredients together until they become a fluffy, light yellow mass.
Constantly check the temperature with a thermometer. It should not exceed 60 °C (140 °F), or else the eggs will start to clot.
Now add the alcohol and the cream and whisk until the mixture noticeably thickens — this usually takes 5–10 minutes. Again, make sure that the temperature does not rise above 60 °C (140 °F).
Use a funnel and sieve to fill the Eierlikör into bottles.
Notes
You can add different flavours to your Eierlikör by substituting the vanilla with 1/2 tablespoon of cinnamon or a pinch of grated tonka bean.Store the Eierlikör in the fridge where it will last for 4 - 6 weeks.
How to serve Eierlikör
Eierlikör is often served in small glasses or chocolate-coated wafer cups. But that’s only one of many options.
Pour your homemade Eierlikör over an ice cream cup. It works wonderfully with vanilla, chocolate or hazelnut ice cream, but also with fruity ones like strawberry or raspberry.
Sneakily add German Eierlikör to your coffee. No one will see it, and it tastes delicious.
There are several cake recipes with Eierlikör, which I intend to post soon. Stay tuned.
Eierlikör can pimp many a dessert and take it from “meh” to “wow”. Whether it’s a tiramisu (forgive me, my Italian friends!), an Eton mess (a British cream dessert) or just whipped cream: a healthy dollop of Eierlikör can make a huge difference.
As Eierlikör is made from eggs, it’s natural that it’s connected with Easter, where it’s often served at celebrations. This is a lovely tradition I absolutely intend to keep!
German Eierlikör – A Treat Made in No Time
Whenever I see Eierlikör, I think of my Oma and aunties and the fun they had together. I miss them and the happy days and moments I shared with them.
Today, I make my own Eierlikör, and I encourage you to make your first (or second, or third…) batch with this quick and easy recipe. It doesn’t need fancy equipment or lots of ingredients and is done in about 10 minutes.
You can drink all of it by yourself, of course. I won’t judge you. But it’s more fun to share it with family and friends. And who knows, you could even start a new tradition that your kids and grandchildren will remember fondly one day.
I toast my granny for that. Cheers, Oma!
If you’re looking for more simple recipes to make from scratch, head over to my Recipes page — there’s plenty more to explore.
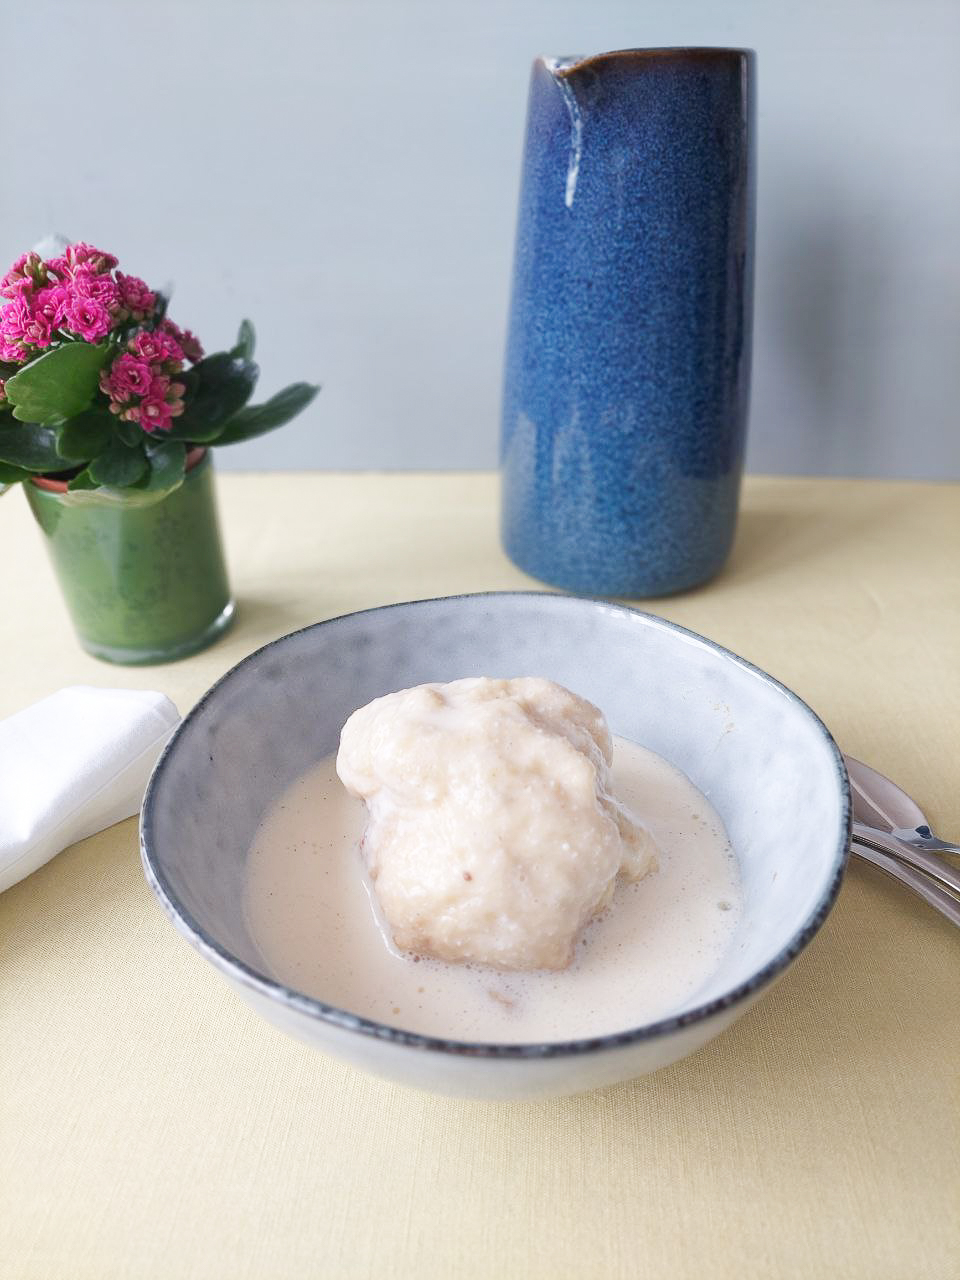
Dampfnudeln, those fluffy Bavarian steamed dumplings with a golden caramelised bottom, were my Oma’s speciality — and today I’m sharing her recipe so you can master them too. In this recipe, I’ll show you how to make traditional Bavarian Dampfnudeln step by step — including all the tips that ensure they turn out fluffy with that signature caramelised crust.
When Oma cooked for our family – usually during harvest when Mom and Dad were in the fields all day – she often made Dampfnudeln. She waited until the four of us children had gathered around the table, making sure our hands were washed. Every one of us already had a plate in front of them, along with two forks and a tablespoon. We had already grabbed the forks and held them like swords.
Finally, Oma brought the large pot and put it in the middle of the table. The lid was still closed, its edges covered with dishcloths to trap the steam, but we could already smell the sweet scent of the steamed Dampfnudeln. Although we could hardly wait, none of us would dare to open the lid, knowing that Oma would give us a good rap on the knuckles (I‘ll soon explain why).
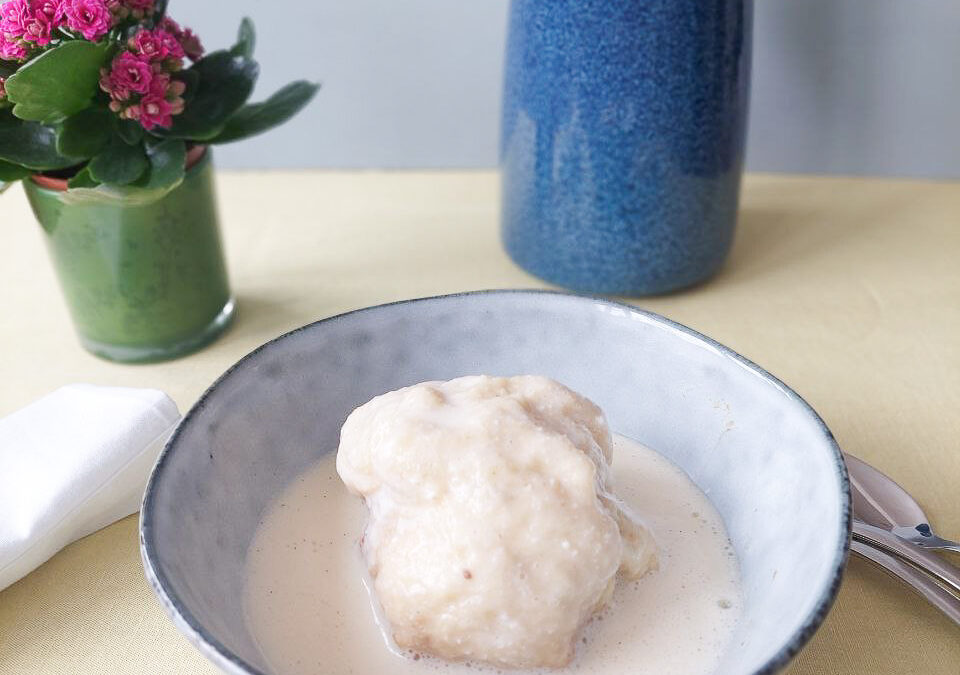
She brought the large jug of vanilla sauce and finally, finally, opened the lid from the pot, releasing the steam that had been trapped in it. And oh, the smell!
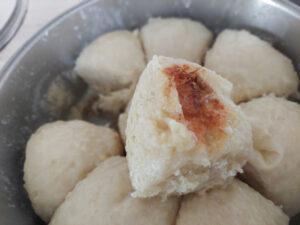
She carefully dug out one Dampfnudel after the other, and we could see the brown, caramelised crust underneath. As she’d placed them on our plates, we eagerly pulled them apart with our forks (hence two) and poured lukewarm vanilla sauce over them. It was pure bliss on a plate!
Aren’t familiar with Dampfnudeln? Let me explain what it is, where it originates from, and – last but not least – how to make the perfect Dampfnudel.
What is a Dampfnudel?
Basically, a Dampfnudel is a dumpling made from sweet, enriched yeast dough that’s steamed instead of baked. It’s a common dish popular across Southern Germany, Palatinate, Austria, Switzerland and the Alsace and is either served sweet or savoury as a main course.
The German word “Dampfnudel” translates as “steam noodle”. Now, “noodle” seems a strange word to describe what looks nothing like noodles, but it is actually an old word for “dumpling”.
Dampfnudeln (plural) are a traditional comfort food here in Bavaria, and they’re often served with sweet sauces like vanilla sauce or savoury sauces like mushroom sauce. They may sound like a dessert (and you can eat them as that), but in fact, they’re mostly served as a main dish, as they’re very filling. A pot of dampfnudeln and a jug of sauce can easily feed a whole family.
Where’s the Origin of Dampfnudeln?
Seeing as I’m from Bavaria, I’d love to say that Dampfnudeln originate here, in the heart of the land of mountains and lakes. But I can’t legitimately make that assertion, particularly as Rhineland-Palatinate, a state in the mid-West of Germany, claims that they’ve invented the Dampfnudel.
There’s a story about the village of Freckenfeld in Rhineland-Palatinate: During the Thirty Years’ War, the Swedes were threatening to plunder and burn down the village if the people wouldn’t pay an immense sum of money. The villagers persuaded the Swedes to spare them, and in return, they’d feed their soldiers abundantly.
The baker of Freckenfeld, a Mr Muck, was assigned the task to fulfil this promise. I’m sure he felt no pressure at all that he alone was responsible for the life or death of a village full of people.
He probably broke out in a sweat – and started to work.
It is said that Muck, with the help of his wife and his apprentice, made 1286 Dampfnudeln for the hungry soldiers (why anyone would want to count them is beyond me) and served them with enough sauce to feed, well, an army.
The village was spared, and the grateful villagers erected the “Dampfnudel-Tor” (Dampfnudel gate), consisting of the described 1286 Dampfnudeln (this time in stone) in commemoration of this event. The gate still stands, and if you ever come to Freckenfeld, go visit.
The Dampfnudel Gate in Freckenfeld (picture: pfalz.de)
In Bavaria, we don’t have a similar story, but we enjoy Dampfnudeln at least equally. The main difference between Bavarian and Palatinate Dampfnudeln is that we in the South usually enjoy them with a sweet sauce, fruit sauce or canned fruit. The people in the Palatinate, on the other hand, usually eat them with savoury sauces like mushroom or béchamel sauce.
Why You’ll love this German Dampfnudel recipe
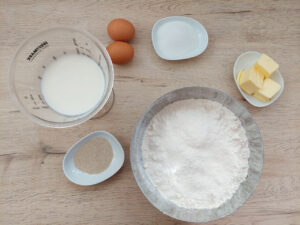
Basic ingredients
Dampfnudeln may seem difficult, but in fact, you’ll only need a few ingredients to make these delicious dumplings. In fact, it’s just a sweet yeast dough, enriched with butter, milk and eggs that makes the basis for Dampfnudeln. You’ll find the full list of ingredients in the recipe section.
Low cost
Seeing as the ingredients are very basic, you’ll see that this dish is very budget-friendly. You can feed a whole family with Dampfnudeln for only a few euros.
The same goes for the sauces or preserved fruits you’re gonna serve them with. Neither vanilla sauce nor mushroom sauce is complicated or expensive. Or you can just take a jar of homemade apple sauce or dry-canned apples from your pantry and serve them with a staple you made yourself.
Comfort
The best thing about Dampfnudeln, though – no matter if served sweet or savoury – is that they’re a real comfort food from autumn to spring. They’re warming, hearty, and pair beautifully with preserved pantry staples you’ve been putting up all summer. Their fluffy dough, drenched in sauce, is like a caress for the soul. Up to now, I have not come across anyone who wouldn’t love Dampfnudeln, and I promise you: your family will, too!
But enough talk. Head for the pantry, grab the ingredients for Dampfnudeln and let’s get started!
How to Make Dampfnudeln (Step-by-Step)
Prefer watching? Here’s how to make Dampfnudeln step by step.
You are currently viewing a placeholder content from Default. To access the actual content, click the button below. Please note that doing so will share data with third-party providers.
Put the flour, sugar, salt and dried yeast in a bowl (see recipe card for quantities).
Warm the milk to hand temperature and melt the butter in it.
Add the eggs to the dry ingredients and slowly pour in the milk. Stir all together to make a soft but not sticky dough and knead it thoroughly until it becomes pliable and the surface turns smooth and silky. If the dough is too sticky, add some flour; if it’s too dry, add some milk.
Knead the dough
You can either knead the dough by hand (which is my preferred method) or with the hook of a stand mixer. In either case, knead it for about 4 minutes until the dough gets the desired texture.
Proof
Put the dough in a bowl and cover it with cling film or a dishcloth. Set it in a warm place and let it rest for 60 – 90 minutes or until the dough has risen to twice its size.
Shape the dumplings
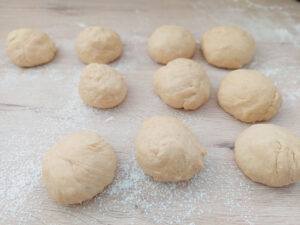
Get the dough out of the bowl and onto a lightly floured board, the kitchen counter or a table. Knead it gently and cut 8 – 10 equally large pieces out of it.
Roll the pieces to form dumplings, squeezing the seams together. Lay them on the floured surface, cover them and let them rest in a warm place for another 30 – 60 minutes.
Prepare the pot
In the meantime, take a large, heavy-bottomed pot or pan with high sides and put it on the stove. The pot should be large enough to hold all the Dampfnudeln. I, for example, use one with a diameter of 25 cm (10 inches). Put the sugar and butter in it and pour in the milk. Slowly heat the mixture and stir it until the butter has melted and the sugar dissolved.
How to steam Dampfnudeln
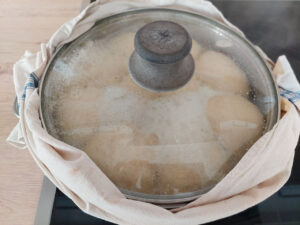
When the dough balls have risen considerably, carefully put them into the pot with the warm milk. Make sure they have enough room to rise, so don’t squash them too tightly.
Close the pot with a lid, ideally made of glass, so that you can look into the pot. Bring the milk to a simmer on low. You want your Dampfnudeln to be steamed, not cooked. If the temperature is too high, the Dampfnudeln will burn while still raw in the middle. To trap the steam in the pot, you can wrap two dishcloths around the rim, just like Oma did.
From now on, do not open the lid until the Dampfnudeln are fully done! This is essential. When you open the lid, even just a tiny bit, the Dampfnudeln will crumble down.
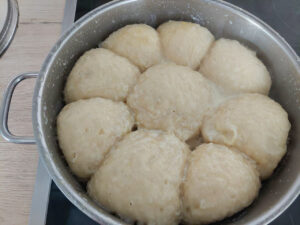
Set the timer and let the Dampfnudeln steam for 30 – 35 minutes. You’ll know they’re done when they don’t move anymore, as the bubbling liquid has been absorbed. As a result, their shape has become stable. The simmer gentles down, and condensation increases.
When they’re done, carefully open the lid. As they’re cooked through now, they won’t crumble.
Freshly steamed Dampfnudeln. Let them cook for another few minutes until the moisture is absorbed and the crust starts to form.
Form the crust
Increase the temperature to medium and let the Dampfnudeln simmer for another few minutes until the milk is completely absorbed. When you can hear a slight sizzling, the crust is forming.
Immediately remove the pot from the stove to prevent the Dampfnudeln from burning and serve them right away, ideally with homemade vanilla sauce. (In this post about apple strudel with vanilla sauce, I’ll give you my favourite recipe).
Why Dampfnudeln get crust (and why you mustn’t open the lid)
During cooking, the liquid evaporates and steam forms. That steam is trapped in the pot and cooks the dough gently and evenly. That’s the reason you must never open the lid during the steaming process. The steam would get out, and cold air would flow in, ruining the result.
The butter in the mixture not only adds some flavour (fat is a flavour carrier) but also prevents the dough from sticking to the pot. With the help of butter, the Dampfnudeln can brown in the end instead of getting scorched.
When at the end of the steaming process, all the liquid is absorbed and evaporated, the sugar concentrates on the bottom of the pot and caramelises. Only after steaming is finished, the caramelised Dampfnudel crust forms. Additionally, the milk proteins and the sugars cause what’s known as the Maillard reaction, which gives browned food its distinct flavour.
Dampfnudeln
Authentic German Steamed Buns with a Caramelised Crust
Put the flour, sugar, salt and dried yeast in a bowl.
Warm the milk to hand temperature and melt the butter in it.
Add the eggs to the dry ingredients and slowly pour in the milk. Stir all together to make a soft but not sticky dough and knead it thoroughly until it becomes pliable and the surface turns smooth and silky. If the dough is too sticky, add some flour; if it’s too dry, add some milk.
Knead the dough for about 4 minutes until it gets the desired texture.
Put the dough in a bowl and cover it with cling film or a dishcloth. Set it in a warm place and let it rest for 60 – 90 minutes or until the dough has risen to twice its size.
Get the dough out of the bowl and onto a lightly floured board, the kitchen counter or a table. Knead it gently and cut 8 – 10 equally large pieces out of it.
Roll the pieces to form dumplings, squeezing the seams together. Lay them on the floured surface, cover them and let them rest in a warm place for another 30 - 60 minutes.
In the meantime, take a large, heavy-bottomed pot or pan with high sides and put it on the stove. The pot should be large enough to hold all the Dampfnudeln. Put the sugar and butter in it and pour in the milk. Slowly heat the mixture and stir it until the butter has melted and the sugar dissolved.
When the dough balls have risen considerably, carefully put them into the pot with the warm milk.
Close the pot with a lid. Bring the milk to a simmer on low. To trap the steam in the pot, you can wrap two dishcloths around the rim.
From now on, do not open the lid until the Dampfnudeln are fully done!
Set the timer and let the Dampfnudeln steam for 30 – 35 minutes. When they're done, carefully open the lid.
Increase the temperature to medium and let the Dampfnudeln simmer for another few minutes until the milk is completely absorbed. When you can hear a slight sizzling, the crust is forming.
Immediately remove the pot from the stove to prevent the Dampfnudeln from burning and serve them right away, ideally with homemade vanilla sauce.
The Secret to Perfect Dampfnudeln (Troubleshooting)
If you enjoy traditional recipes like this and want more seasonal inspiration straight from my kitchen, join the Seasonal Simple Life newsletter below.
It took me years to make perfect Dampfnudeln that are fluffy on the inside and have a crispy, caramelised crust. After testing various methods and many batches of (sometimes failed) Dampfnudeln, I’ve learned my lessons. Let me show you.
The Dampfnudeln are raw inside.
This is a common occurrence when the temperature for simmering is set too high. That way, the Dampfnudeln are cooked instead of steamed, and the milk evaporates too fast.
Next time, make sure that you only let them simmer on very low heat.
The bottom is burned
This could either be a pan, timing or measuring issue:
Make sure you use a heavy-bottomed pot.
When the Dampfnudeln are ready, and you open the lid and let them cook a bit more on the stove, listen carefully. When they start to sizzle, the crust is done, and you must immediately remove the pot from the stove.
Measure the amount of milk or water for the pot carefully, and don’t use too little.
The Dampfnudeln have no crust.
You probably used too much liquid that wouldn’t evaporate fully, even after the lid was opened.
Carefully measure the liquid.
The Dampfnudeln have collapsed.
That’s a classic case of curiosity and impatience. You opened the lid too soon, that is, before the Dampfnudeln were completely steamed through. The steam escaped while at the same time, colder air got inside the pot and caused the Dampfnudeln to collapse.
Keep the lid closed during steaming! Even a slight opening is too much for the sensitive dumplings.
The Dampfnudeln are heavy and dense
Several reasons can lead to dense and heavy Dampfnudeln.
The most common mistake is that the dough was too dry in the first place. Make sure the dough is soft and pliable, and add some milk if necessary.
Another reason can be that the dough wasn’t kneaded enough for the gluten to develop. The yeast in the dough creates gas, which must be trapped within the dough for it to rise. When the gluten structure is insufficiently developed, it can’t hold the gas, and the dough won’t rise properly. Knead the dough until it is soft and pliable and has a smooth and silky surface.
Speaking of rising: give the dough enough time to proof. It must approximately double in size. Now, depending on the temperature the dough is left in, this takes longer or shorter. Don’t stick too close to the clock; rather, watch the dough.
Lastly, when the cooking temperature is too high, the outer dough will set too fast, and as a result can’t rise during steaming. Always simmer Dampfnudeln on very low heat.
The dough didn’t rise.
This can be due to yeast problems: When the yeast is too old, it sometimes gets weak and doesn’t produce enough gas for the dough to rise properly. Check that your yeast hasn’t expired.
Also, if the milk you add to the dough is too hot, it can kill the yeast. Make sure the milk is not hotter than 38 °C (100 °F).
Don’t worry, though. Even experienced cooks have these mishaps from time to time. Just remember that practice makes perfect.
Serving Ideas for Dampfnudeln
Dampfnudeln are incredibly versatile and can be eaten with sweet or savoury sauces. While sweet Dampfnudeln are the Bavarian classic, savoury versions are especially popular in the Palatinate.
Sweet Dampfnudeln (German classic)
Dampfnudeln with vanilla sauce: The classic (and in my opinion, most authentic) way to eat Dampfnudeln is with vanilla sauce.
Fruit: But, of course, you can also serve them with apple sauce or fruit compotes like these dry-canned apples. Oma, for example, always liked to add preserved elderberries or plums to the (obligatory) vanilla sauce.
Butter and sugar: Some people like to pour brown butter on top or dust them with poppy seed sugar, although that’s more common with Germknödel, a filled Dampfnudel variation (more on that below).
Savoury Dampfnudeln Ideas
Mushroom sauce: In Palatinate, it’s more common to steam Dampfnudeln in salted water instead of sweet milk and then serve them as a savoury dish, for example, with a creamy mushroom sauce.
Vegetables: Another delicious way to eat hearty Dampfnudeln is as a side dish to homemade sauerkraut, spinach or other vegetable sauce and soup.
Meat: Serve Dampfnudeln as dumplings with goulash.
Make Ahead and Storage
How to prepare Dampfnudeln in advance
The yeast dough for Dampfnudeln can well be made ahead. Just don’t let it proof in a warm place, but put it in the fridge instead. There, it’ll rise as well, but slower due to the low temperatures. When you plan to make Dampfnudeln in the evening, you can make the yeast dough in the morning or even the evening before and let it proof in the fridge.
Before shaping the Dampfnudeln, take the dough out of the fridge and let it warm up for 1 – 1.5 hours.
Another way to prepare Dampfnudeln ahead is by freezing the raw dumplings. Cut off equal pieces from the yeast dough and roll them into dough balls. Instead of letting them sit to proof, put them in a bag and then in the freezer. Dampfnudeln can be stored in the freezer for up to three months.
Before you cook them, take the dumplings out of the freezer and let them defrost in the fridge overnight.
How to store Dampfnudeln
You can store cooked Dampfnudeln in a closed container for two days at room temperature, 3 – 4 days when you put the container in the fridge.
Alternatively, freeze Dampfnudeln. Just make sure they’ve completely cooled down, then put them in a bag and store them in the freezer. Before eating, take them out of the freezer and let them defrost in the fridge overnight. The next day, you can heat the Dampfnudeln in a microwave or the oven.
How to reheat Dampfnudeln
You got your Dampfnudel out of the fridge or freezer, but how to reheat it so that it becomes that fluffy ball again? There are a few different methods:
Microwave: Moisten or even rinse the Dampfnudel, put it on a plate and let it steam in the microwave for 3 – 4 minutes (600 W)
Pot: Heat some water in a pot, hang a tight-meshed sieve, steaming basket or dishcloth in it (the water mustn’t touch it). If you use a dishcloth, tie it loosely to the pots’ handles so that it forms a slight hollow. Now put the Dampfnudel in whatever device you’re using, close the lid and let it slowly reheat in the steam for 15 – 20 minutes.
Oven: If your oven has a steam function, wonderful! Use that. If not, you can use a roasting pan and an oven rack. Preheat the oven to 160 °C (320 °F), bring some water to the boil and pour it into the roasting pan in the oven. Moisten or rinse your Dampfnudel, put it on the oven rack and push it into the preheated oven. Let the Dampfnudel steam for 20 – 30 minutes and make sure that the water doesn’t evaporate completely.
Steam cooker: Preheat the steam cooker and let the Dampfnudel steam for 15 – 25 minutes in the steaming basket.
Dampfnudel Variations (Traditional and Modern Recipes)
You’ve learned the traditional way to make Dampfnudeln now, but there are a few variations that I’d like to show you, as well.
Sourdough Dampfnudeln
This variety is wonderful as a side dish to goulash or a hearty soup.
Leave out the eggs and milk, and instead make the Dampfnudel dough with sourdough or sourdough discard (alongside the yeast) and water. They must proof a bit longer, around 1.5 – 2 hours, but the steaming process is the same. Put them into a pot with warm water, salt and butter and steam them for 30 – 35 minutes.
Wholemeal flour Dampfnudeln
You can substitute the all-purpose flour with the same amount of wholemeal flour to make Dampfnudeln. You may want to add a bit more milk or water to the dough as wholemeal flour tends to absorb more water. Also, proofing time may be a bit longer. Just give the dough enough time to double in size. Wholemeal flour Dampfnudeln can be either made sweet or savoury.
Filled Dampfnudeln (Germknödel)
A classic Austrian Germknödel, the Austrian version of a filled Dampfnudel, is traditionally filled with plum jam. When you cut the dough into pieces, pull the pieces a bit so that they become flat(ish). Now, place a large teaspoonful of plum or any other jam you like on the dough and close it around the filling. Press the seams together so that the filling is safely tucked inside, and roll the dough into a ball.
When all dumplings are made, leave them to proof, just like regular Dampfnudeln, before steaming them. Germknödel are usually served drizzled with melted brown butter and sprinkled with poppy seed sugar.
Vegan Dampfnudeln
The sourdough Dampfnudeln I mentioned earlier are a good vegan alternative for a salty version. But you can also make vegan sweet Dampfnudeln: Leave out the eggs, replace the milk with oat, almond or soy milk – whatever you prefer – and use margarine instead of butter. You will want to add about a third more margarine than in the traditional recipe, since you have to replace the eggs.
Vegan Dampfnudeln can be just as fluffy as traditional ones, but the crumb is usually slightly lighter and less rich because eggs and dairy add tenderness, structure and moisture.
Here are answers to the most common questions about making Dampfnudeln.
Frequently Asked Questions
Why are my Dampfnudeln dense?
You most probably haven’t kneaded the dough enough and/or given it enough time to rise. Other reasons are that the dough was too dry or you cooked the Dampfnudeln at too high a temperature.
Can I make Dampfnudeln without egg?
Absolutely. Leave the eggs out of the recipe and add more butter (or margarine, if you prefer a vegan version) and, if necessary, more liquid.
Can I make Dampfnudeln without a special pot?
Yes — any heavy pot with a lid works (pan, Dutch oven and so on)
Why must you not open the lid?
When you open the lid before the Dampfnudeln are cooked through, the trapped steam gets out of the pot while cold air gets into it, causing the Dampfnudeln to collapse.
Are Dampfnudeln the same as Buchteln?
Not quite, but close. The (sweet) yeast dough is the same, but while Dampfnudeln are steamed, Buchteln are baked.
Can I use fresh yeast instead of dry?
Absolutely. Use three times the amount of fresh yeast compared to dry yeast.
Can I make Dampfnudeln in the oven?
Yes. Put the (proofed) dough rolls in a greased casserole, fill the casserole with a mixture of warm milk, sugar and butter (like in the traditional recipe) and let the Dampfnudeln bake for 25 minutes at 180 °C (355 °F). Please note that the texture will be different: while traditionally steamed Dampfnudeln are soft on the surface, the baked version will be crisp on the outside.
Why don’t my Dampfnudeln brown?
When they’re cooked through, open the lid and let them cook until all the moisture is absorbed and evaporated. The crust forms after the steaming process.
Seasonal Simple Life Tips
Dampfnudeln are a wonderful Bavarian comfort food. Imagine coming home on a cold autumn day, where you’ve cleaned up your garden, to a steaming plate of Dampfnudeln with vanilla sauce. Pure bliss!
Alternatively (or additionally, if you prefer), serve the Dampfnudeln with homemade fruit preserves, like apple sauce, dry-canned apples, preserved elderberries (as Oma used to), plums or cherries. Try different fruit preserves; there’s no limit to your imagination.
Dampfnudeln are not only delicious, but also a traditional slow food. You need patience to let the dough proof twice, and especially during the steaming process. No lifting the lid, remember?! Take that time deliberately, to make a special, nourishing dish for your family.
While you’re at it, think about making a double batch and either freezing the raw dumplings or the steamed Dampfnudeln. That way, you’ll have a meal prepared that you only have to take out of the freezer the night before and just reheat.
From Oma’s Kitchen to Yours — Ready to Make Your First Dampfnudeln?
Do you remember the beginning of this article, where we four children were sitting at the table, forks raised like swords, waiting for Oma to open that lid?
I’d love for you to create that moment in your own kitchen.
It doesn’t matter if it’s your children, your partner, your friends or just yourself — there’s something deeply satisfying about setting a steaming pot of Dampfnudeln on the table, knowing you made them from scratch with a handful of simple ingredients. And yes, your first batch might not be perfect. The lid might have been lifted just a tiny bit (we’ve all been there), or the crust might not have formed quite right. Don’t worry. Even imperfect Dampfnudeln are delicious — and the next batch will be better.
That’s the thing about traditional recipes like this one: they reward patience and practice. Let the dough take its time. Don’t rush the proofing. And whatever you do — don’t open that lid.
This recipe shows you exactly how to make traditional Dampfnudeln with a fluffy crumb and caramelised crust — step by step.
Guten Appetit! 🥟
If you love traditional comfort food, you might also enjoy these seasonal favourites from my kitchen:
This Dampfnudeln recipe is part of my growing collection of traditional, seasonal dishes. Browse the full recipe archive here and find your next comforting kitchen project.
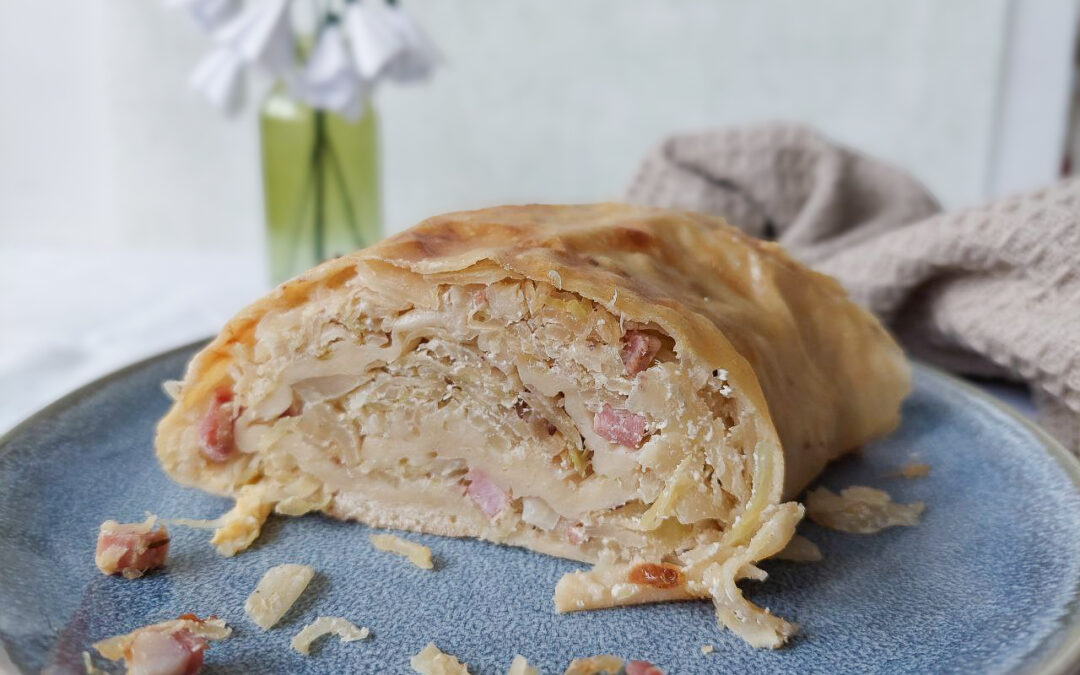
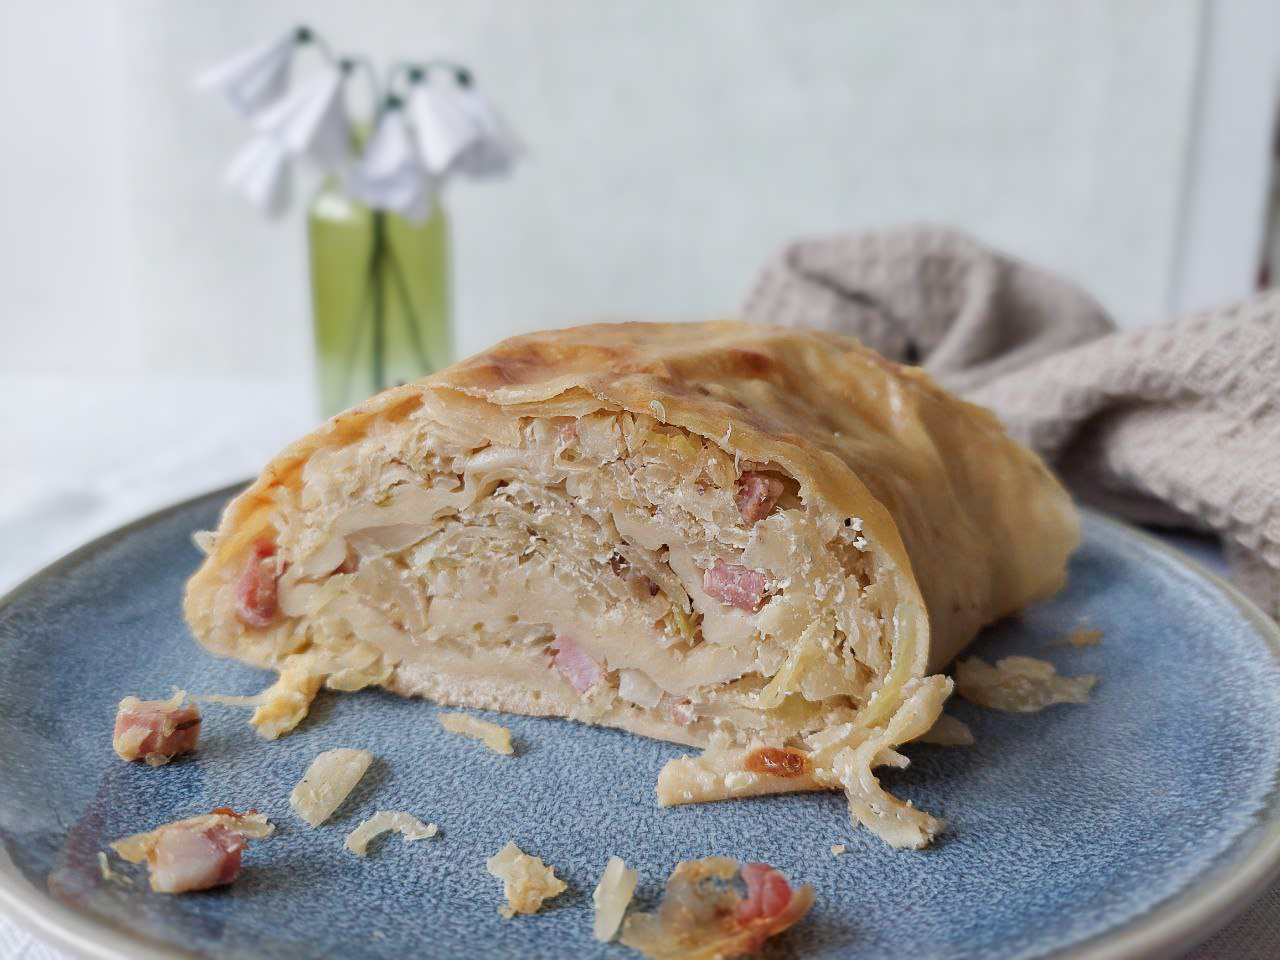
Sometimes in winter, when I don’t know what to cook, I go down into my basement to look at all my jars of homemade preserves. And I’ve always found an inspiration there! One of the most versatile staples there is sauerkraut. Have you ever tried it in pastry? Today, I’m going to share one of my favourite recipes: authentic Bavarian sauerkraut strudel.
As Bavarians, we often eat sauerkraut together with fried sausages, of course. But there are so many other ways to use it! This strudel will soon become one of your go-to recipes, too. The crispy dough, the juicy filling and the wonderful combination of flavours will leave your family and guests begging for more.
What is Bavarian Sauerkraut Strudel?
Strudel is a wonderful dish. Honestly, if we hadn’t already got it, somebody would have to invent it. You can put anything on strudel dough — apples, sauerkraut, potatoes, or fish — wrap it up, and bake it in the oven. In this case, we have crispy strudel dough with a savoury sauerkraut filling.
This sauerkraut strudel recipe makes for a perfect weekday winter dish. The rich, hearty filling makes it a down-to-earth, warming comfort food. And using homemade sauerkraut is the cherry on top!
In Bavaria, we eat this strudel as a main dish. You can serve it with a cream sauce and a fresh seasonal salad like lamb’s lettuce, beetroot or carrot salad.
Ingredients You’ll Need
For the dough
Strudel dough is easy to make. You just need
250 g flour: all-purpose flour is best, make sure it’s not self-raising
1 egg, free-range
1/8 l lukewarm water
2 tbsp vinegar and
1 tbsp oil or melted butter
a pinch of salt
Mix everything and let it rest for half an hour before you thinly stretch it out.
Instead of making the dough from scratch, you can buy a ready-made version, but make sure it’s a high-quality product. Honestly, making the dough is a matter of minutes, and while it rests, you can prepare the filling. There’s almost no time-gain in buying one.
For the filling
For the rich, savoury filling you need
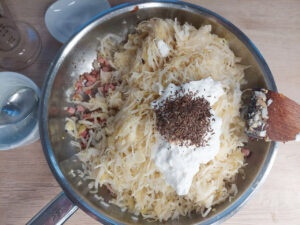
750 g sauerkraut (that’s one large jar): use your homemade staple, if you have one or a good store-bought one. Quality matters!
1 large onion
200 g sour cream
200 g bacon ( you can leave the bacon out for a vegetarian dish)
salt, pepper, and
1 tbsp caraway seeds
Bavarian Sauerkraut Strudel Recipe: Step-by-Step
We start by preparing the dough, as it has to rest for about half an hour.
Making the strudel dough
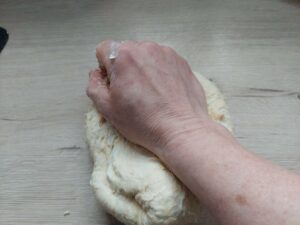
Weigh the flour and put it into a bowl. Now add the egg, the salt, vinegar and oil or melted butter. Warm the water until it’s lukewarm and slowly pour it into the mix. Don’t add all the water in one go, but rather mix the dough and add water as necessary. Depending on the temperature and humidity in your kitchen, you need less or more water.
Mix the ingredients thoroughly and knead the dough
In this post, I describe in detail how to make strudel dough. If you prefer watching a video, look here:
You are currently viewing a placeholder content from Default. To access the actual content, click the button below. Please note that doing so will share data with third-party providers.
Now, the dough has to rest for about half an hour. Just put it back into the bowl and cover it with a second bowl so that it won’t dry out.
As I said before, you can also use store-bought dough, either strudel dough or puff pastry dough. Phyllo/filo dough is an alternative, as well; you just have to “glue” the sheets with oil on top of each other.
Preparing the Filling
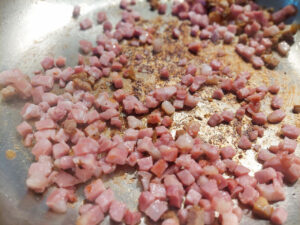
Finely chop the onion and cut the bacon into small squares or strips. Heat a skillet and cook the bacon until the fat is released. When the bacon has become bright and glassy, add the chopped onions and stir the mixture until the onions are glassy, as well.
When the bacon becomes glassy like that, add the onions
Let it all cool down and put the bacon-onion mix in a bowl.
If your sauerkraut has a lot of brine, drain it first. Mine is usually fine without draining since I ferment it with less liquid. Now, add the sauerkraut, the sour cream, pepper and caraway seeds to the bacon and onion mix and stir it together. Don’t add salt yet. Due to the sauerkraut and the bacon, it could be salty enough already. Taste the filling and add salt and pepper if necessary.
Assembling the Sauerkraut Strudel
Preheat the oven to 180 °C (355 °F) top/bottom heat or 160 °C (320 °F) fan oven.
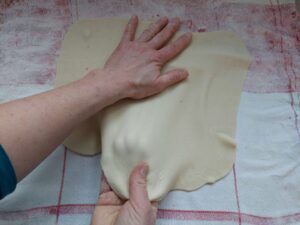
Dust a kitchen towel with some flour and roll the dough out on it. Then stretch it out with your hands as shown in the video until it’s very thin.
Start pulling the dough carefully at the edges with your fingers.
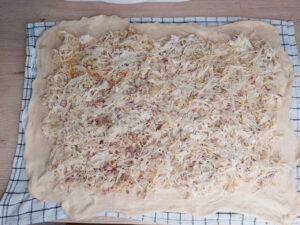
Spread the filling evenly onto the dough, leaving about 1 inch from the edges free.
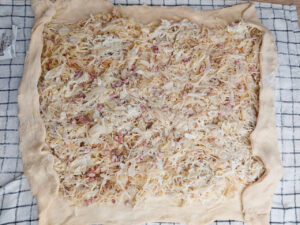
Fold in one inch of the dough on the short edges. Now start rolling the strudel by carefully lifting the kitchen towel and letting the dough roll more or less by itself.
Line a baking tray with baking paper and put the strudel onto it.
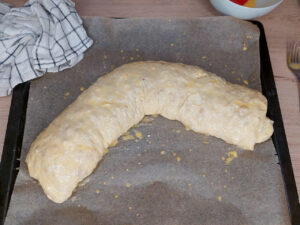
Bavarian sauerkraut strudel, ready for the oven. Larger than life – or rather larger than the tray. Had to bend the strudel to put it onto the baking tray.
Mix one egg with a bit of water in a bowl and brush the strudel with it. Alternatively, you can brush it with melted butter or oil.
Baking
Put the strudel into the preheated oven (remember? It’s 180 °C / 355 °F top/bottom heat or 160 °C/320 °F fan oven) and bake it for 40 – 45 minutes.
You know that it’s done when the surface is crisp and has turned into a beautiful golden brown. When the strudel becomes suspiciously dark before the end of the baking time, cover it with baking paper or aluminium foil. It’ll still bake but won’t get too dark.
When the strudel is done, take it out of the oven and let it rest for 2 minutes. This helps the filling settle and allows any juice that’s leaked out to be reabsorbed into the dough.
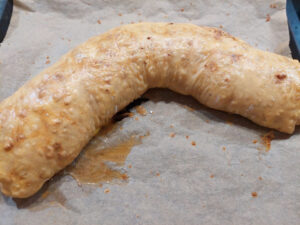
Sauerkraut strudel fresh from the oven
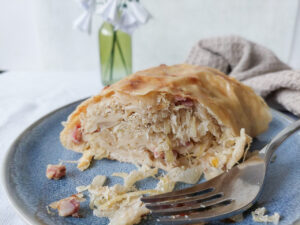
Serve the sauerkraut strudel while it’s still hot.
Traditional Bavarian Sauerkraut Strudel
Crispy strudel dough filled with tangy sauerkraut, bacon, and caraway seeds. This traditional Bavarian comfort food is perfect for cold winter evenings and makes a satisfying main dish.
Weigh the flour and put it into a bowl. Now add the egg, the salt, vinegar and oil or melted butter. Warm the water until it's lukewarm and slowly pour it into the mix. Don't add all the water in one go, but rather mix the dough and add water as necessary. Depending on the temperature and humidity in your kitchen, you need less or more water.
Now, the dough has to rest for about half an hour. Just put it back into the bowl and cover it with a second bowl so that it won't dry out.
In the meantime, finely chop the onion and cut the bacon into small squares or strips. Heat a skillet and cook the bacon until the fat is released. When the bacon has become bright and glassy, add the chopped onions and stir the mixture until the onions are glassy, as well.
Let it all cool down and put the bacon-onion mix in a bowl.
If your sauerkraut has a lot of brine, drain it first. Mine is usually fine without draining since I ferment it with less liquid. Now, add the sauerkraut, the sour cream, pepper and caraway seeds to the bacon and onion mix and stir it together. Don't add salt yet. Due to the sauerkraut and the bacon, it could be salty enough already. Taste the filling and add salt and pepper if necessary.
Preheat the oven to 180 °C (355 °F) top/bottom heat or 160 °C (320 °F) fan oven.
Dust a kitchen towel with some flour and roll the dough out on it. Then stretch it out with your hands as shown in the video until it's very thin.
Spread the filling evenly onto the dough, leaving about 1 inch from the edges free.
Fold in one inch of the dough on the short edges. Now start rolling the strudel by carefully lifting the kitchen towel and letting the dough roll more or less by itself.
Line a baking tray with baking paper and put the strudel onto it.
Mix one egg with a bit of water in a bowl and brush the strudel with it. Alternatively, you can brush it with melted butter or oil.
Put the strudel into the preheated oven and bake it for 40 - 45 minutes.
You know that it's done when the surface is crisp and has turned into a beautiful golden brown. When the strudel becomes suspiciously dark before the end of the baking time, cover it with baking paper or aluminium foil. It'll still bake but won't get too dark.
When the strudel is done, take it out of the oven and let it rest for 2 minutes. This helps the filling settle and allows any juice that's leaked out to be reabsorbed into the dough.
Serve the sauerkraut strudel while it's still hot.
Notes
Serve this traditional sauerkraut strudel as is or with a cream sauce and seasonal salad.
Variations
This recipe is the basic version of a traditional Bavarian sauerkraut strudel. However, there are several variations you may want to try.
Red cabbage strudel
A festive, slightly sweet variation perfect for holidays
Instead of sauerkraut, use 750 g fermented red cabbage for the filling. Leave out the bacon and add some roughly chopped cooked chestnuts instead. For a touch of fruit, either add some orange zest or add roughly chopped baked apples and a generous pinch of cinnamon.
Heartier version with vegetables
Makes the strudel more filling and hearty
Leave the filling as it is, but add 200 g of pre-cooked, peeled and roughly chopped potatoes or carrots. You can also put the carrots in raw, but finely grated.
Different meat options
Use up leftovers or add more protein.
Instead of bacon, add roughly chopped or whole raw frying sausages, ground pork or meat leftovers.
Mediterranean twist
For a Mediterranean version, leave out the caraway seeds and instead add 100 g dried tomatoes and thyme, oregano and ground paprika to taste.
Oriental version
If you prefer an oriental touch, add sesame, 1 -2 tsp of chilli powder, ground cumin and nutmeg.
Frequently Asked Questions
Can I use store-bought dough?
Absolutely. Look for strudel dough, puff pastry or phyllo leaves.
How do I store leftovers?
You can store leftovers in your kitchen at room temperature for one day or in the fridge for up to 3 days.
Can I freeze sauerkraut strudel?
Yes, you can freeze the strudel raw or baked. To defrost, put the strudel out of the freezer and let it sit at room temperature overnight. Heat it in the oven before eating.
What type of sauerkraut works best?
Homemade sauerkraut is always the best option, of course. If you want to use store-bought sauerkraut, look for a fermented, organic product.
Can I make it ahead?
Good idea! To make the strudel one day ahead, there are two options:
Fill, roll and bake the strudel, then let it cool down completely. Wrap it in cling film or put it in an airtight container and store it in the fridge overnight. Before serving, heat the sauerkraut strudel in the oven.
Fill and roll the strudel and put it on the baking tray. It’s important that the filling is not too moist. Brush the raw strudel with melted butter to prevent soaking through. Loosely cover the strudel with cling film and store it in the fridge overnight. Due to cooling, the dough becomes denser and needs some extra minutes to bake the next day.
Time To Bake Your Own Sauerkraut Strudel
Traditional Bavarian sauerkraut strudel is a wonderful winter dish that warms the belly and the soul. It grounds us with its down-to-earth, hearty flavours and transforms simple preserved cabbage into something truly special.
Whether you make the traditional version with bacon and caraway or experiment with one of the variations, this strudel is sure to become a cold-weather favourite. The crispy golden crust and tangy, savoury filling never fail to impress—and your kitchen will smell absolutely amazing while it bakes!
I’d love to hear how your sauerkraut strudel turns out! Which version did you try? Did you make the dough from scratch or use a store-bought option? Share your experience in the comments below, and don’t forget to check out my other traditional Bavarian recipes for more warming winter inspiration.
Happy baking, and enjoy every crispy, flavorful bite!
Love cooking as much as I do? You’ll like these recipes:
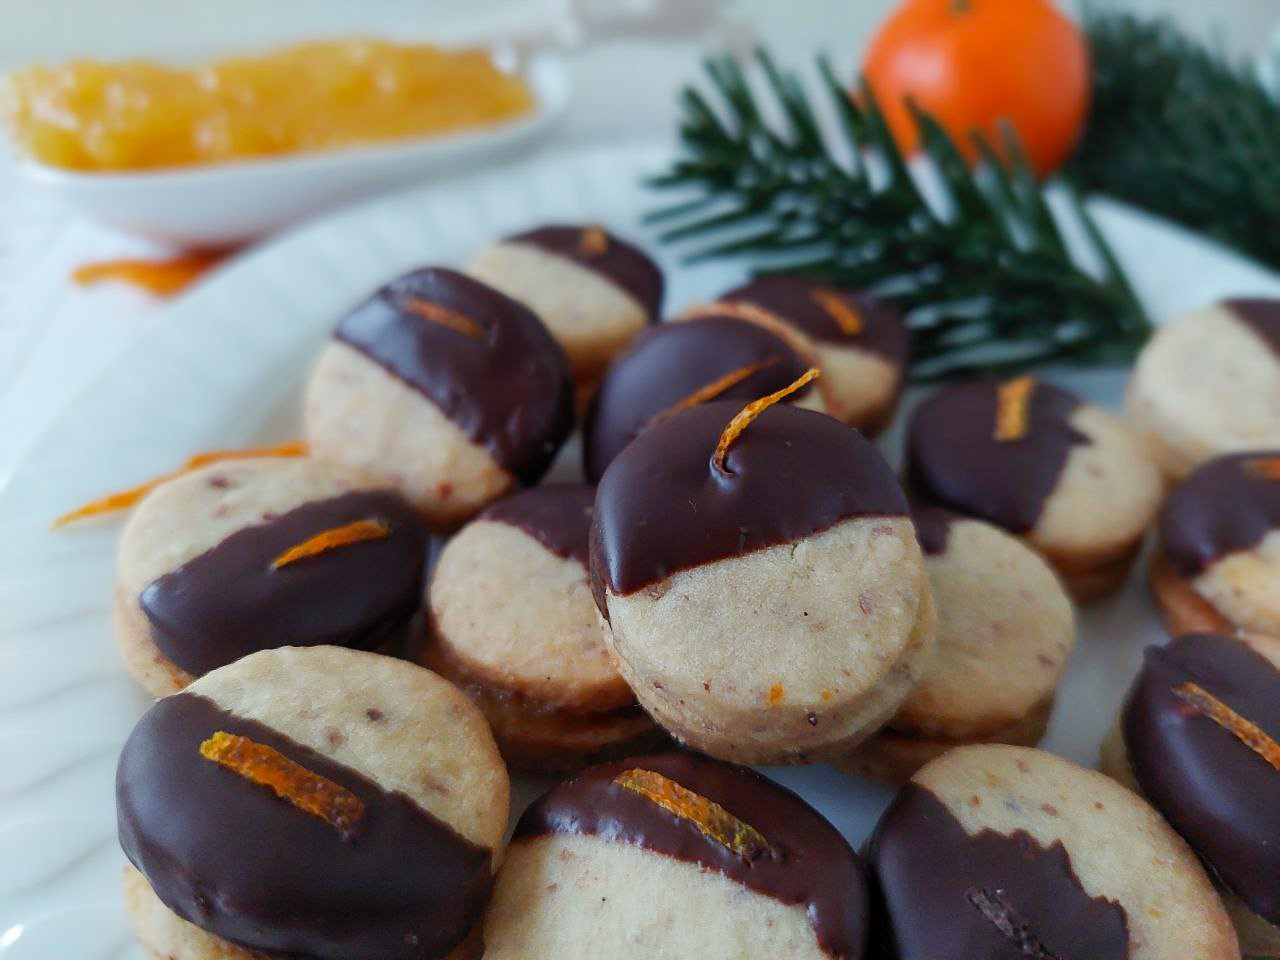
I’ll make a prediction: once you’ve tried this recipe for orange Christmas cookies, they’ll become your favourites! They’re soft and chewy and taste incredibly citrusy while looking elegant and festive enough to jazz up every cookie plate. And the secret to their incredible orange flavour? It’s actually two secrets: homemade candied orange peel and my homemade non-bitter orange marmalade.
Here’s everything you need to make these show-stopping cookies.
What You Need for Orange Christmas Cookies
Base Cookie Ingredients
Basically, this recipe is a shortcrust, so we need
Butter
It should be right out of the fridge and thus cold. The trick to making it pliable enough to mix the dough is to grate the butter block on a cheese grater. That way, the butter is broken up into small flakes while staying cold.
Flour
All-purpose flour is the flour of choice here.
Almonds
The recipe calls for ground almonds. Whether you use peeled or unpeeled almonds is up to you; the taste is the same, it’s more of an aesthetic decision: with unpeeled almonds, the dough becomes a bit “speckled” while it stays brightly yellow with peeled almonds.
Icing sugar
Granulated sugar doesn’t dissolve well enough in the dough, which is why this recipe calls for powdered (icing) sugar.
Egg
You need one medium-sized egg, if possible from free-range chicken.
Vanilla
The seed of one vanilla pod adds a warm, velvety flavour to the cookies, counterbalancing the tangy orange taste.
Orange Flavour Ingredients
Now for the (obvious) star ingredients for these orange Christmas cookies:
Fresh Oranges
Grate the peel of two oranges for this recipe and mix it into the dough. The fresh essential oils that evaporate from the peel when it’s freshly grated add tanginess to the cookie dough.
Grate the butter into a bowl, add the icing sugar and mix it in a food processor until the butter becomes soft and lighter.
Chop your homemade candied orange peel into tiny pieces.
Cut the vanilla pod lengthwise and scrape out the seeds.
Wash the oranges under hot water, dry them and grate their zest off.
Add the vanilla seeds, candied orange peel and orange zest to the butter and mix it all in.
Weigh the flour and almonds and add them to the butter mix.
Add the egg and knead it all together until you have a homogeneous dough. Work quickly here; you don’t want the dough to become too warm.
Wrap the dough in cling film and let it rest in the fridge for at least 3 hours, better overnight.
Preheat your oven to 160 °C (320°F) top and bottom heat or 140 °C (285°F) fan.
Roll out the dough about 3 mm thick and cut out round cookies with a diameter of about 3 cm.
Line a baking tray with baking paper and put the cookies onto it. Leave some room in between so that they won’t glue together.
Bake the cookies in the preheated oven for 15 – 20 minutes. They should be baked through and golden. Don’t let them brown.
Remove the cookies from the oven and let them cool down completely.
Carefully melt the chocolate and dip half of the cookies halfway into it. If you like, you can decorate the chocolate-dipped cookies with orange zest or candied orange peels.
Spread homemade non-bitter orange marmalade on the undipped cookies and set the chocolate ones on top.
Orange Christmas Cookies
These are the best orange Christmas cookies you'll ever taste! Soft, loaded with orange flavour and elegant.
Grate the butter into a bowl, add the icing sugar and mix it in a food processor until the butter becomes soft and lighter.
Chop your homemade candied orange peel into tiny pieces.
Cut the vanilla pod lengthwise and scrape out the seeds.
Wash the oranges under hot water, dry them and grate their zest off.
Add the vanilla seeds, candied orange peel and orange zest to the butter and mix it all in.
Weigh the flour and almonds and add them to the butter mix.
Add the egg and knead it all together until you have a homogeneous dough. Work fast here, you don't want the dough to become too warm.
Wrap the dough in cling film and let it rest in the fridge for at least 3 hours, better overnight.
Preheat your oven to 160 °C (320°F) top and bottom heat or 140 °C (285°F) fan.
Roll out the dough about 3 mm thick and cut out round cookies with a diameter of about 3 cm.
Line a baking tray with baking paper and put the cookies onto it. Leave some room in between so that they won't glue together.
Bake the cookies in the preheated oven for 15 - 20 minutes. They should be baked through and golden. Don't let them brown.
Remove the cookies from the oven and let them cool down completely.
Carefully melt the chocolate and dip half of the cookies halfway into it. If you like, you can decorate the chocolate-dipped cookies with orange zest or candied orange peels.
Spread homemade non-bitter orange marmalade on the undipped cookies and set the chocolate-decorated ones on top.
FAQs
Can I freeze these cookies?
Yes, but only the plain cookies without marmalade filling and decoration.
Let the cookies cool down completely before putting them into a freezer bag or an airtight container. If you use a container, put some baking paper between layers so that the cookies won’t stick together.
Baked cookies can be stored in the freezer for 3 months. Filled, decorated and stored in a tightly closed cookie box, these orange Christmas cookies will stay tasty for about 2 – 3 weeks. They won’t last that long, however, as they’re too yummy to resist.
If you want to keep them longer, store them plain, that is, without marmalade filling and chocolate decoration in the cookie box and assemble them later.
Can I make the dough ahead of time?
Yes. Wrap the dough in cling film and store it for up to one week in the fridge. Alternatively, you can freeze cookie dough for about 2 months. Before baking, let it defrost at room temperature.
Why does the dough need to rest for 3 hours (or overnight)?
Letting the dough rest in the fridge for at least 3 hours is an essential step in cookie baking and must not be skipped!
During that time, the dough cools down “to the marrow”, and that helps the cookies keep their shape when being baked. If the dough is too warm, the cookies will melt and become some unsightly puddles.
While you’re rolling out one batch of the dough, put the rest of it in the fridge.
Can I use store-bought candied peel/marmalade?
Yes, but the taste will not be as good as with homemade products 😏. If using store-bought, look for high-quality products without artificial flavouring.
Can I substitute the almonds?
If you’re allergic to nuts, leave out the almonds and add flour in the same amount. Note that the texture will be slightly different – the cookies may be a bit more crumbly without the almonds’ natural oils.
Can I skip the chocolate?
You could, but the (dark) chocolate pairs exceptionally well with the tangy orange flavour. As an alternative to the chocolate dip, mix a cup of icing sugar with 1 – 2 tablespoons of orange juice or orange liqueur (for example Grand Marnier) and brush it on the top cookie.
Why is my dough too crumbly/sticky?
Sometimes, the egg is too large or small and thus provides too little or too much moisture for the dough. So, if your dough is too sticky, add a bit of flour or almonds and knead the dough quickly.
If your dough is too sticky after adding flour, it might also be too warm – chill it for 30 minutes before continuing.
If your dough is too crumbly, add 1 – 2 tablespoons of (soft) butter. Again, let the dough rest in the fridge before rolling it out.
How thick should I spread the marmalade?
Put a small dollop of marmalade, about the size of a pea, in the middle of the cookie and stick the chocolate-dipped cookie on top of it. When you press them gently together, the marmalade will spread to the edges without spilling and making a mess.
Perfect Orange Christmas Cookies Every Time
These orange Christmas cookies have a way of disappearing quickly from cookie plates – their bright citrus flavour and soft texture make them irresistible. Whether you’re baking for a holiday gathering or simply treating yourself to something special, I hope they bring a little extra joy to your season. Happy baking!
While I’m quite open to trying out new recipes when it comes to cookies, I won’t negotiate my favourite Christmas dessert: Christmas pudding. Today, I’m sharing my tried-and-tested homemade Christmas pudding recipe that I’ve refined for years.
This rich, chewy and flavourful mother of all Christmas desserts (at least in my opinion) is so much better than anything store-bought. It contains an array of dried fruit, and it’s bursting with the Christmassy flavours of warming spices, brandy and tangy citrus. Better yet, it’s also an impressive show-stopper that’ll awe your family and guests.
The only catch is that it needs at least 4 weeks to mature. So, what are you waiting for? Let’s make a Christmas pudding that’ll become your new family tradition!
The History of Christmas Pudding
First, let’s explore the tradition behind this beloved dessert, then I’ll break down the key ingredients.
Traditionally, Christmas pudding was made on Stir-up Sunday, the last Sunday before the start of Advent. That way, it leaves the pudding enough time to mature and develop its wonderful flavours.
Stir-up Sunday got its name from an Anglican prayer, recited in the churches on this day, asking God to “stir up” the hearts of the faithful. Over time, it became associated with the stirring of the Christmas pudding.
The tradition of making the Christmas pudding on Stir-up Sunday likely started in Victorian times. The family gathered in the kitchen and took turns to stir the pudding while making a wish for the upcoming year. This wasn’t only about cooking, it was about celebrating the start of the Christmas season and creating memories together.
Sometimes, a coin or a trinket was stirred into the pudding, predicting good luck in the New Year for the person who found it in their piece on Christmas Day. In my family, we refrain from adding anything other than edibles to the pudding. I don’t want to risk a broken tooth for anyone…
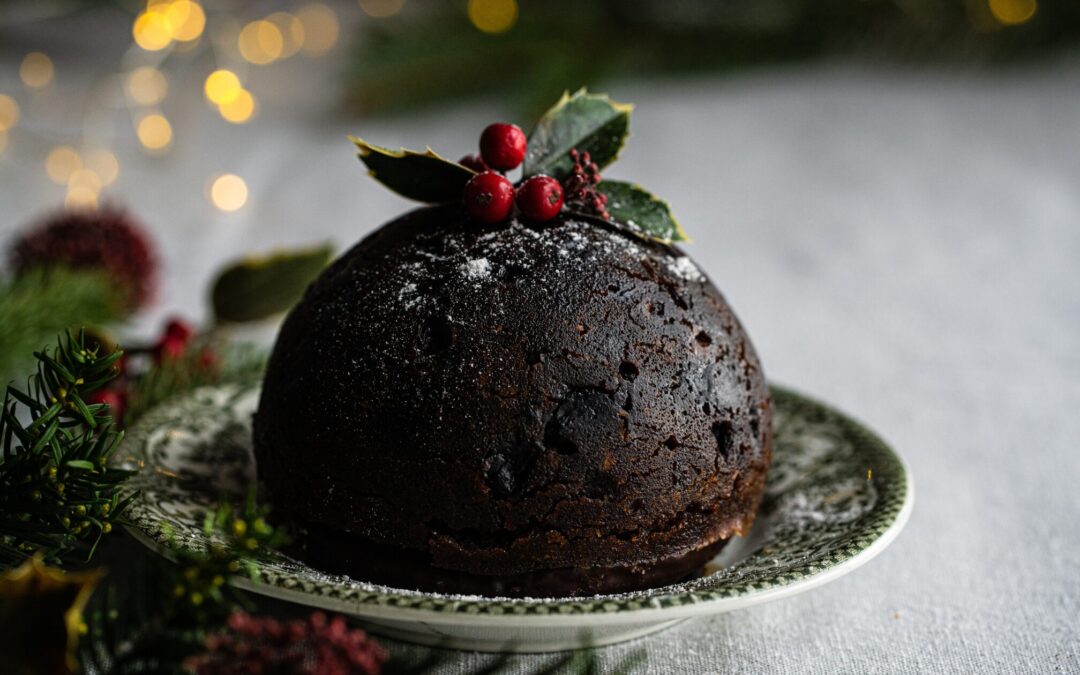
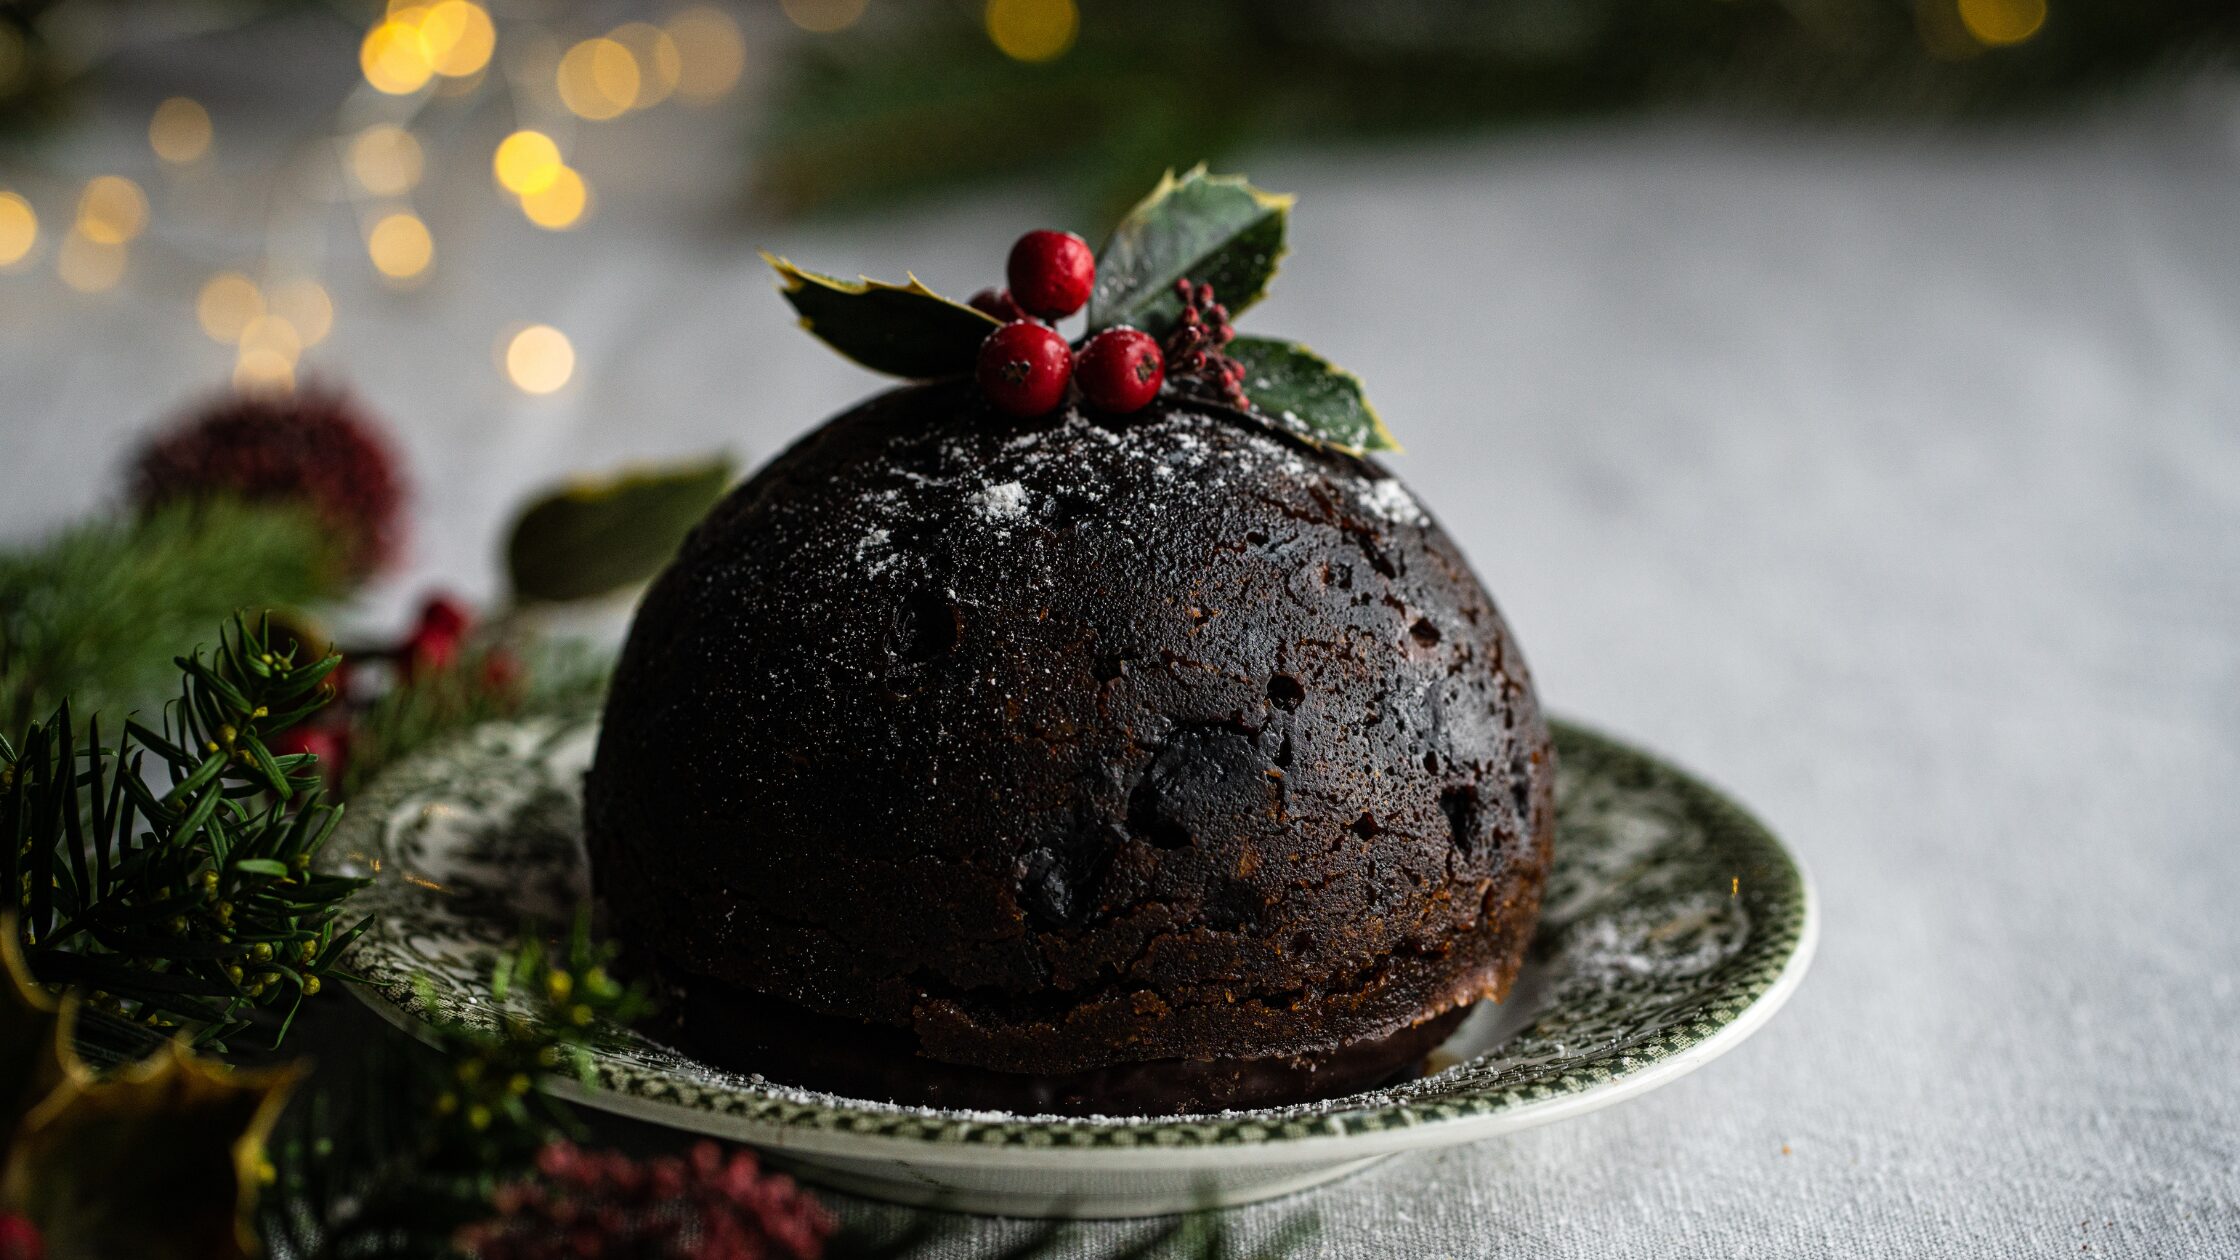
On Christmas Day, the pudding is decorated with a sprig of holly to represent Jesus’ thorn crown. Add a little bit of warm brandy and light the pudding before proudly carrying it to the family table.
Now that we know the tradition, let’s see what goes in a good Christmas pudding:
Key Ingredients for Traditional Christmas Pudding
Fruit mix
Traditional Christmas pudding contains loads of different dried fruit. I prefer the mixture I describe in the recipe, but you can alter the fruits and/or their amounts. Just make sure that in the end, you have the same overall amount of dried fruit. You’ll need 550 grams total of dried fruit (plus candied orange and lemon peels separately)
If you can’t get dried cherries, for example, you can easily swap them for dried cranberries. Or you leave out the dried apricots and try dried apples or pears instead.
Spices
Although you can juggle with the fruits if you want, don’t alter the spices. The blend of cinnamon, nutmeg, cloves, and ginger is what makes this recipe so unique and special. There’s nothing quite like this combination of warming Christmas spices that fills your kitchen with the most wonderful aroma while it steams.
Suet
Suet is beef or mutton fat from around the kidneys, which is usually sold shredded or in blocks. Here in Germany, I can get it at the butcher’s; I just need to call in advance and pre-order it. Sometimes you can find suet in the supermarket meat section, in speciality stores or even online.
There are many recipes that use butter, vegetable shortening or even oil for Christmas pudding. I strongly recommend, however, to always use suet, not butter or oil! Suet is in the recipe for a reason: it needs a relatively high temperature to melt. When the pudding gets steamed for hours in a hot water bath, the suet melts very slowly and distributes evenly throughout the pudding as it melts.
When you use butter, shortening or oil, it’ll pool at the bottom of the pudding bowl. When you serve the pudding on Christmas day, you’ll have a greasy top (which was the bowl bottom) and a dry remainder.
I agree that suet isn’t the best thing in the world to eat, but it’s only once a year and in a relatively small amount. And just in case you were wondering: no, it doesn’t taste of meat.
By the way: Suet can be frozen if you buy extra, making it easy to keep on hand for next year.
Booze
This recipe is not for teetotalers as it contains a fair amount (150 ml) of brandy, rum, sherry or similar spirit in which the dried fruits are soaked. Unfortunately, the alcohol doesn’t fully cook off, so this isn’t suitable for children either. If you want to make an alcohol-free version of Christmas pudding, use alcohol-free rum (yep, that’s a thing) instead.
The mould
Apart from the usual equipment like mixing bowls, a spoon (wooden or metal), and a large pot to cook the pudding in, the most important equipment is the pudding mould. Don’t worry, there’s no need to rush out and buy a specific Christmas pudding mould or worse, refrain from making the pudding because you don’t have one! A simple metal bowl that’s large enough to hold the pudding dough and still has some space below the brim will do well. I use a 1.5-litre pudding basin and it’s perfect. If you have a pudding mould of whatever shape, though, feel free to use it. There’s no law that forbids Christmas pudding in any other form than the famous half-ball.
How to make Christmas Pudding
Day 1 – 4: Soaking the fruit
Christmas pudding needs some time to make, several days, in fact. But don’t worry, most of the time is spent letting the ingredients sit and soak.
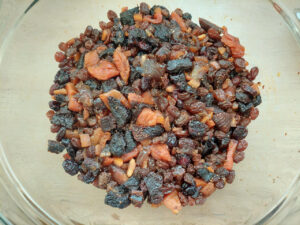
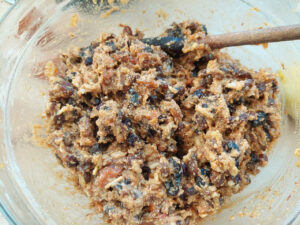
Start with the dried fruit: place the dates, raisins, sultanas, figs, plums, cherries, as well as the candied orange and lemon peel in a large bowl.
Add the rum or brandy, or whatever your favourite booze is.
Mix all these ingredients thoroughly, taking care not to crush the cherries. I recommend either using a wooden or metal spoon or just mixing everything with your hands. The ingredients are heavy – and will get even heavier as they soak up the booze as the days go on.
This fruit mix has been soaking in rum for a few days!
Once everything is thoroughly mixed, cover the bowl with clingfilm or aluminium foil and let it soak for four days. Every day during this time, take the cover off and mix the ingredients. The 150 ml of booze we used on Day 1 will usually be soaked up within two days. If the mixture looks a little dry, add more booze.
So, if you want to cook the pudding on a Sunday, for example, start soaking the fruits on Wednesday or even Tuesday evening.
Day 4
Everything’s prepared, now’s the time to bring our pudding together.
Making the pudding dough
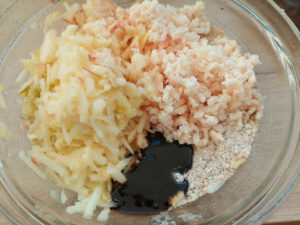
Place the flour, baking powder, brown sugar, the spice mixture (cinnamon, nutmeg, cloves, and ginger), salt and breadcrumbs into a large mixing bowl. Mix these dry ingredients well before adding the next one.
Now, coarsely grind the beef suet on a cheese grater and add it to the dry mixture.
Grate the apple as well and also add it to the mix.
The same goes for the treacle, the eggs and – you guessed it – the freshly grated orange and lemon peel.
Mix everything really well, taking care not to crush the cherries if possible. When the pudding cooks, the suet melts, so it must be well distributed or else it will look clumpy. At this point, the mixture is very sticky and heavy.
Filling the mould
Grease whatever pudding mould you have with butter, so that the ready-cooked pudding will come out more easily. Gently press the sticky mixture into the bottom of the bowl or mould so that there are no holes or gaps. The bottom of the mould will later be the top of the pudding once it’s unmoulded.
If you want to stick to the old tradition of adding a penny or another token into the pudding, now is the right time. Tradition says that the person who finds the penny in his piece of pudding will get one year of good luck. Just remember to tell your guests in advance to watch out for the penny; otherwise, the new year would start with a broken tooth…
Fill the bowl or mould up to 1 cm (1/2 inch) under the brim. The pudding will expand a bit when cooked so it’s important to leave some room.
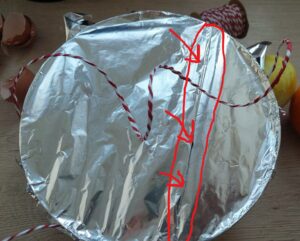
If you use a pudding mould, close and secure the lid. In case of a bowl, cover it with aluminium foil. I like to fold a pleat into the foil to give the pudding plenty of room if it likes to rise.
See the crease? That way, the pudding can rise without pushing off the foil
Seal the foil with rubber bands to prevent water from getting into the bowl while the pudding’s cooked in the water bath. Make sure you don’t get water in your pudding!
Cooking the Pudding
Now the pudding is ready to be cooked in a water bath. Fill a pot that’s large enough to hold the pudding bowl or mould. The water level should come up halfway to the edge of the pudding mould, so that water can’t get into it.
Put the mould into the water and bring the water to a boil.
Don’t put cold pudding moulds into boiling water, unless the bowl is of a tempered material. The bowl may crack from the drastic temperature change!
How long to steam Christmas Pudding
Let the pudding cook for 8 hours on low to medium heat. The water shouldn’t boil vigorously (boiling water could splash into the mould); keep it at a gentle simmer.
As the water will evaporate, you must check the pot every one – two hours and fill it up with boiling (!) water if necessary.
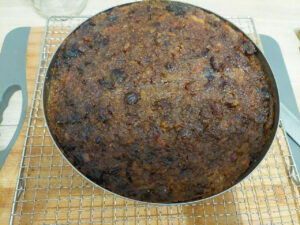
After eight hours, take the mould out of the water bath. Be careful handling it, it’s hot and it’ll take a while to cool down.
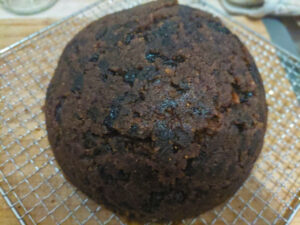
I usually let the steamed Christmas pudding sit for about 5 – 10 minutes on the counter to cool down before I try to unmould it. Then I place a cooling rack on top of it. Take the mould with one hand (wear an oven mitten!) and the rack with the other and flip it upside down. Usually, the pudding comes out beautifully.
Maturing
This is where the magic happens! As the pudding ages, it develops more flavour. Smell the traditional steamed Christmas pudding when it’s first cooked, and then smell the pudding on Christmas Day. You can smell and taste the difference in an aged Plum Pudding. There’s a reason for preparing homemade Christmas pudding about four weeks before Christmas and some people even start in early or mid October.
When the pudding is completely cool, sprinkle it with the booze you used to soak the fruit and cover it in aluminium foil and either store it in the fridge or a cool and dry basement for at least four weeks.
Once a week, take off the foil and sprinkle the pudding again with rum or brandy. Wrap it back up again (in the same foil) and put it back to rest. Keep up this weekly maintenance until Christmas.
Angela Braun
Christmas Pudding (aka Plum Pudding or Figgy Pudding)
Start four days before you want to steam the pudding:
Place the raisins, sultanas, figs, dates, prunes, apricots, cherries and the candied orange and lemon peel in a bowl.
Pour the brandy or rum over the dried fruit and stir to combine the mixture.
Once everything is mixed, cover the mixing bowl with cling film or a plastic wrap and let it soak for four days. Once a day, take the plastic wrap off and mix up the ingredients. If the mixture gets a little dry, add more brandy or rum.
After four days, place the breadcrumbs, flour, salt, baking powder, brown sugar and spices in a bowl and stir to combine.
Finely grate the suet.
Grate the apple.
Add the grated apple, treacle (or molasses), suet, lemon and orange zest and the eggs to the soaked dried fruit and stir to combine it.
Add the dry mixture to the fruit mixture and stir thoroughly to combine it. It'll become very thick and sticky.
Grease your pudding mould or bowl with butter and scoop the batter into the mould. Gently press the batter down and smooth the top.
Either close the lid on the form or cover it with aluminium foil that you secure with a string around the mould. Fold a pleat in the foil to allow room for expansion as the pudding cooks.
Fill a large pot with water and bring it to a low simmer.
Put the pudding mould into the water. The water level should come up halfway to the edge of the pudding mould.
Now, cook the pudding over low heat for about 8 hours. The water should not be boiling but just simmering. Check every 1 - 2 hours to make sure that there's enough water left in the pot. Add more (hot) water if necessary.
When the pudding is done steaming, carefully lift out the pudding mould and let it sit for about 5 - 10 minutes. Then, put the mould upside down and let the pudding slide out of it.
Put the pudding on a plate and let it cool completely.
When the pudding is cool, sprinkle it with brandy or rum and cover it with foil. Store the pudding in the fridge or a cool place, e.g. the basement.
Once a week take off the foil and sprinkle the pudding with brandy or rum. Then wrap it back up again and put it back in the fridge or basement.
On Christmas Day - or whenever you want to serve the pudding - unwrap the pudding and put it back into the mould it was steamed in. Recook it again on a low setting for one hour.
Flip the pudding onto a plate and light it on fire if you like (see blog post section on how to light a pudding).
Serve the Christmas pudding with vanilla sauce, whipped cream or ice cream.
How to serve Christmas Pudding
Reheating the Pudding
On Christmas Day (or whenever you want to serve your Christmas pudding), unwrap the pudding, place it back into its original mould and cover it with foil (or tighten the lid). Seal the foil with rubber bands and steam it again in a water bath on a low setting for one hour. This gentle reheating brings the pudding back to its perfect serving temperature and refreshes the texture.
Flaming (optional)
Now, you can serve your pudding traditionally with a holly sprig and a dusting of powdered sugar, or go for the spectacular flaming presentation!! It’s not necessary, of course, but it looks so spectacular, and it gives the pudding even more punch.
Safety first: This creates dramatic flames, so keep children and pets at a safe distance, tie back long hair, and have the lights dimmed for maximum effect.
Unmould the warm pudding onto a plate and make a cross-shaped indentation on top of the pudding with a wooden spoon handle – this creates channels for the flaming brandy to run down dramatically.
The trick is to use booze with more than 50% alcohol. I usually use “Strohrum” with 80 % alcohol content but any high-proof rum or brandy (50%+ alcohol) will work – the higher the proof, the better it flames.
To flame your brandy, it must be warm or even hot. Place about 50 ml of brandy in a pot and heat it until it starts to steam. Then pour the heated brandy over the pudding, letting it run down the sides of the pudding where you put the cross in.
For maximum dramatic effect, dim the lights. Then quickly light your homemade Christmas pudding with a lighter or a match. Be careful not to burn yourself! A blue flame will now cover the pudding where the brandy has run down. After a few seconds, the flame will go out.
How many servings does this Christmas Pudding make?
If Christmas pudding were a cake, I’d say you’d get out about six servings from this recipe. However, due to all the heavy ingredients like the dried fruit, suet and sugar, Christmas pudding is a relatively rich and satisfying dessert, so I recommend serving small slices. The pudding will be enough for 8 – 10 people.
Can I substitute the suet? / What can I use instead of suet?
As explained in the ingredients section, suet is essential for the best texture. However, if you absolutely can’t source it or if you’re looking for a vegetarian alternative, you can use butter or vegetarian suet. BUT: as suet has a higher melting point, it melts later during steaming and distributes evenly throughout the pudding. Butter melts a lot quicker and tends to pool at the bottom of the bowl, leaving a slightly soggy pudding top and a dry remainder.
Vegetarian suet is chemically similar to traditional suet and should work, though I haven’t tested it myself due to concerns about hydrogenated oils. If you prefer to avoid both animal suet and hydrogenated fats, butter is your best option—just expect a slightly different texture.
Can children eat Christmas Pudding?
The alcohol doesn’t fully cook off during steaming, so this recipe isn’t suitable for children. For a family-friendly version, substitute alcohol-free rum or brandy throughout the recipe, and skip the flaming presentation.
Does Christmas Pudding contain nuts?
As my son’s girlfriend is allergic to nuts, I’ve adapted this recipe to be nut-free. If you want to, however, you can add 100 g coarsely chopped hazelnuts, walnuts, almonds or other nuts of your liking to the dried fruit mix on Day 1 and let them soak alongside everything else.
How long does Christmas Pudding keep?
Christmas pudding keeps for at least 6 months when stored in a cool and dry place. If you sprinkle it with alcohol weekly, it won’t go bad and you can even store it longer, up to one year.
So, if you like to you can make Christmas pudding already in summer or early autumn, put it in the fridge and sprinkle it with alcohol once a week until Christmas. It’ll mature with time.
Can I store leftover Christmas Pudding?
Definitely! The sugar as well as the alcohol preserve it rather well. Wrap the leftover pudding tightly in foil or plastic wrap to prevent it from drying out. Then, put in the fridge, where it’ll keep for up to two weeks.
Can I freeze Christmas Pudding?
Yes, you can, but it’s best done when the pudding is already steamed. Once the pudding has cooled down completely, wrap it tightly in foil or clingfilm and put it in the freezer. It’ll last for up to one year.
To defrost, put the pudding out of the freezer, unwrap it and put it on a cake rack where you let it come to room temperature.
Can I make Christmas Pudding to be served right away?
Well, you still need to soak the dried fruit, even if it’s only for one hour. Then you could mix the pudding “dough” and steam it in the water bath, all on the same day. The pudding will taste delicious, just not as complex and deep as Christmas Pudding that had the time to mature.
So, while possible, I really recommend the 4-week maturation—the flavour difference is remarkable and truly worth the wait.
Ready to get started?
And there you have it—my tried-and-tested Christmas pudding recipe that’s been years in the making! Yes, it requires some advance planning and weekly attention (think of it as a delicious pet that only needs feeding once a week), but I promise the end result is worth every moment. There’s nothing quite like presenting a flaming Christmas pudding to your amazed guests, knowing you made it from scratch—and didn’t burn down the kitchen in the process! So don’t wait—start soaking those fruits today and make this Christmas truly special. If you have any questions along the way, leave a comment below. I’m always happy to help fellow pudding makers! Enjoy, and have a wonderful Christmas!
Looking for more Christmas recipes? These may interest you:
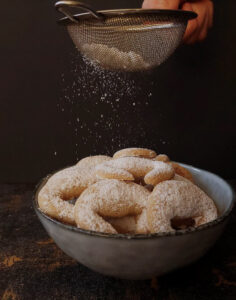
When the days grow short and St. Martin’s geese are finished, it’s finally time for Christmas cookies. While I love trying new recipes each year, some are non-negotiable in our family. Vanillekipferl top that list.
Compared to American Christmas cookies with their frosted sugar and chocolate dips, these pale crescents tell a quieter story. But don’t be fooled—they’re far from bland. One bite releases the flavour of vanilla sugar and toasted almonds, and those delicate half-moons crumble on your tongue in the most satisfying way.
Vanillekipferl are essential to German and Austrian Christmas celebrations, passed down through generations. My great-grandmother made them, my grandmother made them, my mother made them—and now I do too. When Mum baked Vanillekipferl each December, their vanilla scent filled the house. My brother and I could barely wait for them to cool. Mum would dust them with powdered sugar while still warm, and we’d sneak one. Or ten.
One year, we’d really overdone it—half a tray gone. Mum, naturally, scolded us thoroughly until my brother protested, “But how come Daddy can eat them?” She turned just in time to catch my dad finishing off the last Vanillekipferl from the tray…
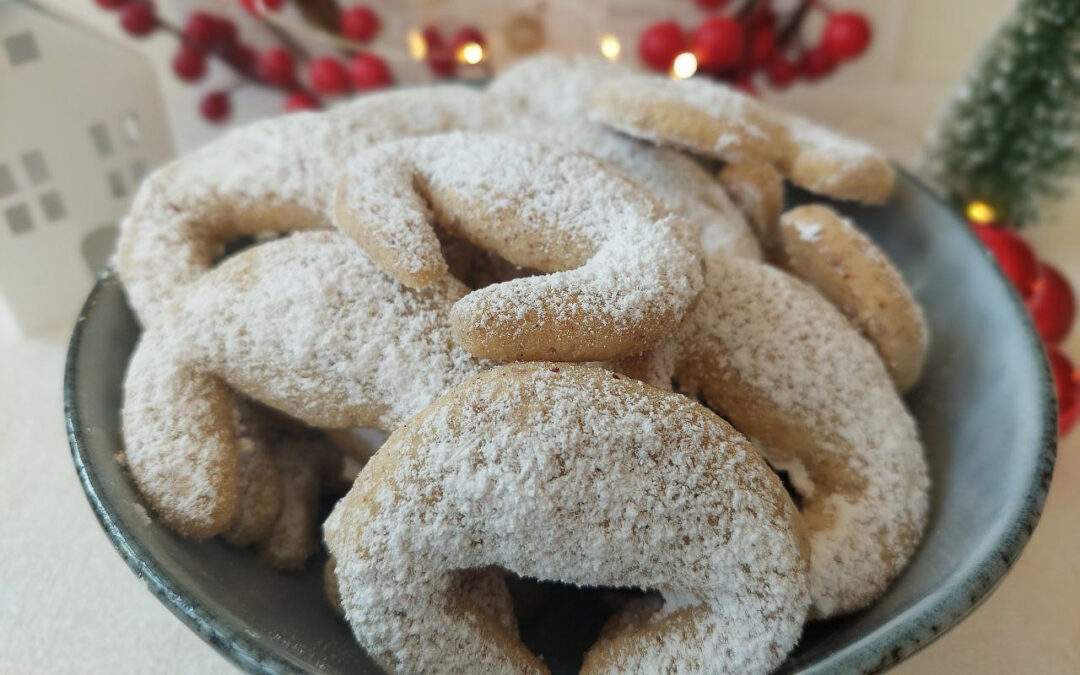
Well, that’s the thing about Vanillekipferl: they disappear fast. Their buttery texture and subtle vanilla-almond flavour make them dangerously addictive, and making them has become as much a part of my December ritual as the eating. Let me show you how to make these beloved Austrian Christmas cookies so you can start your own tradition.
200gpowdered vanilla sugarsee blog section on how to make powdered vanilla sugar
Method
Put the flour, sugar, almonds, salt and the vanilla seeds in a bowl.
Cut the cold butter into small cubes and add it to the ingredients in the bowl.
Quickly but gently mix the ingredients with your hands until just combined - overworking makes the cookies tough.
Form rolls from the dough (see blog section for why rolls) and put them in the fridge for at least 1 hour, better overnight.
Cover a baking tray with parchment.
Remove the rolls from the fridge and cut off pieces of about 1 cm.
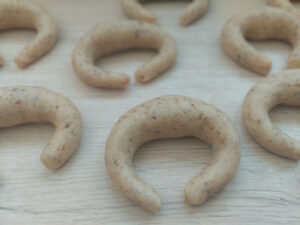
Roll each piece into a small rope of 5 - 6 cm, tapering the ends.
Shape into crescents by bending the ropes and set them onto a baking tray.
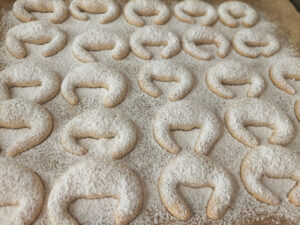
Chill the tray with the kipferl for 15 - 20 minutes (see blog section on chilling the cookies).
Preheat the oven to 140 °C (285 °F) upper-lower heat or 120 °C (250 °F) circulating heat.
Bake the Vanillekipferl in the hot oven for 15 - 20 minutes. They're ready when you can lift them easily from the tray and they're still pale, don't let them brown!
Right after removing them from the oven, roll the kipferl in vanilla sugar OR dust them with vanilla or icing sugar.
Let the kipferl cool down completely and layer them into a cookie box.
Notes
Vanillekipferl can be stored in a tightly closed cookie jar for up to six weeks. But honestly, they won't last that long 😉...
Great tips for even greater Vanillekipferl
There are a few things you need to observe to make really great Vanillekipferl:
Be quick
You must be quick when mixing the pastry dough. Take the butter directly from the fridge and cut it into small cubes. Then, quickly mix the ingredients with your hands until they’re well combined and the dough is homogeneous. Overworking activates the gluten, which makes cookies tough instead of tender.
Use powdered sugar
You can use granulated sugar, but powdered or icing sugar makes the dough finer and the cookies more tender in the end.
Form rolls
You can, of course, refrigerate the dough in a ball shape, but I find it more convenient if you form rolls. That way, you can cut off slices of roughly the same size and form them into the typical Vanillekipferl crescent.
Cooling the dough
I know it can be tempting to skip the cooling part of the dough, but the dough must be refrigerated for at least one hour (and preferably longer). Otherwise, the cookies will spread during baking, and instead of beautiful crescents, you’ll get flat, unshapely “pancakes”. So, when you plan to bake cookies with your family on Saturday, prepare the dough on Friday evening and let it rest in the fridge overnight.
Forming the cookies
Cut slices of about 1 cm from the cooled cookie rolls and roll them into a ball.
Then, roll them gently into a rope about 5 – 6 cm long and taper the ends.
Form the typical crescent by bending the rope.
Sometimes, the dough falls apart during rolling. In that case, press it all together and knead it slightly until it becomes more pliable.
Cooling the cookies
While forming the Vanillekipferl, the dough naturally becomes warm again. To prevent the cookies from spreading, cool the cookies before baking. As it’s usually cold outside, I normally put the trays with the ready-to-bake Vanillekipferl on my balcony to cool for about 15 minutes. During that time, I preheat the oven and clean up the kitchen.
Preheating the oven
Baking temperature must be right from the start. That’s why you must preheat the oven to the required 140 °C (285 °F) and only put the trays in when the oven has reached this temperature.
Stay close
Each oven is different and the baking time can only be an estimate. Therefore, stay close to your ovenand watch the Vanillekipferl while they bake. They should be light-coloured in the end. If they’re golden-brown, they’ve been in the oven for too long.
Homemade vanilla sugar
Don’t throw the vanilla pod you used earlier for the dough away. Instead, carefully dry it in the oven or a dehydrator and mix it with sugar in a food processor. The result is a wonderfully fine, vanilla-flavoured sugar you can use to dust the Vanillekipferl with!
Covering with sugar
When you dust the Vanillekipferl with powdered or your homemade vanilla sugar while they’re still warm, the sugar will stick better to the cookies. To dust, you can either sprinkle the sugar on the cookies with a sieve or you can carefully roll the Vanillekipferl in a bowl with vanilla sugar.
How long can Vanillekipferl be stored?
Let the cookies cool down completely after baking before you put them in an airtight container (cookie box or jar). In a cool and dry place, the Vanillekipferl store well up to 6 weeks, but honestly, they won’t last that long.
Already one missing!
If you start baking your Christmas cookies really early and want your Vanillekipferl to be at their best when serving them, you can freeze the baked cookies. Just don’t dust them with icing sugar.
By the way: you can also freeze the cookie dough. When you finally want to bake the cookies, put the dough out of the freezer and let it defrost at room temperature.
Vanillekipferl variations
Now that you know the classic, traditional Vanillekipferl recipe, you can get creative if you like:
Go nuts: Swap the almonds for ground hazelnuts or walnuts.
All things chocolate: Replace 50 g of flour with 50 g of baking cocoa for a chocolaty version of Vanillekipferl
Dark coat: dip the ends of the Vanillekipferl in melted chocolate; this is also a great way to add to the chocolate kipferl
Cinna-licious: Coat the Vanillekipferl in cinnamon sugar (powdered sugar mixed with cinnamon) instead of vanilla or pure icing sugar.
Add like crazy: Add pistachios to the dough, or freeze-dried strawberries or raspberries, or replace the almonds with ground poppy seeds. Add lemon or orange zest to the dough or – if you like it hot and spicy – 1/2 a teaspoon of ground chillies!
The tradition continues…
Making Vanillekipferl connects me to generations of women in my family who also baked these delicious Christmas cookies before me – and all the men who loved eating them (looking at you, Dad!). Now, I’d love you to start your own tradition, and it doesn’t matter if you have German or Austrian roots or have just discovered this recipe for the first time.
Admittedly, Vanillekipferl take some patience with the forming and double cooling, but the payoff is so worth it: while baking, your house will smell of vanilla and roasted almonds, and there are only a few things more satisfying than seeing the perfectly shaped little crescents on a cooling rack and powdered vanilla sugar on your fingertips.
Early December is the perfect time to bake your first batch of Vanillekipferl, and if you manage to keep them away from all the sweet tooths, you can proudly present your own Vanillekipferl at Christmas.
Whether this becomes your new December tradition or reminds you of your own family’s cookie rituals, I hope these little crescents bring you as much joy as they’ve brought mine.