
.
The cheapest and easiest way to make natural fertiliser for your vegetables is by using plants that already grow in and around your garden. No transportation is required, (almost) no processing is involved and most of it won’t cost a penny! Just rip out the weeds – or should we call them “green gold” – use them as mulch or make liquid fertiliser from them. Or you sow cover crops to enrich the soil with nutrients. Let’s see how you can make natural fertilisers from plants.
Homemade liquid fertiliser
You can make liquid fertiliser from various plants that I’m sure you’ll find in your immediate vicinity. The basic process is simple:
Take 1 kilogram of fresh or 150 g dried plants per 10 litres of water. Put the plants into a bucket, or a wooden or plastic barrel. Never use a metal container as it may react with the fertiliser in an undesired way. Fill the bucket or barrel with water about 5 – 10 cm (2 – 4 inches) under the brim. It’s best to use rainwater or stale water, warmed up by the sun. Cover the barrel or bucket with a lid so that air may get in and let it sit outside for about a week. You’ll know when the brew is ready because it’ll stink bestially 😊, usually after 2 – 3 weeks. Mix in some stone meal to get the smell under control and to prevent a riot from the neighbours.
Dilute the fertiliser at a ratio of 1 part fertiliser to 10 parts water and water or spray your plants.
Plants for liquid fertilisers and their benefits
These are the plants most commonly used for liquid fertilisers.
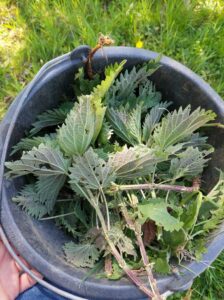
Stinging nettle (Urtica dioica)

Stinging nettle is one of many types from the family of nettles. They often grow – or rather proliferate – on soils that contain much nitrogen, thus indicating nutritious soil.
Besides nitrogen, stinging nettles are rich in potassium, iron, calcium and manganese. You can use it for liquid fertiliser as well as in your salad.
Comfrey (Symphytum officinale)

The comfrey family contains many types of lovely plants with small, tender flowers and large, stiff leaves. Liquid comfrey fertiliser is particularly rich in potassium but also contains calcium, phosphorus, magnesium, manganese, iron, selenium and zinc. It’s good for tomatoes. You can prepare the liquid fertiliser with a mixture of comfrey and stinging nettle to add more nitrogen.
Field horsetail (Equisetum arvense)

Field horsetail contains a lot of silicon, making it suitable for prevention against fungal diseases like mildew. If a plant is already ill, however, field horsetail can’t cure it. Make sure to use field horsetail for your liquid fertiliser and not the poisonous marsh horsetail.
Medicinal, aromatic and wild herbs

You can use medicinal and aromatic herbs as additives in liquid fertilisers. Those include chive, peppermint, marjoram, chamomile and hyssop. You may also use wild herbs like dandelion and shepherd’s purse. Just add one or two handfuls of herbs for example to your stinging nettle brew and let it ferment.
Fertilisation with liquid fertiliser
Liquid fertilisers are meant for maintenance fertilisation and as “energy drinks” or “snacks”.
Water the soil or spray the plant leaves with it.
Liquid fertiliser is a good substitute for urine when you want to fertilise vegetables shortly before harvesting.
Mulching
While fermenting plants to make liquid fertilisers is a direct method to enhance your garden’s nutrient content, mulching is an indirect way to make natural fertilisers from plants.
What is mulching
Mulching means covering the soil with organic material that comes either from plants or is of animal origin. With mulch, we imitate nature where soil never lies bare but is always covered with vegetation, leaves or other rotting organic material.
Advantages of mulching
Open soil is more vulnerable than covered soil. It erodes, dries out, gets cracks and becomes crusty. Without roots absorbing them, nutrients will wash out. And without food and “work” and “living space”, the soil animals and microorganisms disappear.
By covering your soil, its mull content rises, and it becomes porous. It can bind nutrients more easily and store water and oxygen better. A porous soil provides the plants with optimum conditions for growth. Also, the relatively constant temperature in a covered soil is beneficiary for vegetation. And last but not least, mulch suppresses weeds.
Covering soils with mulch is also called surface composting. Like in a compost heap, mulch material rots and becomes fine mull. The advantage of surface composting is that fewer nutrients disappear, and fewer greenhouse gases are released than with classic composting where high temperatures are generated.
Disadvantages of mulching
Alas, even mulching has its disadvantages. Snails and voles feel well under the moist mulch. Factors like microclimate, plant growth and thickness of the mulch layer also play an important role. If necessary, mulch in thinner layers.
Mulch material
In autumn, you can use leaves, in summer grass clippings and during harvesting time plant residues as mulch. You may shred the material (for example with your lawn mower) before using it as mulch. Apart from grass, leaves and plant residues you can also use hay, straw, bark and seaweed as mulch material, as well as sheep wool or hair from your pets.
How to mulch
Stack up about 5 – 30 of mulch, depending on your material. Grass clippings may stick together and rot when moist and spread too thickly. Let them dry a bit before using them as mulch. I recommend mulching more often and in small portions. Add new mulch as soon as the original mulch layer has decomposed and crumbled.
When organic carbon-rich material decomposes, part of the nutrients are used up during composting. You can compensate for that by fertilising with urine or liquid fertiliser from chicken manure.
Cover crops

Cover crops are special plants that improve the soil structure with their root system and at the same time provide nutrients. The plants themselves fertilise the soil with nitrogen, for their own growth and succession plants. That means they raise the nitrogen content (and only that) instead of decreasing it.
Nitrogen collectors
Legumes like beans, peas, lupines, flat and sweet peas, lucernes and clover can fix nitrogen from the air. It’s a miracle they can do by a symbiotic relationship between their root nodules and certain bacteria. Nitrogen is collected in the plant’s roots as well as in its aboveground parts. For this reason, you should dig in the remains after cutting the plants.
When the plant mass is worked superficially into the soil, decomposition starts and nitrogen is released into the soil. The organic material raises the soil’s mull content. 20 to 40 % of fixed nitrogen is released almost immediately for the successive crop.
Soil breakers
Cover crops with long roots like melilot and lupines “drill” into deeper soil layers and get nutrients from deep down. When you later work in the plants, the nutrients are released into the mother soil. This is a smart, yet simple process to make the otherwise inaccessible nutrients available.
A further advantage is that the roots that die off after cutting, leave long canals in the soil through which oxygen, water and nutrients can be transported. This results in a porous soil.
Furthermore, cover crops suppress weeds when they’re sown densely.
How to use cover crops
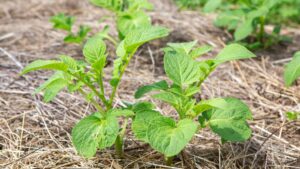
You can sow cover crops between plant rows or even between plants within a row. Beans and potatoes, for example, are a well-known and proven combination.
You can also sow cover crops after harvesting an early crop like lettuce or before a late crop to prevent the soil from lying bare.
When you create a new patch, cover crops are like a curative treatment for your soil. You must wait a year, that’s true, but you get a cultivation area in top form! For optimum results choose a mixture that provides nitrogen, loosens the soil deeply and suffocates weeds.
To prevent the cover crops from spreading their seeds, you must cut them off before. Some sorts may be cut several times during a season (and best used as mulch). Annuals can be worked into the soil late in autumn.
Perennials should be left on the patches over the winter to prevent washing out of nutrients. Work them into the soil in early spring or late autumn. You can also dig in dry leaves, straw or other carbon-rich materials.
Cover crop plants and their benefits
Depending on what your soil needs, you can choose the right cover crop plants:
- Plants that gather nitrogen out of the air like legumes
- Those that break up the soil like lupines and meliot
- Plants that increase the mull content due to their great leaf mass like tansy phacelia
You can mix the seeds or buy ready-made seed mixtures.
Crimson clover (Trifolium incarnatum)
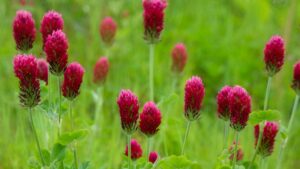
An annual, fast-growing plant with a strong root system. Crimson clover is a good nitrogen collector.
Common vetch (Vicia sativa)

An annual, fast-growing plant that collects nitrogen well.
Bluebell (Phacelia tanacetifolia)

An annual, fast-growing plant that covers soil easily and well. Bluebells don’t collect nitrogen but absorb nutrients well from the soil.
Lupine (Lupinus)

An annual plant with a strong root system and good nitrogen-collecting abilities. The yellow and white lupine is suitable for light soils, and the blue lupine is great for heavy loam soil.
Persian clover (Trifolium resupinatum)

An annual plant with good nitrogen-collecting abilities that needs a lot of water.
Lucerne (Medicago)

A perennial, slow-growing plant with a deep root system. Lucerne is a great cover plant.
Burrowing clover (Trifolium subterraneum)
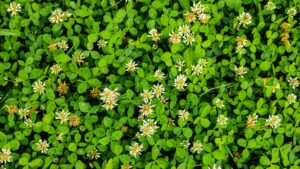
An annual plant with a strong root system. Burrowing clover is a great cover plant and a good nitrogen collector. Shade tolerant.
Sweet clover (Melilotus)

A bi-annual plant with a powerful taproot. Sweet clover is a good nitrogen collector.
There are many ways to use wild and cultivated plants as natural fertilisers for your garden! Plants in combination with fertilisers from animals not only give your vegetables a great start into the season. They also help you to maintain the soil’s nutrient level, thus ensuring healthy plants and a great harvest.
0 Comments