
.
Every autumn, there comes a time when my kitchen fills with the sharp, tangy scent of fermenting cabbage. Even though it may still be warm and sunny outside, for me, the season for winter comfort food has officially begun. Call it genetic programming if you like. I don’t consider myself to be a typical German. I usually wear jeans and a shirt (I don’t even own a Dirndl), I’ve never been to the Oktoberfest, and I’ve got a fair sense of humour, if I may say so myself. When it comes to Sauerkraut, however, my German DNA takes over completely.
Whether I’m piling it alongside creamy mashed potatoes for the ultimate comfort meal, tucking it into a flaky strudel, or serving it as an elegant wine-braised side dish (yes, with sausages – some clichés exist for good reasons!), there’s simply no surviving a German winter without proper sauerkraut. And after years of mediocre store-bought versions, I discovered something wonderful: making your own is ridiculously simple.
You only need cabbage, salt, and a little patience to create sauerkraut that’s tangier, crunchier, and infinitely more satisfying than anything from a jar. Plus, there’s nothing more gratifying than watching this ancient preservation method work its magic right on your countertop. Ready to channel your inner German Oma and work some cabbage magic? Here’s everything you need to know.
What You Need For Homemade Sauerkraut
Once you see how simple it is to make sauerkraut and how little you need for it, you’re gonna ask yourself why you haven’t done that long before.
Equipment
I promise you’ll already have every equipment item in your kitchen!
Essential equipment for beginners
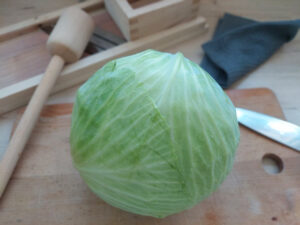
You need a wooden board and a sharp knife to slice the cabbage.
Once you’ve done so, you need a large bowl to put the cabbage slices in and mix them with salt.
For the fermentation process, take some jars with lids. Twist-off caps are fine, but even better are jars with rubber rings and a glass lid.
To keep all the kraut slices under the brine, you need weights. If you’re just starting, you can fill freezer bags with water (about a quarter full, depending on the bag size), close them and use them as weights.
Optional but helpful tools
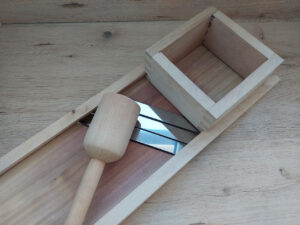
If you intend to make large batches of sauerkraut, you may want to think about buying a kraut slicer, which is a real game-changer when it comes to slicing cabbage heads.
Another great gadget for making sauerkraut is a kraut tamper, kind of a wooden club on a long stick. Optionally, you can use a (clean) bottle.
You’ll find kraut slicers and tampers in every well-assorted German hardware store (which I highly recommend visiting when you are in Germany!) or on the internet.
For the fermentation process, you can use the aforementioned jars or a large sauerkraut pot.
Sauerkraut pots usually come with two halves of a clay weight; for jars, there are good glass weights you can buy.
Ingredients
For the classic version of homemade sauerkraut, you only need cabbage and salt. Make sure the salt doesn’t contain any additives like anti-caking agents, iodine or others. I like to use sea or rock salt.
Instructions For Homemade Sauerkraut
First of all, sterilise the sauerkraut pot or the jars and lids. You can read up here on how to do that properly.
Preparing the cabbage
Cut the cabbage head lengthwise in half and quarter it. Remove the outer leaves and put them to the side; we’ll need them later.
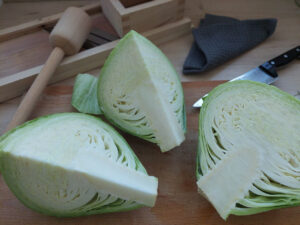
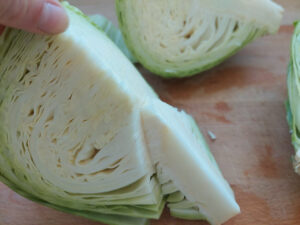
Now you can generously cut off the stalk part, which is too hard (and bland) to make sauerkraut from.
Weigh the cabbage.
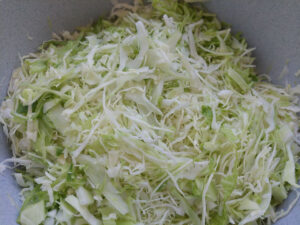
Finely slice the cabbage quarters, either with a knife, in the food processor or with your kraut slicer.

Put the cabbage slices in a large bowl.
Kneading and Packing
Now, add salt to the cabbage, about 1 tablespoon of salt per 1.5 kilograms of cabbage.
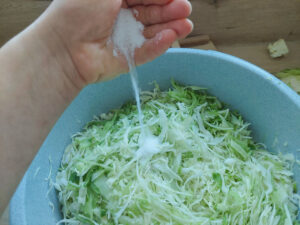
Roughly mix the salt into the slices and taste them. It should be salty but not oversalted.
Now, start kneading the cabbage slices thoroughly to break open the cell structure of the cabbage slices and knead the salt in. This takes some time; the larger the amount of cabbage, the longer. The slices will lose volume during this process, they’ll lose their usually opaque appearance and become glassy, and brine will form. If you can’t for the life of you squeeze out enough liquid from the cabbage – after a fair amount of wrestling with it, of course – cover the bowl, let it rest for 45 minutes and knead it again.
Put a handful of the cabbage into the kraut pot or a jar and press it thoroughly down with your fists, a clean bottle or the kraut tamper.

It’s important to apply sufficient pressure to get all the air bubbles out. Fermentation only works without oxygen, so if there’s air in the jars, the kraut will spoil.
While pressing, you can see the brine welling up.
Alternately, add cabbage and press it in with the bottle or tamper until the pot or jar is full. Leave room to the edge of about 2 cm (1 inch). I know that some people recommend leaving more room in the jars, but I found that the risk of spoilage due to too much residual oxygen in the glass, even after fermentation, is higher.
Now, take one of the outer cabbage leaves you put aside earlier, rinse it and cut it so that it can cover the cabbage in the jar.
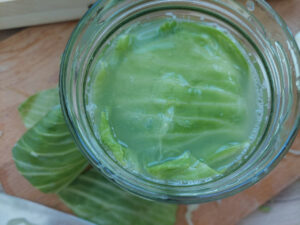
Put a weight on top and thus fix the cabbage slices under the brine.

The Fermentation Process
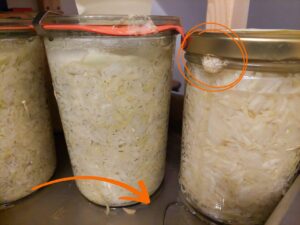
Close the pot or jars with their lids and put them on a baking tray.
Put the jars in a place without direct sunlight and at temperatures between 15 and 22°C (60 – 70 °F). After a few days, the brine begins to bubble and foam, and it usually presses out of the jars. Now’s the time when you’re glad you put the jars on a baking tray.
Let the cabbage ferment for about 5 – 7 days (the colder the place, the longer the fermentation process takes, which can be up to 14 days). Check the jars daily and fill up with brine if necessary. For that purpose, mix 1/2 l of water with 15 g of salt and stir it until the salt has dissolved.
Storage
You can either taste the sauerkraut and – when it’s to your liking – store it in a cooler place of about 8 – 12 °C (45 – 55 °F) or you wait until the initial process of bubbling over is finished and put it in a cooler place then.
Closed jars can be stored at a cool and dark (but not necessarily pitch black) place for up to one year.
Once you’ve opened a jar, keep it in the fridge and consume the sauerkraut within 1 – 2 weeks.

Traditional Sauerkraut
Ingredients
Equipment
Method
- Sterilize the sauerkraut pot or the jars and lids. You can read up here, how to do that properly.
- Cut the cabbage head lengthwise in half and quarter it. Remove the outer leaves and put them to the side; we'll need them later.
- Now you can generously cut off the stalk part, which is too hard (and bland) to make sauerkraut from. Weigh the cabbage.
- Finely slice the cabbage quarters, either with a knife, in the food processor or with your kraut slicer.
- Put the cabbage slices in a large bowl.
- Now, add salt to the cabbage, roughly 1 tablespoon of salt per 1.5 kilograms of cabbage.
- Roughly mix the salt into the slices and taste them. It should be salty but not oversalted.
- Start kneading the cabbage slices thoroughly to break open the cell structure and knead the salt in. This takes some time; the larger the amount of cabbage, the longer. The slices will lose volume during this process, lose their usually opaque appearance and become glassy, and brine will form. If you can't for the life of you squeeze out enough liquid from the cabbage - after a fair amount of wrestling with it, of course - cover the bowl, let it rest for 45 minutes and knead it again.
- Put a handful of the cabbage into the kraut pot or a jar and press it thoroughly down with your fists, a clean bottle or the kraut tamper. It's important to apply sufficient pressure to get all the air bubbles out. Fermentation only works without oxygen, so if there's air in the jars, the kraut will spoil. While pressing you can see the brine welling up.
- Alternately add cabbage and press it in with the bottle or tamper until the pot or jar is full. Leave room to the edge of about 2 cm (1 inch). I know that some people recommend leaving more room in the jars but I found that the risk of spoilage due to too much residual oxygen in the glass, even after fermentation, is higher.
- Now, take one of the outer cabbage leaves you put aside earlier, rinse it and cut it so that it can cover the cabbage in the jar. Put a weight on top and thus fix the cabbage slices under the brine.
- Close the jar with a lid but don't screw it too tightly. When the fermentation process starts, it's likely the brine bubbles out of the jar and that works best when the lid is still a bit loose.
- Put the jars in a place without direct sunlight and at temperatures between 15 and 22°C (60 - 70 °F). After a few days, the brine begins to bubble and foam, and it usually presses out of the jars. Now's the time when you're glad you put the jars on a baking tray.
- Let the cabbage ferment for about 5 - 7 days (the colder the place, the longer the fermentation process takes, which can be up to 14 days). Check the jars daily and fill up with brine if necessary.
- You can either taste the kraut and - when it's to your liking - store it in a cooler place of about 8 - 12 °C (45 - 55 °F) or you wait until the initial process of bubbling over is finished and put it in a cooler place then.
Notes
I could imagine that you feel a bit amazed now that you see how easy it is to make sauerkraut at home, right? Just like a conjurer revealing his tricks, I hope I’ve shown you that there’s actually not much to it – it really is this simple: Slice some cabbage, mix it with salt, knead it until liquid starts coming out, fill it into jars and let nature do the rest. So, what are you waiting for? Grab your cabbage heads and some jars and start making sauerkraut. Your inner Oma will dance with joy.
Already hooked on fermenting? Then these recipes are for you!
For more recipes about preserving, view this site: Preserving – seasonalsimplelife.com