
.
Garlic is such a great vegetable! It’s a star in the kitchen, it’s healthy AND it’s easy to cultivate. Don’t believe me? Then read on: in this post, I’ll not only give you an overview of the different types of garlic but show you exactly how and when to plant garlic. Following these steps an abundant harvest is inevitable!
Garlic varieties
Garlic is divided into two groups: hardneck and softneck. Hardnecks develop a flower stalk (a “scape”), softnecks don’t.
Softneck varieties usually have a milder flavour, are better suited for warmer climates and can be stored for a prolonged time.
Hardneck garlic, on the other hand, has a more intense flavour and a shorter shelf life. It’s generally better for colder climates.
I always cultivate both varieties.
How to find good garlic varieties for your garden
It seems easy to buy some garlic in the supermarket and plant it in your garden. However, supermarket garlic usually is a softneck variety and comes from sites in very warm climates. If your climate is cold, however, store-bought cloves won’t grow very well in your garden.
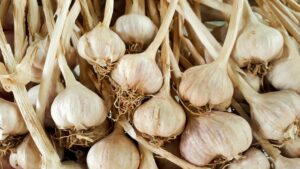
Instead, look for local seed manufacturers. Their cloves are well-adjusted to your climate. Or you have friends who already cultivate garlic and will give you a few cloves for planting.
I always set the largest bulbs aside and use their cloves for planting. That way, I develop and gather my own garlic cloves that are perfectly adjusted to my garden conditions.
Preparing your garden for planting
First of all, select an area that gets at least 6 – 8 hours of sunlight full sunlight per. Also, drainage should be good to prevent waterlogging, which can cause rot.
The soil should not be too light. A healthy loamy soil is best for garlic as it retains moisture well.
Garlic doesn’t like weeds (who does?), so make sure that the bed you want to cultivate garlic in is weed-free.
Also, mixing in compost or rotten manure won’t hurt. It’ll help to improve the soil structure, drainage and fertility.
Planting garlic: step-by-step
If you follow this step-by-step guide, you’ll be rewarded with an abundance of garlic next summer!
When to plant garlic
There are two possibilities when to plant garlic:
Spring
You can plant garlic cloves in March / April. They will develop fine bulbs, albeit small ones that you can harvest in the same year.
Autumn
Planting garlic cloves at the beginning to mid-October will give them a headstart. They’ll grow until it becomes too cold, overwinter and restart growing in spring. That way, the bulbs will be much larger and that’s why I recommend planting garlic in autumn.
Autumn vs. spring planting
As I said before, you can plant garlic in spring as well, but the bulbs will stay smaller and they cannot be stored for long. Also, you’ll be busy in spring with all the gardening tasks.
Planting garlic in autumn not only makes your life easier but also gives you a much more substantial harvest with a prolonged storage time.
How to plant garlic
The easiest and most common way is to break up the bulb and stick the single cloves with the tip facing upwards about 4 – 6 cm (1,5 – 2,5 inches) into the soil. Loosen the soil a bit before planting, for example with a garden fork. A dibble can help with preparing the holes into which the cloves are to be set.
Plant garlic in rows with a distance of 15 cm between cloves and 25 cm between rows.
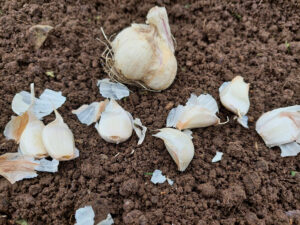
Break up the bulb so that you get out the single cloves.

Always plant garlic with the tip facing upwards
Garlic is a great companion for many other plants, for example tomatoes and strawberries but also flowers.
Watering and mulching
A great advantage of planting garlic in autumn is that usually, the soil is very moist. That way, we don’t have to water the cloves at all. If it’s very dry when planting, water the rows with the freshly set cloves.
I don’t water my garlic but depending on your climate it may be necessary to do so.
If you’ve followed me for some time you know that I’m a huge fan of mulching. When you’ve planted your garlic, I recommend mulching it to protect the cloves from extreme cold and keep the soil moist and weed-free. However, garlic can develop fungal and viral diseases when mulched too thickly, so make sure that the mulch layer is not thicker than about 3 – 5 cm.
Caring tips for spring
When the air grows warmer in spring, remove the mulch from your garlic so that the soil can warm up.
Remove weeds as they will compete with the garlic for nutrients and water.
If the soil is compacted, gently loosen it around the garlic plants to improve drainage.
Keep the garlic well-watered, especially as it gets warmer, but don’t over-water it.
A healthy dose of a nitrogen-emphasized fertiliser, for example stinging nettle manure, provides nutrients in spring.
Keep an eye out for pests and diseases like thrips or mould. Remove ill plants immediately to keep pests and diseases at bay.
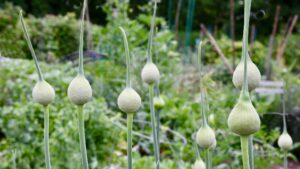
These beauties are the stakes. If you let them on the plant, they’ll burst into bloom which is quite a pretty sight. However, if you want to get large bulbs, I recommend cutting them off.
If you cultivate hardneck garlic, remove the scapes (i.e. flower stalks) as they form so that all the energy goes into the bulb and thus enhances growth. You can use the scapes in your kitchen just like garlic. I like them best in a light cream sauce on freshly cooked pasta…
When the soil has warmed up and it gets warmer and drier, put on a thin layer of mulch again to keep the plants moist and weeds at bay.
Harvesting and storing garlic
You can harvest garlic continually, beginning in late spring, and use the whole plant, including the green stems, in the kitchen. Usually, however, garlic is harvested 8 – 10 months after planting, depending on your variety and climate.
That gives us a harvesting period of late June to early July for hardnecks and mid to late July for softnecks.
How do you know when garlic is ready to be harvested?
You know that the garlic is ready for harvesting when half to two-thirds of the leaves have turned yellow and the bulbs are still closed. If you wait too long, the bulbs may open up which reduces their storage time.
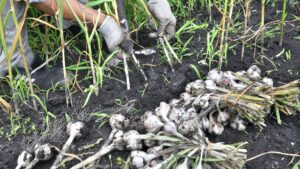
To harvest, loosen the soil around the garlic with a garden fork and pull out the bulbs. Clean up the garlic right on the bed by carefully removing the outer skin which is usually already very loose. That way there will be no soil on the bulbs and they are ready to cure.
For curing, put the garlic into bundles that you hang in a dry place with good air circulation for about two weeks. This drying process is essential for storage. If you have a canopy at your house or garage or even a balcony that’s protected from rain, that’s an ideal place.
Storing garlic for long-term use
When your garlic bulbs are dry, you can twist them into a plait and hang them in your kitchen. Another method is to remove the stalks and store them in airy baskets. The best storage place for garlic is dry, cool and dark with good air circulation. In these conditions, garlic may be stored for up to 8 months.
So come and join the garlic-planting club! This comprehensive guide shows you all the steps for a large garlic plant next summer. Envious stares from the neighbours included.
Have you already cultivated garlic? Share your experiences (and further tips) in the comments.
0 Comments