
.
I don’t know about you, but whenever I pass a chestnut tree in autumn and see aaaaall those beautiful, smooth, glossy chestnuts lying there on the ground, I simply cannot pass them without taking as many as I can store in my pockets. First, of course, I use them as a decoration, sprinkling (or rather: throwing) them between all the pumpkins I use for decorations. Once the pumpkins make way for Christmas decorations, however, I don’t throw out the chestnuts but use them for making chestnut soap. Here’s how I do it:
Why Chestnuts?
Just to clarify: When I speak of “chestnuts” in this recipe, I’m referring to the common horse chestnut (Aesculus hippocastanum) as opposed to the edible sweet chestnut (Castanea sativa). Horse chestnuts naturally contain natural soap compounds, so-called saponins. Due to this, chestnuts were (and still are) widely used as a washing detergent, much like a local alternative to washing nuts. Today, however, we want to use the saponins to enhance the washing and foaming characteristics of homemade soap.
You can also use chestnuts to make homemade chestnut laundry detergent – check out my complete chestnut laundry detergent recipe for another sustainable way to use foraged chestnuts.
Disclaimer: This tutorial is for educational purposes. Soap-making involves sodium hydroxide (lye), which is caustic and can cause serious injury if mishandled. Always follow proper safety procedures, wear protective equipment, and work in a well-ventilated area. I cannot guarantee results or accept liability for any injuries, damages, or outcomes. You are responsible for your own safety when following this tutorial.

How to make chestnut extraction
To use the chestnuts for soap-making, we have to extract their soap-making properties first. To do that, we roughly chop the chestnuts, fill about 1/3 cup of the chopped chestnuts into a glass jar or bottle and fill it up with 500 ml of distilled water. This makes more than you need for making the chestnut soap (330 g), but it’s always good to have a backup.

Some people recommend peeling the chestnuts first, but for just making an extraction, that’s not necessary. The skin neither darkens the fluid nor does it have any other negative influence on the extraction.
Leave the jar with the chestnuts and water for at least 24 hours and up to 3 days. I personally couldn’t find a difference between the short (24 hours) and the long soaking time regarding washing properties or lather enhancement. 24 hours, however, are at least necessary to extract the saponins into the water.
Shake the mixture well twice a day and then pour the liquid through a fine-mesh sieve. Discard the chopped chestnuts and either use the extraction right away or store it in the fridge for up to 2 days.
How to make chestnut powder (optional)
If you want to give your chestnut soap a peeling effect, you can add chestnut powder. Now, to make that powder, we definitely have to peel the chestnuts first!

For this recipe, peel about 10 – 15 chestnuts (depending on the size) and let them dry for 5 – 10 days. Alternatively, you can dry them in the oven or dehydrator. Let them cool down and grind them finely in a food processor or a coffee mill. If you want to make sure that no coarse particles get into your soap, strain the powder through a fine-mesh sieve.

This will make more chestnut powder than you need for the soap, but as with the extraction, better safe than sorry, and you can use the excess fluid as laundry detergent.
How to Make Chestnut Soap – Step-by-Step
Step 1: Put on Your Protective Gear
In soap-making, we deal with lye, which is potentially hazardous. To protect ourselves from any accidental harm, therefore, we must wear protective gear throughout making the soap. This gear contains safety goggles, protective gloves and a face mask (the latter only until you’ve mixed the lye into the fats/oils), but you should also wear long-sleeved shirts that cover your arms and, if possible, an apron to protect your clothing. For more details about safety in soapmaking, especially if you’re new to soapmaking, read this article on soapmaking safety guidelines.
Step 2: Get all your Ingredients and Equipment Together
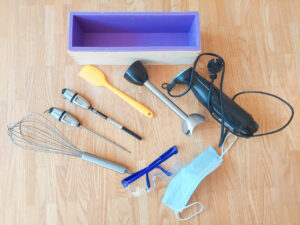
When making soap, we have several narrow time frames, which is why it’s crucial that we have all the ingredients and our equipment ready before we start. I usually weigh all my fats and oils first and then make the lye, but you can also start with the lye and heat the fats while the lye cools down. Nevertheless, make sure everything’s within reach. You cannot afford to head off and look for an oil or a spatula at a crucial point.
Step 3: Weigh the Ingredients
I always start by weighing all the fats and oils first and putting them in a pot for heating up later. Use a 0.5-gram-precise scale, as it’s essential to obtain the measures as accurately as possible. Even deviations of a few grams can have a negative effect on your soap, the worst being that you have to throw it away.
After weighing the fats and oils, weigh the chestnut extraction and pour it into a heat-resistant container.
Afterwards, carefully weigh the sodium hydroxide. Now, at the latest, should you wear your protective gear, including safety goggles, protective gloves and a face mask!
Step 4: Make the Lye
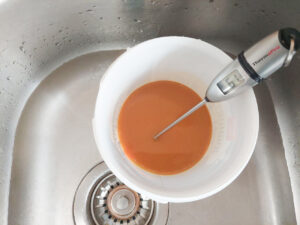
Pour the sodium hydroxide into the chestnut extraction, never the other way round! I always mix the lye in a heat-resistant glass jar that I put in the sink. That way, if anything should go wrong, both I and my kitchen surface are protected. Insert a thermometer into the lye and measure the temperature.
Gently stir the mixture with the thermometer to make sure that all the sodium hydroxide dissolves properly. The lye must now cool off to a temperature between 40 and 42 °C (104 – 107 °F). To speed up that process, you can put the container with the lye into a cold water bath or fill up the sink with cold water.
Step 5: Heat up the Fats and Oils
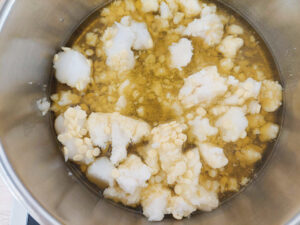
When the lye’s temperature approaches the recommended temperature range, it’s time to heat the fats and oils to the same temperature. Start with gently heating the solid fats, in this case the coconut oil, until it’s completely melted. Remove it from the stove and add the oils, stirring gently to combine all the ingredients. Measure the temperature and, if necessary, heat the mixture up again until it also reaches 40 – 42 °C (104 – 107 °F). Either leave the fat mixture in the pot (if it’s used for soap-making only) or fill it into a second container.
Step 6: Combine the Fats and Lye

Once the lye and the fats have reached the desired temperature, it’s time to combine them. I take the lye container out of the sink and put it onto the draining rack while putting the container with the liquid fat into the sink. For me, that’s the safest method to make soap.
Insert the stick blender into the fat mixture and slowly add the lye (not the other way round). Once all the lye is in the fat, start blending everything together without adding too much air. Do not turn on the blender until it’s fully submerged.
Stir the mixture well until it becomes thicker and shows traces when you move through it. It should have the consistency of Greek yoghurt.

When you can see those traces in the soap batter, it’s ready to be poured into the mould.
Step 7: Mix in the Additives
If you want to add chestnut powder for a peeling effect in your soap, now is the time. Add the powder all at once and carefully stir it into the soap batter with a whisk, as at this point, the blender might speed up trace too much. Also, take into consideration that adding the chestnut powder may accelerate the tracing process. So, make sure everything is combined homogeneously and work fast.
Step 8: Pour the Chestnut Soap into the Mould
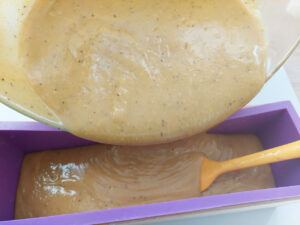
Once everything is combined well together and the batter starts to thicken, pour it into your mould. Scrape the edges of the bowl with a rubber spatula to make sure that you get all the soap into the mould. Flatten the batter in the mould with the spatula so that you achieve a smooth, level surface.
Step 9: Cover the Mould
Cover the soap surface in the mould with a greaseproof paper or baking paper and wrap the whole thing with a towel to insulate the soap. This technique encourages the so-called gel phase, where the soap heats up before it hardens off.
Step 10: Cleaning your equipment
Although we’ve mixed the lye into the fat, the fresh soap batter is still slightly caustic. For that reason, we mustn’t just rinse off large quantities of residual soap batter into the sink. A good way to get rid of most of the soap batter is by wiping it off with a paper towel or toilet paper (which works just as well and is cheaper!) that you throw directly in the bin.
There’ll still be a thin coat on the bowl, blender, spatula, etc., but that’s okay. Just wash everything well with dish soap, rinse it with a bit of vinegar to neutralise the lye and wash it again with water.
Step 11: Unmould your chestnut soap
Leave the soap in the mould for at least 48 hours before you try to unmould it. Those 48 hours are necessary for hardening the batter, and every attempt to unmould it earlier will result in a smeary, unshapely soap. Believe me, I know what I’m talking about…
Step 12: Cut and Cure
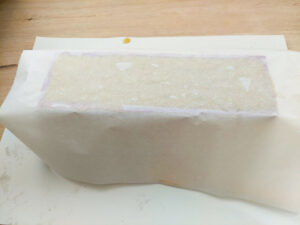
When the soap is unmoulded, you can cut it into bars. The size and shape of the bars depend on the mould you used. I mostly use a rectangular mould and cut the soap into slices of about 1.5 – 2 cm (0.6 – 0.8 inches). As a rule of thumb, cut the bars so that they fit comfortably in your hand.
You can either cut the bars with a sharp knife or you can use a soap cutter that often comes as part of soap-making kit, together with the mould.
Cut straight through the soap and slide the soap off the knife. If the soap sticks badly to the knife, let it set for another day or two in a well-ventilated place. That way, it can dry out a bit before you start cutting it again.
After cutting, let the soap bars cure – again in a well-ventilated place – for about 4 – 6 weeks. Turn the bars twice a week to make sure that they cure and dry evenly. During this curing time, the soap will become milder, and the lather will improve.


Homemade Chestnut Soap (5 % superfat)
Ingredients
Equipment
Method
- Prepare the chestnut extraction by putting 1/3 cup of chopped chestnuts in a jar or bottle and adding 500 ml of distilled water. Let the mixture rest for 24 - 60 hours and strain it through a fine-mesh sieve.
- Prepare the chestnut powder (optional) by peeling 5 - 10 chestnuts (depending on the size) and either dry them for about 5 days in a well-ventilated area or until completely dry in an oven or dehydrator.Grind them in a food processor or coffee grinder and sieve the powder once or twice through a fine-mesh sieve.
- Put on your protective gear!
- Make the lye by adding sodium hydroxide to the chestnut extraction (never the other way round!)
- While the lye cools down, melt the fats and add the oils
- When the lye and fats/oils have reached a temperature of 40 - 42 °C (104 - 107 °F), pour the lye into the fats/oils (never the other way round).
- Stir everything well together with a stick blender, but make sure that you don't insert too much air.
- When traces begin to form, add the chestnut powder with a whisk.
- Pour the soap batter into a soap mould, cover it with greaseproof paper and insulate it by wrapping the mould in towels.
- Let the soap set for about 48 h before unmoulding it.
- Cut the soap in bars and cure it for 4 - 6 weeks in a well-ventilated space. Change the soap bars twice a week to make sure that they dry and cure evenly.
Notes
Enjoy Your Homemade Chestnut Soap
Homemade chestnut soap is a marvelously sustainable way of cleansing ourselves, as we use foraged chestnuts that not only don’t cost a dime but also drop at our feet in abundance each autumn. Just keep your eyes open and collect some when you stumble across them. Two handfuls are about enough to make this soap. But be wise and collect extra. They make a wonderful decoration 😁
Looking for more natural soap recipes? Then check out my recipes for green mint soap and calendula soap.
For more articles on homemade home and body care, view this site: Home and Body – seasonalsimplelife.com