
.
Shortly before one Christmas, I sent one of my boys down into the basement, where we store our preserves, and asked him to get a jar of sweet-and-sour pumpkin. It took him a while – men rarely find something on the first go. When he finally made it up again our three flights of stairs, he proudly presented me with a jar of something brown and sluggish in it. Hadn’t it borne a label with “sweet-sour pumpkin” on it, I would never have guessed the content. With a lot of guesswork, we figured out that it must have been from the year before we moved apartments, which was six entire years ago. My son had taken a jar from the very back of the shelf, showing me painfully why I needed to do a pantry audit at least once a year and that a clever rotation system prevents food from being spoiled.
Why a Pantry Audit Matters
Forgetting about food we already have doesn’t just cost money—it costs a lot of money. We buy duplicates of items already in our pantry while perfectly good food spoils at the back of the shelf.
This is not only a financial disaster, but it also has a significant impact on the environment: according to the Food and Agriculture Organisation of the United Nations (FAO), people in Germany discard 18 million tonnes of food per year. That’s roughly one-third of our total food consumption of 54.5 million tonnes. To put this in perspective: we throw out 313 kilograms of good food every second!
In terms of agricultural land, 2.6 million hectares of land are cultivated in vain each year, not to mention the greenhouse gas emissions.
A well-audited pantry, on the other hand, saves money and helps the environment while benefiting our health through fresher ingredients. While many foods remain safe past their ‘best by’ dates, fresher ingredients naturally offer better nutrition and flavour.
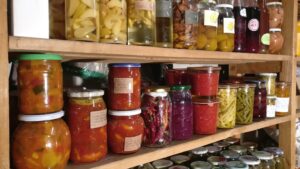
This doesn’t only apply to store-bought stock, but also to our lovingly made preserves. It’s heartbreaking when all the time and care we put into growing, harvesting and preserving our food simply goes to waste, just because we didn’t know what was sitting forgotten in our pantry.
When to Conduct a Pantry Audit
Optimally, we should conduct a pantry audit once every three months – or so “they” say (whoever “they” are).
I’ve found twice a year works perfectly for my household: once in May before harvest season begins—when I’m using up last year’s preserves to make room for the new season’s bounty—and again in early January after the holiday cooking frenzy.
A clear sign that it’s high time for a pantry audit is when you can’t find things you know you bought, discover duplicate items hiding in the back, or notice expired products.
The key is choosing a schedule that works for YOUR household and sticking to it. Whether it’s quarterly, twice yearly, or seasonally, having set dates means you’ll actually do it rather than putting it off indefinitely.
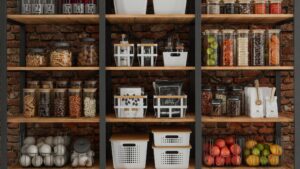
Preparing for Your Pantry Audit
Before we dive deep into the realm of our pantry, let’s gather a few things:
What you’ll need
- Containers of different sizes for storage
If you have some already, great. If not, don’t buy them yet—wait until after your audit to see what you actually need! If you do need to buy containers, choose transparent ones with lids so you can see what’s inside at a glance. Also, look if you have some empty large jars with lids left. They are great for storing rice, grains or pasta in them. And when you don’t need them for storage, they can be used for canning. - Labels and markers
These are essential for homemade preserves and freezer stock. Nothing more annoying than when the bag of “frozen red peppers” is actually rosehips you chopped for making jam! Yep, talking of experience here. - Inventory tracking tools
A notebook works brilliantly for tracking what’s in your pantry. You could dedicate one page per shelf, or create a spreadsheet listing items and quantities. Whenever you use something, add it to your shopping list. There are also inventory apps available, though I haven’t tried them myself. - Cleaning supplies
Since we’ll be emptying the shelves anyway, this is the perfect opportunity to clean them properly. Get your all-purpose cleaner and several cleaning rags ready.
Setting Up
Clear some workspace where you can temporarily place items as you empty the pantry. This can be a table, or the kitchen counter, or even the top of your freezer. Keep your containers and supplies within reach.
Now take a deep breath – let’s get started.
Step-by-Step Pantry Audit Process
Step 1: Empty Everything Out
Take everything off the shelves and place items on your workspace. If your pantry is large or your workspace is limited, work in sections—empty one category at a time (for example, all the pasta), then clear one shelf to make room as you continue.
Step 2: Clean Thoroughly
Wipe down the shelves with an all-purpose cleaner or vinegar cleaner (the homemade orange vinegar cleaner mentioned in this post works well, for example).
Thoroughly check for any pests or moisture issues and vacuum the entire pantry, especially the corners.
Step 3: Check Expiration Dates
Now, check all your inventory and sort the items per group by expiration date.
Understanding date labels:
- ‘Best by’ or ‘Best before’: Quality dates, not safety dates. Food is typically still safe to eat after this date, though quality may decline. Use your judgment—if it looks, smells, and tastes fine, it’s usually okay.
- ‘Use by’: Found on perishable items. Take these more seriously, especially for dairy, meat, or refrigerated goods.
- Canned goods: Often safe well beyond printed dates if the can is undamaged (no rust, dents, or bulging).
Food slightly past its ‘best by’ date is usually still fine—use your judgment based on how it looks, smells, and tastes. Items past their ‘use by’ date should be discarded for safety, especially perishables.
If your items have an expired “use by” date, however, they’ll not be safe for consumption any longer, and you should discard them.
When in doubt, trust your senses. If something smells off, looks mouldy, or has changed texture significantly, discard it.
For homemade preserves, always label jars with the preparation date (for example, ‘Tomato Sauce – September 2025’). This helps you track age and avoid surprises like my six-year-old pumpkin incident!
Step 4: Categorise Your Items
When you have all the items on your workspace, group them by category: grains, pasta, canned goods, baking supplies, spices, oils, condiments, snacks and home-preserved items.
This is also a good time to check for duplicates—do you really need four half-empty bags of flour?
Step 5: Take Inventory
It’s time to create your master list. Note down all the items you have and their quantities. That way, you can simultaneously identify gaps (items to add to your shopping list) and surpluses (ingredients you should prioritise using in upcoming meals).
Grab my free downloadable pantry inventory template here to make this process even easier!
I keep this list on the back of my pantry door, together with a pen on a string, so that I can adjust the quantity of items whenever I take something out.
Step 6: Reorganise Strategically
If your current pantry layout works well, keep it! But if you’re constantly searching for items or things feel chaotic, now’s the time to redesign.
Strategic placement principles
- Heavy items low: Flour, canned goods, bottled items
- Eye level = prime real estate: Items you use daily (in our pantry, that’s pasta, rice, and everyday spices)
- Top shelves: Duplicates, rarely used items, or bulk backstock
Transfer bulk items like flour, rice, sugar, and oats into clear, airtight containers. Label EVERYTHING—and I mean everything with its content! I cannot stress this enough! You think you’ll remember what’s what, but trust me, in three months you won’t be able to tell your all-purpose flour from your bread flour. Also, add the expiration date (if not visible), and if there is none indicated on the package, note down the date you bought it.
Create designated zones for each category and consider labelling the shelves themselves if it helps your household stay organised. If you share your kitchen with others, clear labels on shelves help everyone maintain the system.
Now put all your items, organised by category, back onto the shelves. Place the oldest items at the front and the newer ones at the back.
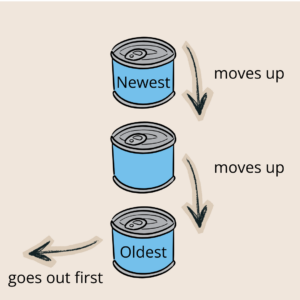
Understanding the FIFO Rotation System
Have you ever heard of FIFO? It stands for First In, First Out—a simple principle where you use the oldest items in your pantry before the newer ones. Simple as it is, FIFO is incredibly powerful for preventing food spoilage and waste, saving you money while ensuring you’re always eating the freshest ingredients possible.
The key is visual placement: older items at the front of the shelf, newer items behind them. When you reach for something, you’ll automatically grab the oldest item first—it’s that simple.
In the case of homemade preserves, the labelling system I mentioned earlier is invaluable, so you can see at a glance how old a jar is: Apart from the content, add the date of making, for example: “Sauerkraut – September 2025”. These jars are placed behind the jars of Sauerkraut that were made the previous year. (Though let’s be honest: I know that your homemade sourkraut tastes so good, there won’t be any year-old jars anyway!)
Upholding the system
Before each shopping trip, scan your pantry shelves. With the FIFO system, you can quickly see what’s running low or needs restocking – no more buying duplicates of items hiding in the back.
When you return from shopping, resist the temptation to stuff items wherever they fit. Instead, take an extra two minutes to place new items behind older ones in their designated categories. This small habit keeps your FIFO system running smoothly with minimal effort.
What to do if your pantry is tiny
In our last apartment, the pantry was incredibly small. So small, in fact, that we could only install 20 cm-deep shelves (8 inches), which made it impossible to stack our items front-to-back. What I did instead was mark the latest purchases with Post-it stickers. That way, I knew what food to use first, although the items were stacked side by side.
Common FIFO mistakes
Simple as it may seem, FIFO can present some pitfalls. Knowing them beforehand will help you to avoid them in the first place:
Skipping the labels
Once you transfer items into storage containers, it’s tempting to think you’ll remember what’s inside. You won’t. Always label containers with both the contents AND the best-by date. Your future self will thank you when you’re not playing guessing games at dinner time.
Inconsistent rotation
It’s easy to tell yourself you’ll organise purchases “later” when you’re tired from shopping. But later rarely comes, and skipping rotation even once creates chaos. The good news? It typically takes just 2-3 minutes to put new items in their proper spots behind older ones. Make it part of your grocery unloading routine—like putting away the milk—rather than a separate task you’ll do “eventually”.
Ignoring what’s up front
FIFO only works if you actually USE the items you’ve rotated to the front. Make it a habit to scan front-row items when meal planning—these are your ‘use soon’ ingredients. If something’s been sitting up front for weeks, either plan a meal around it or accept it might not be something your family enjoys (and don’t buy it again).
Buying more than you need
Even with perfect rotation, FIFO can’t help if you’re constantly overbuying. Before adding items to your cart, check your pantry first. Just because pasta is on sale doesn’t mean you need five boxes when you already have three at home. Buy what you’ll realistically use before it expires.
Making FIFO a lasting habit

Get the whole household on board
Every member of your household should not only be acquainted with the rules of FIFO but also be dedicated to maintaining it. Even small children understand the simple principle behind the system and can be encouraged to help maintain it. Ideally, every household member takes out the front item of what they want and notes on the grocery list what they’ve taken.
Make it a game for younger children—who can find the item with the earliest date? Reward consistent participation with a special treat. For teens, explain the financial benefits: every item that doesn’t go to waste is money saved for things they care about.
Audit regularly
FIFO isn’t a set-it-and-forget-it system—it needs regular attention to stay effective. The good news? A quick weekly scan of your pantry takes just 5-10 minutes. Pull older items forward, check for anything approaching its expiration date, and note what needs restocking.
This weekly check naturally becomes your grocery planning session: you’ll see exactly what’s running low and what ingredients you need to use up soon.
Connect FIFO to meal planning
The most effective way to maintain your rotation system is to tie it directly to meal planning. Each week when planning your meals, deliberately choose recipes that use ingredients sitting at the front of your pantry. This ensures nothing gets forgotten and naturally keeps your rotation moving.
Adapt to changes
Your pantry isn’t static—it evolves with your family’s tastes, dietary needs, and cooking habits. When you discover new recipes requiring unfamiliar ingredients, don’t just squeeze them in anywhere. Take a moment to decide: Is this a one-time purchase or a new staple? One-time ingredients can go in a designated ‘speciality items’ section, while new staples deserve their own spot in your regular rotation.
The same principle applies to seasonal products and bulk purchases. If you buy 10 kilos of potatoes in autumn, designate a specific storage area and rotate through them systematically. During preserving season, adjust your pantry layout to accommodate the influx of homemade jams, pickles, and sauces—then reorganise again in spring when those shelves empty out.
Time to take action
A well-organised pantry with a solid rotation system isn’t about perfection—it’s about progress. Whether you’re managing a tiny cupboard with Post-it notes or a spacious walk-in pantry with labelled zones, the goal remains the same: use what you have, waste less, and always know what’s hiding on your shelves.
Start small if the whole process feels overwhelming. Maybe this month you just tackle the canned goods, or focus solely on labelling your homemade preserves. Next month, you can expand to another category. The beauty of FIFO is that even partial implementation helps—every item you rotate to the front is one less jar destined to languish for six years like my unfortunate pumpkin.
Remember, your pantry should work for YOU, not the other way around. Adapt these strategies to fit your space, your family, and your lifestyle. Check in regularly, adjust as needed, and be patient with yourself as you build new habits.
Now go take a look at your pantry. What’s lurking in the back? What treasures have you forgotten about? Your pantry audit awaits—and I promise, it’s not as daunting as it seems. Your future self (and your wallet, and the planet) will thank you. Don’t forget to grab your free Pantry Inventory Template here to track everything easily!
Wanna learn more about preserving? These posts are for you:
Channel Your Inner Oma: Simple Homemade Sauerkraut That Actually Tastes Amazing
How to Make Perfect Pear Jam: From Tree to Jar
Pickled Zucchini: From Garden Surplus to Flavour-Packed Treasure
See this page for all preserving posts: Preserving – seasonalsimplelife.com
0 Comments