
.
Ah compost! The gardener’s “brown gold” that is the magic bullet for all our garden problems: Wanna add nutrients to your soil? Mix it with compost. Got water retention issues? Add compost to your soil. Looking for the perfect seed-starting soil? Compost it is. In this article, I’ll show you what you need for good compost and how to make compost, even if you don’t have a garden!
Learn with this step-by-step guide how you can transform garden and kitchen waste into valuable humus.
Benefits of composting
With a compost, you can dispose of kitchen and garden waste and put it back into the natural cycle of transformation. With the help of microorganisms, all the organic material will be broken down into a new, nutritious gardening soil.
Compost improves the soil by loosening its structure and enhancing its water retention capability.
With compost, you have a natural, organic fertiliser for your plants. It’s not called “the gardener’s brown gold” for nothing. 😉
That wonderful fertiliser and soil improver will save you money.
Better still, compost is environmentally friendly as it is all-natural and well-tolerated by plants and soil.
Composting systems
Before you make your first compost, let’s get an overview of the different models. They all have their advantages and disadvantages.
You must also consider how much space you’ve got in your garden, and how much garden and kitchen waste you will produce.
Open composting systems
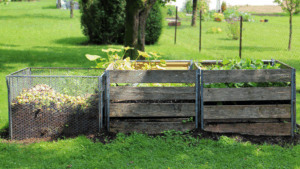
The classic open composting system is the compost heap, where you just pile all your garden and kitchen waste. Open compost heaps should be at least 1,2 m (4 feet) broad, 80 cm (2,5 feet) high and – if necessary – several metres long. They are best for large gardens with plenty of organic waste.
Open composters are usually grids or frames made of wood or metal that surround the compost heap. They are relatively cheap, and you can even build them yourself out of wooden slats, palettes or sturdy metal fences.
Open composters are well-aired and easily accessible.
On the downside, the compost in open systems needs more time to mature, up to 12 months and longer.
Closed composting systems
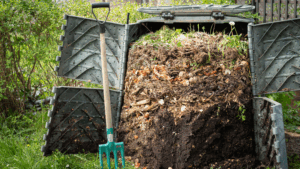
Closed composters are usually made of well-isolating plastic or metal containers that usually come with a flap on ground level where you can take out the mature compost. They should be able to contain at least 200 litres to make sure that the composting process takes place fast and effectively.
They protect against weathering and animals (like rats) and require less space than open systems.
Their most important advantage is that they generate high temperatures, making the compost mature a good deal faster than in open systems. These systems are often called thermo composters.
Disadvantageously, closed composters are more expensive than open ones
An alternative closed composter that needs less space is a drum composter. By regularly turning the drum, you’ll mix the waste and provide it with oxygen.
If you want to buy a thermo composter, make sure that the plastic is weather and UV resistant.
Composters for the balcony
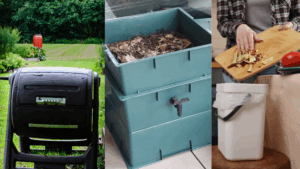
Even on a balcony or patio, you can make compost.
You can, for example, use the above-mentioned drum composters that have a compact size.
Also, worm bins are a good method of composting with little space. They do not smell and are very efficient. You can either buy worm bins or build them yourself. The necessary composting worms can be bought online.
Another great method of composting with limited space is a Bokashi bucket, in which you ferment your organic waste and transform it into nutritious soil.
How to make compost: finding the right location
A compost, no matter which system you choose, is usually not a very pretty sight. Sometimes, it can even smell bad. So, to avoid stress with the neighbours, you shouldn’t place the compost directly at the property boundary.
The perfect location for your compost heap should lie in the half-shadow, maybe under trees or (fruit) shrubs. That way, it’s not only protected from winds and sun but also from views. If you have the possibility to hide it, do so.
It’s also important that you can access your compost with a wheelbarrow. All that black gold has to be transported to your patches 😊
Compost should not lie in the direct sun as it dries out very fast. Yet, I don’t have (half-)shade in my garden, and so the compost is exposed to the blazing sun. To keep it from drying out, therefore, I have to water it during the summer, and sometimes I put a cardboard on top to keep the moisture in.
Composts should always have direct contact with the soil. That way, worms and microorganisms can get into it, and excess water can flow away. Even many closed composting systems are open at the bottom. With a floor grid, you can prevent voles, rats, mice and other pests from entering.
If you want to compost on the balcony, make sure that the total weight doesn’t exceed maximum load.
Basic composting factors to observe
Before you make a compost, there are some basic factors you have to observe:
Size
Closed systems have a preset size but an open system should be at least 1 x 1 metre (3,5 x 3,5 feet) to produce enough heat for the rotting process. Larger compost heaps should not be broader than 2 m (6 feet) to ensure sufficient ventilation.
Material
The one thing we need to make compost is: compostable matter! Usually, we get plenty of organic waste from our garden and the kitchen.
“Brown” material like wood chips, twigs and branches, straw and leaves contains much carbon (C)
“Green” material like grass clippings, kitchen waste, weeds, coffee grounds, or manure contains more nitrogen (N).
For an optimal composting process, the ratio between carbon and nitrogen should be between 15:1 and 25:1. That means that we compost more brown material than green one. Ideally, we collect brown material and every time we throw some green material on the compost, we add an amount of brown material.
Chop up large chunks of wood or vegetables to accelerate composting, but don’t make them too small. Sizable parts of organic matter make sure that air is held within the heap, which prevents it from moulding or putrefying.
Oxygen
Oxygen is a vital factor for the composting process. Make sure your heap is well-ventilated by adding coarse material like twigs, straw and leaves.
Moisture
Your compost should be moist but not wet. If it’s too dry, water it now and then; if there’s heavy rain, cover it to avoid putrefaction.
The best time to start a compost
Basically, you can start a compost at any time of the year, but I recommend the warm seasons. Life in the compost heap, like bacteria, microorganisms, worms and other creatures, develops and thrives better when it’s warm.
In winter, however, there is next to no activity. The beneficial bacteria are slow and they even stop working when it gets too cold. It may help to cover the compost to protect it from cold and wetness.
How to Make Compost in 8 Easy Steps
Step 1
Lay a grid against voles and mice on the ground. Then, build a basic layer of coarse material like twigs, straw or leaves. This layer ensures good ventilation and prevents waterlogging.
Step 2
After that, alternately layer green materials (moist and nitrogen-rich) like grass clippings, vegetable scraps or coffee grounds and brown materials (dry and carbon-rich) like leaves, straw or chopped loppings. Each layer should be about 10 – 15 cm (4 – 6 inches) high. The smaller the materials, the faster they decompose.
Step 3
Activate your compost by one of the following methods:
- Add mature compost as a starter. It contains the microorganisms required for composting.
- Mix a compost starter from 10 litres of lukewarm water, 1 kg of sugar and two packages of dry yeast and pour it over the compost heap. The microorganisms love that!
- Have you ever heard of Effective Microorganisms? They are mixtures of different aerobic and anaerobic microorganisms that can, among other uses, accelerate composting.
Step 4
If necessary, water the compost to ensure enough moisture. Compost should always be moist but never wet.
Step 5
Cover the compost heap on hot days with a layer of leaves, straw or cardboard to prevent it from drying out and overheating.
Step 6
Oxygen is an important factor for composting. Mix in enough coarse material to get in air pockets and (optionally) turn the compost over every 4 – 6 weeks to mix the ingredients well and ventilate it.
Step 7
Let the compost mature for about 6 – 12 months. During that time, microorganisms and soil organisms break the material down and transform it into nutrient-rich humus. You know that your compost is ready when it looks dark and crumbly and smells of forest soil.
Step 8
When your compost is ripe, you can use it as a fertiliser and soil improver in your garden. Distribute the compost on your patches to provide your plants with nutrients and loosen up the garden soil. You can also use mature compost as potting soil for balcony boxes and planting pots.
What to put in the compost
The following materials are good for composting:
- Garden waste: leaves, straw, hay, grass clippings (dried), loppings, weeds (without seeds), plant remains
- Kitchen waste: fruit and vegetable remains (untreated), coffee grounds
- Egg shells (crushed)
- Tea and coffee filters (from paper)
- Sawdust and wood shavings (untreated); don’t use too much of it as it may attract wireworms
- Litter from small animals (plant-based and untreated), manure, feathers
- Paper and cardboard (uncoated and in small amounts)
What NOT to put in the compost
Do not put any of the following on your compost:
- Cooked or baked food
- Meat and fish remains
- Dairy products
- Weeds with seeds or roots that hardly decompose (e.g. goutweed, couch grass). Plants with contagious diseases like blight or mildew. The disease is not killed but spreads through the new compost into the soil and infects your whole garden. Always throw parts of ill plants into the garbage bin.
- Treated wood, plastics or metals
How to use compost
There are different stages of decomposition and in each of them the compost can be used, but for different purposes.
Half-rotted compost: Mulch
The temperature of the compost heap has decreased, and large chunks remain. You can now use them as mulch for your patches.
Nearly mature compost
The temperature has fallen to normal, and there are only a few smaller bits and pieces in there. The compost smells of forest soil. Now you can use it as fertiliser for heavy feeders like cabbage, tomatoes and cucumbers.
Mature compost
The compost has a dark colour, a fine and crumbly structure, and it smells of forest soil. Use this compost as seed-starting soil or make a new vegetable patch with it.

I made a new patch with my compost where I’m going to plant strawberries
You can throw the compost through a sieve and sort the chunks out. They need a bit longer to decompose so put them back in the compost.
Usually, compost is distributed in early spring, as soon as the soil warms up and needs new nutrients for the plants. Add a layer of about 2 cm (1 inch) of compost to your vegetable patches, flower beds or under your fruit trees and bushes and rake it slightly in.
You can add compost to your soil in autumn as well, but only as long as the soil is still warm. And you need to cover it with mulch afterwards.
If you can’t use the compost right away, store it in closed buckets until you need it. That way, the nutrients won’t be washed out by rain.
Compost maintenance
Once you’ve layered all the material, your compost doesn’t need you to do its work. However, there are a few factors that need controlling to ensure a fast and good decomposition process:
Temperature
In closed composting system the temperature will get higher than in open systems. The hotter the temperature, the faster the composting process will be.
Moisture
If the compost is too dry, the microorganisms can die; if it’s too wet, it may rot. But how to know if the moisture is right? I usually take a large stick and poke some holes into the compost. When it feels like a squeezed sponge, the moisture is right.
Oxygen
Composting needs oxygen to work properly. That’s why it’s so important to not add too many (wet) grass clippings to your compost as that would lead to an anaerobic (that is: without oxygen) mass that moulds and rots.
Compost troubleshooting
Composting does not always go without trouble. Here are the most common problems and their solutions.
#1 The compost stinks
The reason for bad smells from the compost is that it has too little oxygen and thus creates an anaerobic atmosphere.
Solution:
Check if your composting system is water permeable towards the ground and the cover is water-tight.
Open the composter and shovel everything out. Now put it back into the composter, but mix in plenty of dry brown material to keep oxygen in.
#2 The compost moulds
Although we associate mould and mildew with moisture, it’s the contrary: the compost is too dry.
Solution:

Turn the compost over and mix in some mature compost to reactivate it. Then water it with several buckets of water and keep an eye on its moisture the next time.
#3 Animal infestation
Animals like rats, voles or mice can be attracted by a compost heap.
Solution
Make sure that it’s well protected, for example by putting a metal grid on the ground before starting the compost. Also, don’t ever put meat, fish or cooked food on the compost!
#4 Composting takes too long
Although composting takes its time, more than a year is too long. This may be caused by too little moisture or an imbalance in green and brown material.
Solution:
Turn the compost and add what’s necessary, either moist or dry material and mix it regularly. That way, oxygen gets in, and the good microorganisms thrive.
Composting is not difficult. With the right tips and tricks you can soon transform your garden and kitchen waste into great humus for your garden. Just make sure to use the right materials, to layer the compost in the right way and to give it enough oxygen, moisture and warmth. That way, you contribute to a sustainable eco-cylce and do something good for your garden. Your vegetables will soon thrive in the “brown gold” and reward you with a great harvest. So, get out there, look for a good spot and start composting!
Cant’t get enough of garden topics?
Read on here:
How to plant, grow and harvest tomatoes in 14 steps
Small garden, huge harvest: Maximising your small vegetable garden
Seed-starting cucumbers: how to get healthy seedlings
For more articles about gardening, browse my garden library.
0 Comments